![[Updated] In 2024, Thread Through Time Traditional Stitches on Modern Platforms](https://thmb.techidaily.com/c71f8b11a9475a90b96c899fdeade9228f855c7ed46c02973b8fefdc10e6507c.jpg)
"[Updated] In 2024, Thread Through Time Traditional Stitches on Modern Platforms"
Thread Through Time: Traditional Stitches on Modern Platforms
Best Video Editor for Beginners on Windows and Mac
Wondershare Filmora is one of the most popular video editing software among TikTokers , download and have a try.
TikTok’s collaborative nature is one of its most appealing features. Your video is not finished the moment you publish it. They can be responded to, remixed, and re-shared by anybody. TikTok is meant to allow users to construct on other’s films shared on the network, whether you’re utilizing audio from some other video or making a duet.
Thanks to the stitch tool, creators may remix, remake, and reply to videos with a couple of taps. This article will tell you what you need to know about stitching videos on TikTok. Continue reading to learn more about Stitching and how to stitch on TikTok. Let’s get started!
In this article
02 How to Turn Stitch On or Off?
04 How to Stitch Any TikTok Video withFilmora Video Editor ?
05 FAQs About TikTok Video Stitch
Part 1: What is Stitch on TikTok?
TikTok’s latest video editing tool ‘Stitch,’ lets people incorporate video snippets from other people into their own. Creators may use Stitch to provide a five-second snippet from a TikTok video out of their own. Unlike duets that play videos together, stitched videos play in the sequence they were stitched. Videos containing open-ended questions have gained in popularity with the advent of the stitch.
Whenever you Stitch a clip-on TikTok, you are essentially inserting your video after yet another video that has already been submitted. People frequently utilize this to remark on or reply to other videos. And, when done well, it can add a lot more context to your movies.
The one limitation of the Stitch tool is that you may only publish up to five seconds from some other video. So, if you’re focusing on a Stitch, you must select the five seconds which are most critical to highlight your message.
Part 2: How to Turn Stitch On or Off?
By enabling the Stitch feature, you make your material available to millions of prospective collaborators. Consider the possibilities – it might be a fantastic approach to enhance reach and virility.
If you aren’t comfortable exposing your films to the whole TikTok community, users can opt out of allowing others to Stitch their work. You may modify them under the Privacy Controls. Here’s how to do a Stitch on TikTok:
Step 1: Launch the TikTok app and then head to your profile by clicking on the Profile option at the bottom right. After that, select the three dots to open the settings.
Step 2: After entering the settings, select Privacy to proceed, and then tap on the Stitch option to open the Stitch settings.
Step 3: Now, you will see three options that are No-one, Everyone, and Friends. If you want to allow the Stitching, select either Everyone or Friends. However, to restrict the people from stitching your videos, choose No-one. After you are done selecting, click on the back arrow to save the applied changes.
Part 3: How to Stitch on TikTok?
TikTok keeps giving creators more reasons to continue producing, and fans like us are more committed to continuing to open it. Stitch, a new app functionality from the famous social networking platform, makes things more straightforward than ever for artists to interact with each other.
But, you might be wondering, how to do a stitch on TikTok? Don’t worry; you’ve come to the right place. Here’s how:
Step 1: Launch TikTok and then go to the video that you want to stitch. Select the Share icon, which resembles an arrow. Select the Stitch symbol from the menu that displays, and then wait a few seconds for the video to complete. The lengthier the video is, the more the loading time.

Step 2: When it’s finished, you’ll be sent to a screen where you may take five seconds of the film and use it on your own. To navigate through the movie, use the sliders and the red bars to choose the portion you want. When you’re finished, tap Next.

Step 3: You’ll be sent to TikTok’s normal recording screen. Record the remainder of your TikTok video with all of the features you’re accustomed to utilizing. You may use whatever effects, stickers, texts, voiceovers, or captions you desire. After that, press the Next button.

Step 4: Make a title and hashtags for your TikTok video. You could also choose whether or not these users may Stitch your movie here – hit the toggle switch beside Allow Stitch to turn it off. Following that, hit the Post option, and your stitched video will be uploaded.

Part 4: How to Stitch Any TikTok Video with Filmora Video Editor
Before getting started, understand why people opt for Filmora video editor for stitching videos on TikTok when this can be done through the official TikTok application. TikTok app only allows you to stitch a video for up to five seconds which is quite frustrating if you wish to stitch an entire video.
One more reason is that, with TikTok, you cannot stitch the already existing video from the camera roll, which restricts creators from adding the already edited content to the existing video. So, to avoid the above problems, Filmora is used for stitching TikTok videos.
For Win 7 or later (64-bit)
For macOS 10.12 or later
To begin, download the video that you wish to stitch with from TikTok. After, follow the below stepwise guide:
Step 1: Launch the Filmora software on your PC and import the video files by clicking on the File and then Import/Export Media. You can simply drag and drop the videos as well.
Step 2: Drag the clips from the media library to the Timeline’s video track. All video files will be stitched into a single video with no transitions.

Note: To add a transition to the video , go to the Transition tab and drop the desired transition to the junction of two clips.

Step 3: Now, preview the stitched video and, when finished, click the Export option to save numerous video segments to a single file. Choose any format from the Format tab’s list.
Part 5: FAQs About TikTok Video Stitch
1. Can you do a Stitch on TikTok with a video from your Camera Roll?
Unfortunately, you cannot utilize a video from your Camera Roll in a Stitch at the time of this writing. So, whatever your reaction to a Stitch is, you must record 100% unique footage shot with the TikTok camera. However, you may download the video first and then stitch it with some third-party software such as Filmora.
2. Can you stitch longer than 5 seconds?
No, it is not possible to stitch a video for longer than five seconds using the built-in Stitching feature of the TikTok app. But this can be done by stitching the videos using third-party applications and software.
3. How do I see TikTok stitches?
Users who want to view as many stitches as possible can do it by browsing for them on the app. You must first browse to Discover, and from there to the search box. Then type #Stitch @username, where the username is the name of the account from which you wish to view stitches.
4. TikTok Stitch option not showing. How to fix it?
Users may choose whether or not someone else can Stitch their work in their settings. The option may be found under the Settings and Privacy tab, where users can activate or uncheck Stitch for all videos. So, if the Stitch option is not showing, the user may have disabled the Stitch option.
Conclusion
The Stitch feature is an excellent way to continue the discussion with your videos. You may leave comments on popular content on the site. Most importantly, it may be a fun method to generate material different from what you usually publish. And since you know How to Stitch on TikTok after reading this article, stitch the videos today and create unique content!
TikTok’s collaborative nature is one of its most appealing features. Your video is not finished the moment you publish it. They can be responded to, remixed, and re-shared by anybody. TikTok is meant to allow users to construct on other’s films shared on the network, whether you’re utilizing audio from some other video or making a duet.
Thanks to the stitch tool, creators may remix, remake, and reply to videos with a couple of taps. This article will tell you what you need to know about stitching videos on TikTok. Continue reading to learn more about Stitching and how to stitch on TikTok. Let’s get started!
In this article
02 How to Turn Stitch On or Off?
04 How to Stitch Any TikTok Video withFilmora Video Editor ?
05 FAQs About TikTok Video Stitch
Part 1: What is Stitch on TikTok?
TikTok’s latest video editing tool ‘Stitch,’ lets people incorporate video snippets from other people into their own. Creators may use Stitch to provide a five-second snippet from a TikTok video out of their own. Unlike duets that play videos together, stitched videos play in the sequence they were stitched. Videos containing open-ended questions have gained in popularity with the advent of the stitch.
Whenever you Stitch a clip-on TikTok, you are essentially inserting your video after yet another video that has already been submitted. People frequently utilize this to remark on or reply to other videos. And, when done well, it can add a lot more context to your movies.
The one limitation of the Stitch tool is that you may only publish up to five seconds from some other video. So, if you’re focusing on a Stitch, you must select the five seconds which are most critical to highlight your message.
Part 2: How to Turn Stitch On or Off?
By enabling the Stitch feature, you make your material available to millions of prospective collaborators. Consider the possibilities – it might be a fantastic approach to enhance reach and virility.
If you aren’t comfortable exposing your films to the whole TikTok community, users can opt out of allowing others to Stitch their work. You may modify them under the Privacy Controls. Here’s how to do a Stitch on TikTok:
Step 1: Launch the TikTok app and then head to your profile by clicking on the Profile option at the bottom right. After that, select the three dots to open the settings.
Step 2: After entering the settings, select Privacy to proceed, and then tap on the Stitch option to open the Stitch settings.
Step 3: Now, you will see three options that are No-one, Everyone, and Friends. If you want to allow the Stitching, select either Everyone or Friends. However, to restrict the people from stitching your videos, choose No-one. After you are done selecting, click on the back arrow to save the applied changes.
Part 3: How to Stitch on TikTok?
TikTok keeps giving creators more reasons to continue producing, and fans like us are more committed to continuing to open it. Stitch, a new app functionality from the famous social networking platform, makes things more straightforward than ever for artists to interact with each other.
But, you might be wondering, how to do a stitch on TikTok? Don’t worry; you’ve come to the right place. Here’s how:
Step 1: Launch TikTok and then go to the video that you want to stitch. Select the Share icon, which resembles an arrow. Select the Stitch symbol from the menu that displays, and then wait a few seconds for the video to complete. The lengthier the video is, the more the loading time.
Step 2: When it’s finished, you’ll be sent to a screen where you may take five seconds of the film and use it on your own. To navigate through the movie, use the sliders and the red bars to choose the portion you want. When you’re finished, tap Next.
Step 3: You’ll be sent to TikTok’s normal recording screen. Record the remainder of your TikTok video with all of the features you’re accustomed to utilizing. You may use whatever effects, stickers, texts, voiceovers, or captions you desire. After that, press the Next button.
Step 4: Make a title and hashtags for your TikTok video. You could also choose whether or not these users may Stitch your movie here – hit the toggle switch beside Allow Stitch to turn it off. Following that, hit the Post option, and your stitched video will be uploaded.
Part 4: How to Stitch Any TikTok Video with Filmora Video Editor
Before getting started, understand why people opt for Filmora video editor for stitching videos on TikTok when this can be done through the official TikTok application. TikTok app only allows you to stitch a video for up to five seconds which is quite frustrating if you wish to stitch an entire video.
One more reason is that, with TikTok, you cannot stitch the already existing video from the camera roll, which restricts creators from adding the already edited content to the existing video. So, to avoid the above problems, Filmora is used for stitching TikTok videos.
For Win 7 or later (64-bit)
For macOS 10.12 or later
To begin, download the video that you wish to stitch with from TikTok. After, follow the below stepwise guide:
Step 1: Launch the Filmora software on your PC and import the video files by clicking on the File and then Import/Export Media. You can simply drag and drop the videos as well.
Step 2: Drag the clips from the media library to the Timeline’s video track. All video files will be stitched into a single video with no transitions.
Note: To add a transition to the video , go to the Transition tab and drop the desired transition to the junction of two clips.
Step 3: Now, preview the stitched video and, when finished, click the Export option to save numerous video segments to a single file. Choose any format from the Format tab’s list.
Part 5: FAQs About TikTok Video Stitch
1. Can you do a Stitch on TikTok with a video from your Camera Roll?
Unfortunately, you cannot utilize a video from your Camera Roll in a Stitch at the time of this writing. So, whatever your reaction to a Stitch is, you must record 100% unique footage shot with the TikTok camera. However, you may download the video first and then stitch it with some third-party software such as Filmora.
2. Can you stitch longer than 5 seconds?
No, it is not possible to stitch a video for longer than five seconds using the built-in Stitching feature of the TikTok app. But this can be done by stitching the videos using third-party applications and software.
3. How do I see TikTok stitches?
Users who want to view as many stitches as possible can do it by browsing for them on the app. You must first browse to Discover, and from there to the search box. Then type #Stitch @username, where the username is the name of the account from which you wish to view stitches.
4. TikTok Stitch option not showing. How to fix it?
Users may choose whether or not someone else can Stitch their work in their settings. The option may be found under the Settings and Privacy tab, where users can activate or uncheck Stitch for all videos. So, if the Stitch option is not showing, the user may have disabled the Stitch option.
Conclusion
The Stitch feature is an excellent way to continue the discussion with your videos. You may leave comments on popular content on the site. Most importantly, it may be a fun method to generate material different from what you usually publish. And since you know How to Stitch on TikTok after reading this article, stitch the videos today and create unique content!
Mastering Pre-Upload: TikTok’s Copyright Guidelines
So, you have successfully created an awesome TikTok video with the perfect dance moves and accurate lip-sync. But what’s this? Your video gets muted or taken down! What a bummer!
The reason?
Copyright infringement, or in simple words, using music without the permission of the singer!
This includes external sounds that are not a part of the TikTok library.
So, what should we do to avoid this, you ask?
To avoid this, you need to learn how to check TikTok video copyright before uploading.
And, in this article, we will tell you exactly why you need to follow TikTok copyright, and how to check it before posting a video.
Why Do You Need to Follow Tiktok Copyright?
To avoid getting banned!
You see, TikTok has a vast library of sounds with proper legal authorization that is available for the users to use in their videos. However, sometimes people use their own music in the videos.
The external sound may or may not be copyrighted.
If it does not have any copyrights on it, all is good. But in case you accidentally use a copyrighted video, TikTok automatically detects it, and either mutes your video or takes it down entirely. If the copyright is detected while posting, the platform will prevent you from uploading it in the first place.
To be on the safe side, we recommend using sounds already present in the TikTok library.
But, what if you want to use an external sound? Is there a way to check TikTok video copyright before uploading?
Yes, there is! And in the next section, we will tell you all about it.
Wondershare Filmora
Get started easily with Filmora’s powerful performance, intuitive interface, and countless effects!
Try It Free Try It Free Try It Free

Check Tiktok Video Copyright Before Uploading
Whenever you’re posting a video to TikTok, you get the option of running a copyright check on it. But this option is only available on desktop browsers.
Therefore, if you’re posting a sound other than one from TikTok’s library, you can check if it’s copyrighted or not from your PC.
Here’s how:
Step 1
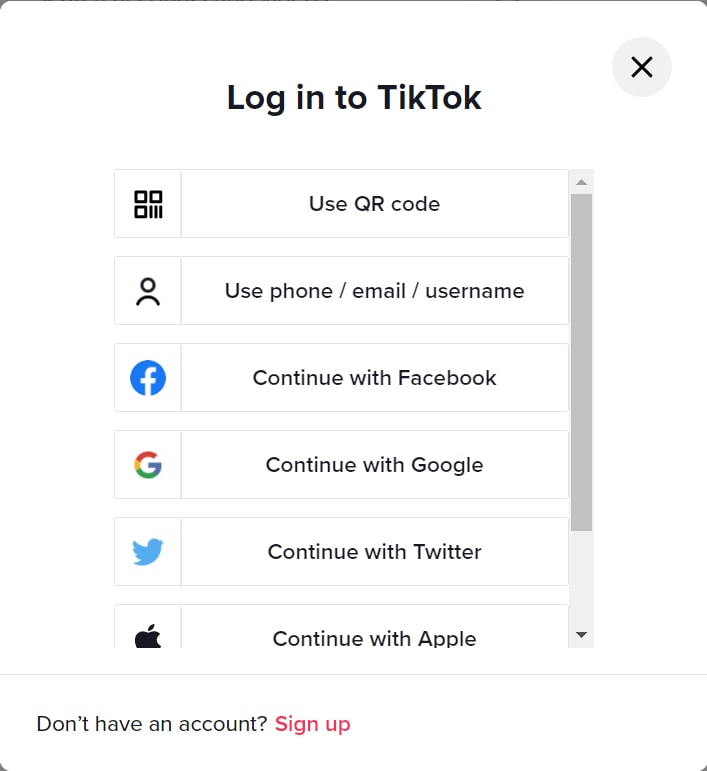
Go to the website version of Tiktok from Chrome, and click on “Log In” at the top-right corner of the page. You can also click on “Log In” under the “Following” option on the left.
Step 2
You will get a popup asking you to either sign up to Tiktok or log in using your email, Facebook, Twitter, Google, Apple, or Instagram. You can choose whichever option you find convenient.
Step 3
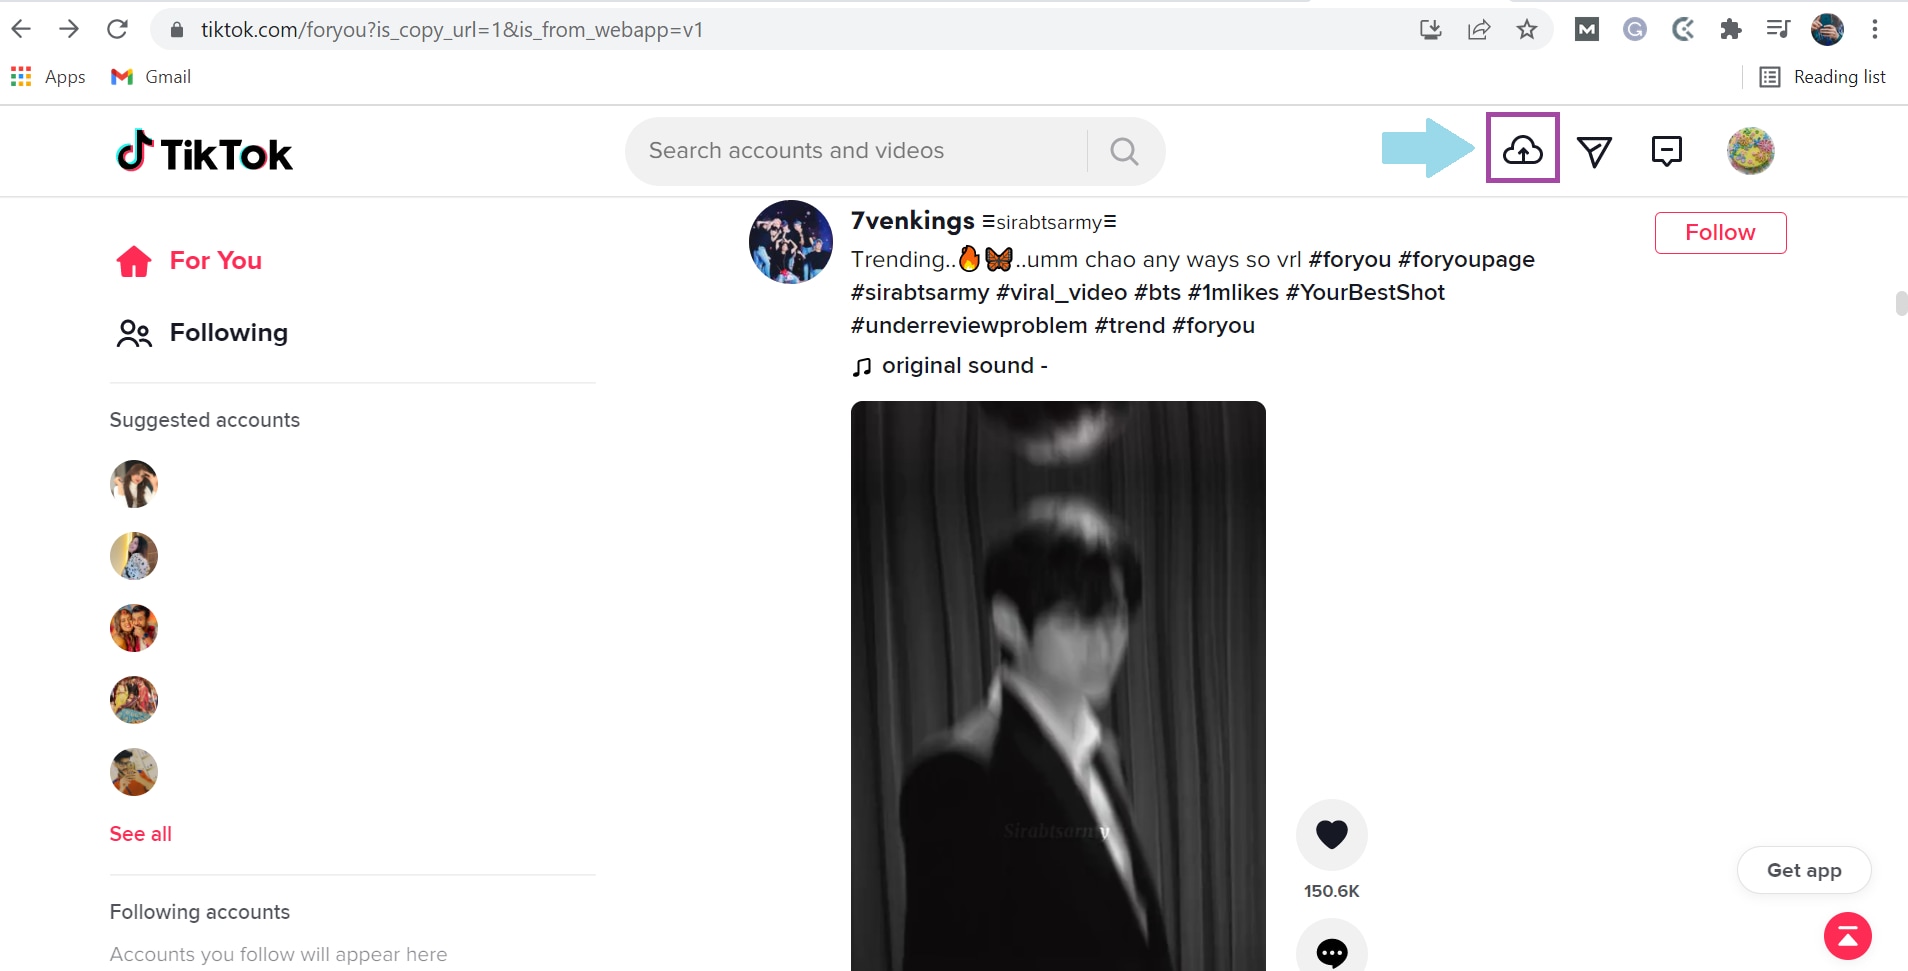
Click on the “Upload” option indicated by a cloud with an arrow.
Step 4
Click on “Select Video to Upload” and choose a video from your PC’s storage.
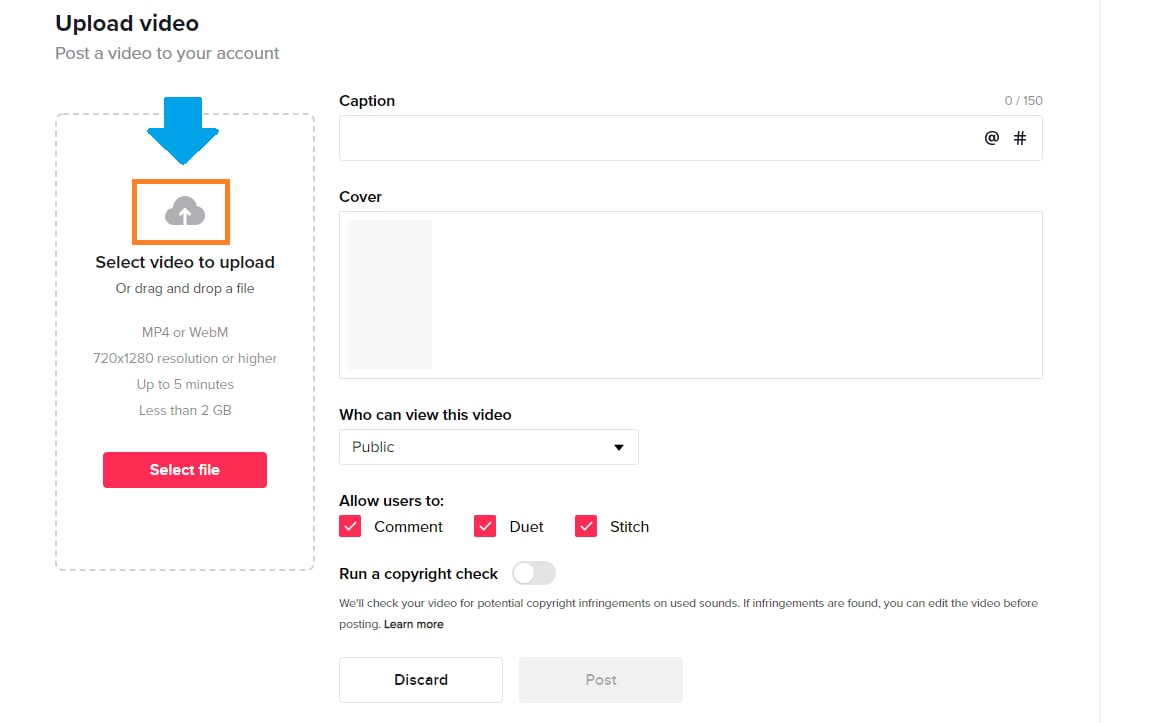
Step 5
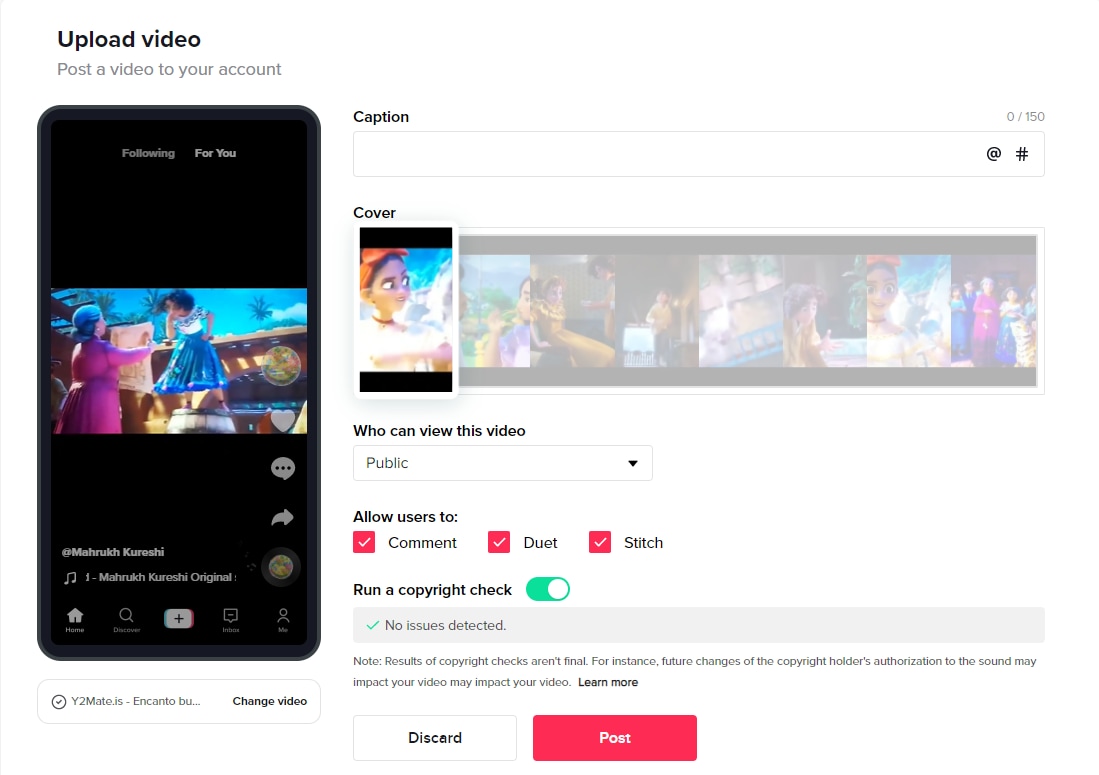
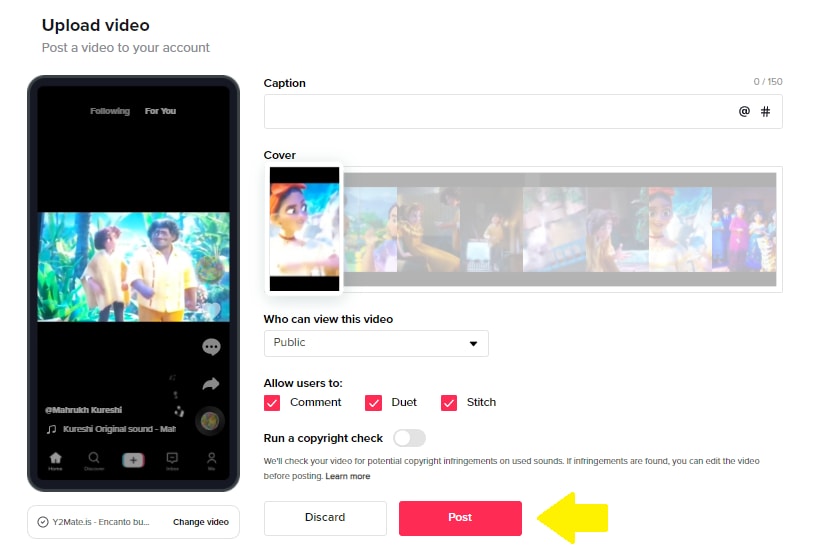
Once the video is uploaded, add a caption with hashtags and select the cover for your video.
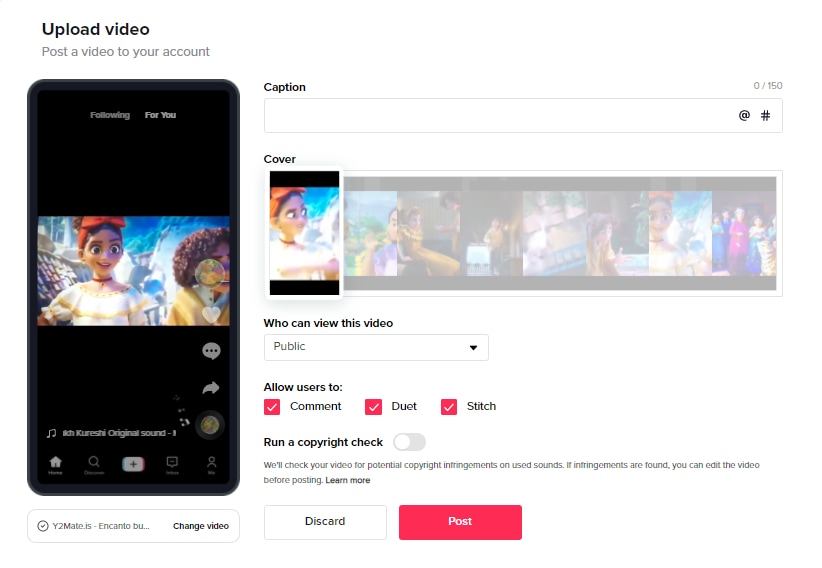
Step 6
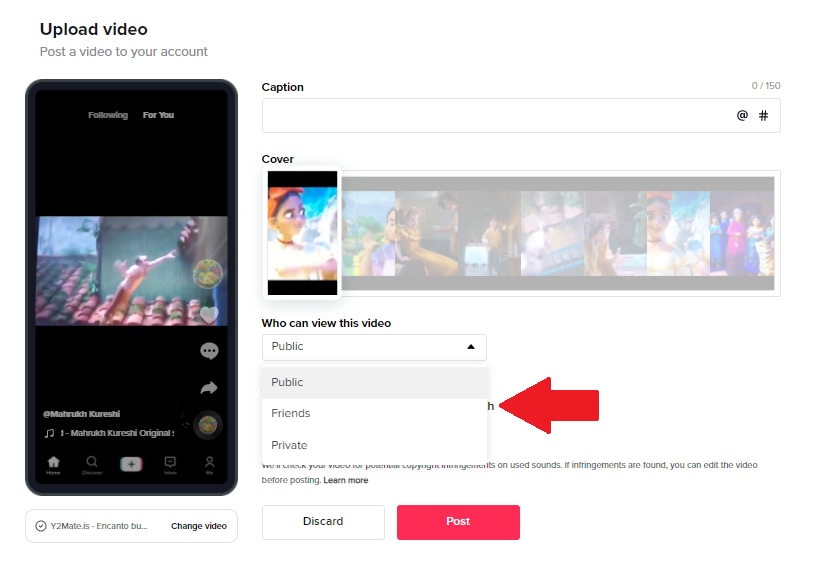
The next step is to choose whether your video can be viewed by the public or your friends or whether you want to keep it private from everyone.
Step 7
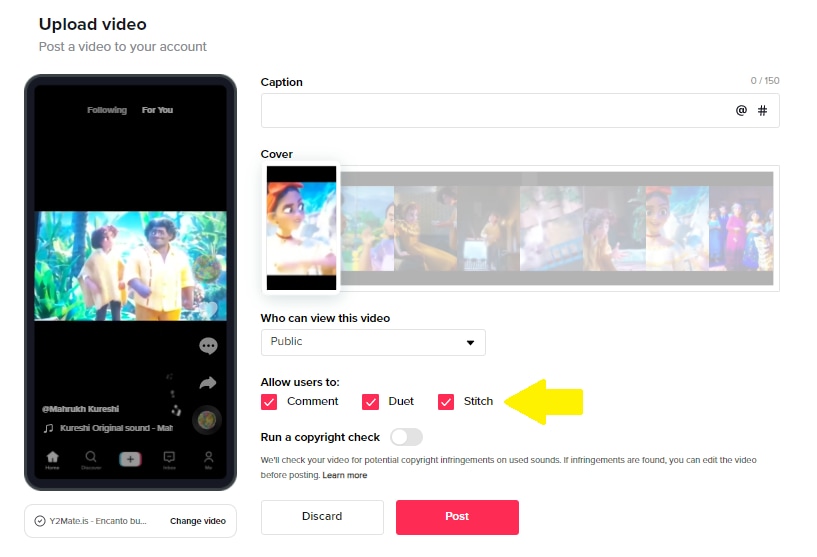
You can also allow or restrict users to comment on your video, make duets, or stitch your video.
Step 8
Now comes the part where you run a copyright check on the video. Turn the toggle on for “Run a Copyright Check” and wait to see if any issues arise.
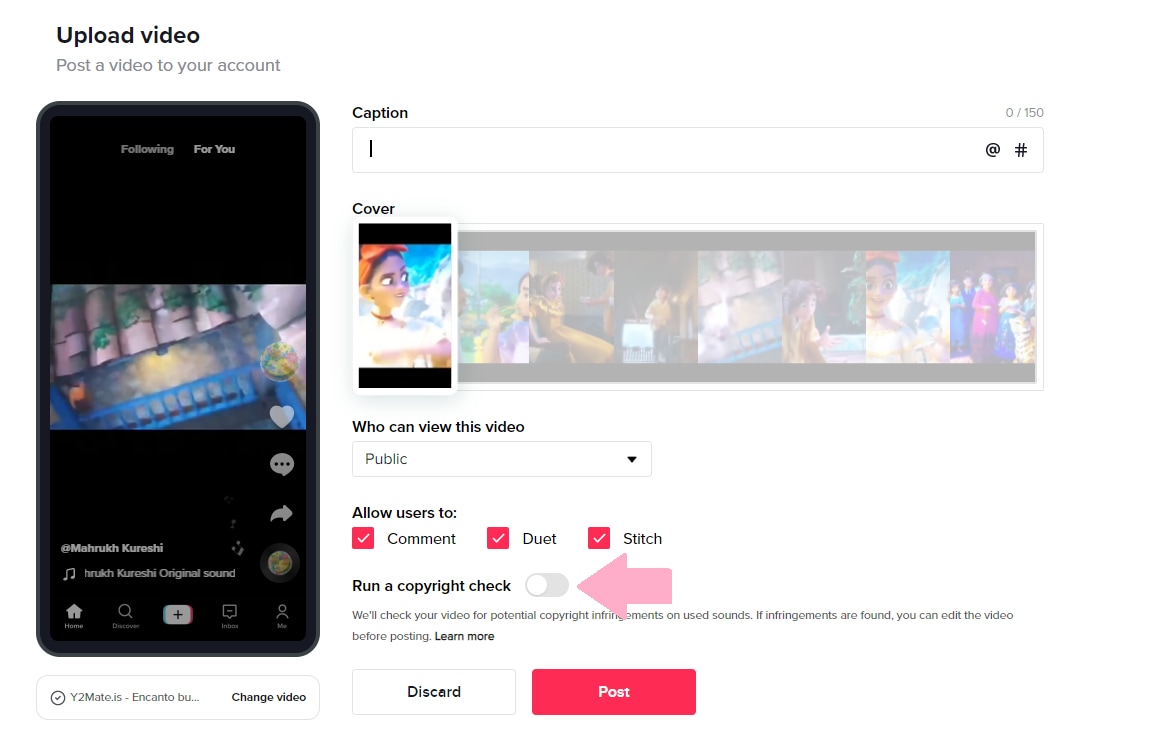
As you can see, this video does not have any copyright-related issues, so it is safe to post it.
However, if your video comes up with an issue, you can try using a sound from TikTok’s built-in library and proceed to post your video without any fear.
Conclusion
While making TikTok videos is quite a fun activity, we have to follow the rules, especially those revolving around using copyrighted material. According to TikTok’s policies, if a video has copyrighted sound, it will be muted, and if the video itself is copyrighted, like a clip from a movie or song, it will be taken down.
However, if you continue posting copyrighted content even after receiving copyright infringement notices from TikTok, it can result in your getting shut down for good!
Therefore, it’s good to know how to check TikTok video copyright before uploading through the steps explained in the article.
So, run a copyright check, and play it safe!
Check Tiktok Video Copyright Before Uploading
Whenever you’re posting a video to TikTok, you get the option of running a copyright check on it. But this option is only available on desktop browsers.
Therefore, if you’re posting a sound other than one from TikTok’s library, you can check if it’s copyrighted or not from your PC.
Here’s how:
Step 1
Go to the website version of Tiktok from Chrome, and click on “Log In” at the top-right corner of the page. You can also click on “Log In” under the “Following” option on the left.
Step 2
You will get a popup asking you to either sign up to Tiktok or log in using your email, Facebook, Twitter, Google, Apple, or Instagram. You can choose whichever option you find convenient.
Step 3
Click on the “Upload” option indicated by a cloud with an arrow.
Step 4
Click on “Select Video to Upload” and choose a video from your PC’s storage.
Step 5
Once the video is uploaded, add a caption with hashtags and select the cover for your video.
Step 6
The next step is to choose whether your video can be viewed by the public or your friends or whether you want to keep it private from everyone.
Step 7
You can also allow or restrict users to comment on your video, make duets, or stitch your video.
Step 8
Now comes the part where you run a copyright check on the video. Turn the toggle on for “Run a Copyright Check” and wait to see if any issues arise.
As you can see, this video does not have any copyright-related issues, so it is safe to post it.
However, if your video comes up with an issue, you can try using a sound from TikTok’s built-in library and proceed to post your video without any fear.
Conclusion
While making TikTok videos is quite a fun activity, we have to follow the rules, especially those revolving around using copyrighted material. According to TikTok’s policies, if a video has copyrighted sound, it will be muted, and if the video itself is copyrighted, like a clip from a movie or song, it will be taken down.
However, if you continue posting copyrighted content even after receiving copyright infringement notices from TikTok, it can result in your getting shut down for good!
Therefore, it’s good to know how to check TikTok video copyright before uploading through the steps explained in the article.
So, run a copyright check, and play it safe!
Also read:
- [New] In 2024, Leading Virtual Reality Goggles Makers
- [New] Jump Into Action How To Start Someone's TikTok Session
- [Updated] 2024 Approved Prime Business Sky-Storage Choice
- [Updated] Craft a Distinctive TikTok Persona with These Unique PFP Ideas
- [Updated] In 2024, Infiltrate Live Tips for Guesting on TikTok Sessions
- 2024 Approved Cutting-Edge Techniques for Outstanding TikTok Video Production Using Templates
- 移動維薩電子 Wav到m4r格式無條件轉換器 - 線上全面免費
- Captivating Anime Concepts that Topped the TikTok List for 2024
- Complete Tutorial: Undo Sending and Recalling Messages in Outlook
- How to Update Your Brother MFC-J480DW Printer Drivers on Windows Systems
- Immerse in TikTok Entertainment with Ease and Grace for 2024
- New Auto-Play Ad Feature for Amazon's Fire TV Units Unveiled
- SOLVED: Printer Stopped Working After Windows 10 Update
- Tom's Computer Gear: The Ultimate Guide
- Unlocking Compressed Data: A Step-by-Step Guide to Extracting ZIP Files on Windows - Tech Tips by YL Software
- Title: [Updated] In 2024, Thread Through Time Traditional Stitches on Modern Platforms
- Author: Kenneth
- Created at : 2025-02-12 16:27:09
- Updated at : 2025-02-19 16:24:52
- Link: https://tiktok-video-files.techidaily.com/updated-in-2024-thread-through-time-traditional-stitches-on-modern-platforms/
- License: This work is licensed under CC BY-NC-SA 4.0.