
!["[Updated] In 2024, Achieving Pure Sound Filtering Out Auditory Interference"](https://www.lifewire.com/thmb/L_bLJsnpl-tFtCL5yNXr6cWRq-I=/400x300/filters:no_upscale():max_bytes(150000):strip_icc()/Recycle-laptop-battery-94eeae5ae45246b2801317b86b868cb0.jpg)
"[Updated] In 2024, Achieving Pure Sound Filtering Out Auditory Interference"
Achieving Pure Sound: Filtering Out Auditory Interference
The most frequent request you’ll get from video makers is to eliminate irritating noises like rumbling or humming from an original clip. Almost all of the time, capturing high-quality audio during filming is challenging since the conversation is often hard to hear or is made unclear due to surrounding noises, such as the dreadful air conditioners or fans.
To get rid of all these awful noises, this Audacity Noise Reduction feature will serve you a significant purpose in removing unwanted background noise for your future videos. Without further ado, let’s get started!
In this article
01 Things You Need to Prepare for Background Noise Reduction
02 How to Remove Background Noise in Audacity?
03 Why is Audacity Noise Reduction Not Working?
04 How to Prevent Background Noise in Audio Recording?
05 How to Remove Background Noise in Filmora?
Part 1: Things You Need to Prepare for Background Noise Reduction
Here are few things that you need to consider before you apply the noise reduction to your clips:
1. Noise Sample
A decent sample of the noise you wish to eliminate is perhaps the most crucial aspect of the Audacity remove noise procedure.
This will be used by Audacity to understand the noise and build a noise profile. The noise recording should last for a fair amount of time and be devoid of any other noises.
2. Avoid Copy Pasting Tiny Noise Section in Your Spoken Phrases
When you have a tiny part of noise between your stated words on your audio, please don’t copy/paste it to make a more significant piece of sound for Audacity to examine.
You would not be supplying Audacity with any more information that will help it generate a decent noise profile. The noise profile is what enables Audacity to tell the difference between speech and noise.
3. Minimum 2048 Data Samples Required
To build a noise profile, the Noise Reduction function requires a minimum of 2048 sample data. An audio file with a sampling frequency of 44.1kHz is roughly five hundredths of a second.
Note that this is the minor sound level that Audacity needs to generate a noise profile; however, should you supply a larger sample of the noise, Audacity can typically perform a great job of producing a suitable noise profile. As a result, attempt to capture a few seconds of background noises wherever possible.
4. Establish Recording Level and Record “Silence”
Setting your audio volume and capturing some “quiet” prior to speaking is the best way to achieve this. Instead, when you’ve finished talking, keep your camera/recorder going for a few moments.
Don’t move or create any sounds while capturing the background noises, and keep an ear open for any other noises. You only need to capture the ambient noise for a few moments; two to five seconds will suffice.
Part 2: How to Remove Background Noise in Audacity on Windows and Mac?
Whether you are using Windows or macOS, we will show you a step-by-step process to achieve your results using both software in this part of Audacity remove background music guide.
Remove background noise in Audacity on Windows
Step 1: On your recording, select a few moments of sound. Any segment of noise that incorporates other noises should be avoided.

Step 2: From the Effect menu, select Noise Reduction.

Step 3: Select the Get Noise Profile option whenever the Noise Reduction effect screen appears.

Note: Choose whether to implement the noise removal to the entire waveforms or only a portion of it.
Step 4: To access the Noise Reduction effects window, go to Effects > Noise Reduction. Raise the level of noise reduction progressively while previewing the result.

Step 5: Head over to the File section to Export and Save the result. Audacity does not save sound clips when you select Save Project; instead, you must choose Export. Select the file type you want to store and the place wherever you can save it. Select Save after giving the File Name.

Remove background noise in Audacity on Mac
Step 1: Create a room tone-containing audio file. When you don’t have a separate track for room tone, use a recording with a few moments of quiet in it. Click-and-drag to select a segment with a few minutes of silence using the Selection Tool.

Step 2: Select Noise Reduction from the Effects tab. Select the Get Noise Profile tab in the new tab under Step 1. The screen will shut, and Audacity will take noise profile samples of the indicated area.

Step 3: Click-and-drag to select the whole file, which requires noise reduction with the Selection Tool. To re-open the function, go to the Effect tab and pick Noise Reduction. Make modifications to the following parameters under Step 2:
- Reduce and Residue
- Frequency Smoothing (bands)
- Sensitivity
- Noise Reduction

Step 4: To listen to how the chosen file will look with the selected parameters, select Preview. Re-adjust until you have a sound noise reduction with no interference. When you’re finished, select Reduce and click OK.
Part 3: Why is Audacity Noise Reduction Not Working?
It’s possible that the Noise Reduction function isn’t letting you mop up your recording since your audio isn’t appropriate for it. The disturbance must be continuous, not random or fluctuating, to work for Audacity’s Noise Reduction function.
For example, the Noise Reduction function will not assist if your audio was made in a busy environment with unique noises such as background chatter, random traffic noises, or in an exhibition space or museum. The Noise Reduction feature in Audacity isn’t meant to cope with that kind of distortion. You’ll need to alter your recording approach if you’re capturing voice in either of those situations.
Under the following situations, the Audacity Noise Reduction function might underperform.
- Particular noise in the background, including traffic or people.
- When the harmonics of the sound and voice are comparable.
- There is sound variance where there is fluctuation in the noise.
- The volume of the voice is comparable to or lower than that of the background noise.
- When the noise is irregular or changeable rather than continuous.
- The loudness is deafening.
- The sound is a single click or pop.
Part 4: How to Prevent Background Noise in Audio Recording?
Although Audacity allows eliminating noise very simply, it is still an additional level that takes time to refine your podcast production. These pointers can help you avoid the necessity for noise reduction and cut down on the amount of time you spend processing.
1. Reduce the Computer Fan Noise
Whenever computers become too heated, they can produce a lot of noise. You may limit the amount of software that runs and position your mic away from the keyboard to help lessen this impact and avoid the fan from coming on.
However, even if you observe all of these guidelines, undesired recording sounds may still appear in your program. Fortunately, contemporary software makes this problem quite simple to resolve.
2. Reduce the Gain and Get Close to the Mic
Reduce the gain (sensitivity of the microphone) and go nearer to it. Talking straight into the microphone won’t distort your audio if you reduce the gain, and that would assist your microphone in concentrating on scooping up your voice’s tone.
Bonus Tip: Set your recorder’s (or DAW’s) sensitivity such that your speech peaks between -12 and -10db.
3. Utilize a Versatile Microphone
Condenser and dynamic microphones are the two most common types of podcast microphones. Condenser microphones are significantly more sensitive instruments meant to take up average atmospheric noise, whereas dynamic microphones have a narrower frequency range, picking up fewer ambient noises.
4. Optimize Your Recording Environment
The most significant and most crucial aspect of your podcasts’ sound quality is where you capture it. To optimize your personal podcasting space, we recommend choosing a peaceful, compact area away from HVAC systems, vehicles, external hard drives, background sound, motors, and other distractions. You may also increase the tone of your room by using natural sound absorbents such as curtains, rugs, carpets, and sofas.
Part 5: How to Remove Background Noise in Filmora?
Although there is a lot of software available to eliminate ambient noise, we highly suggest Wondershare Filmora Video Editor to edit audio and video in one place.
In addition to the standard audio editing capabilities, the recently redesigned Filmora currently includes enhanced waveforms, volume Keyframing , peak metering, and audio transitions, giving you a better audio editing interface.
For Win 7 or later (64-bit)
For macOS 10.12 or later
Filmora Video Editor will quickly remove ambient sound from both sound/video. You may also remove the sound from the video with this simple video editor, use the Audio Equalizer or Audio Mixer functions to modify the audio further, and then Export and save the audio in an Mp3 file. Here are the detailed steps:
Step 1: In the Wondershare Filmora Timeline menu, Import your footage. Trim the footage after previewing it and deleting the sections you don’t want to retain.

Step 2: To eliminate the ambient noise immediately, double-click on the video file, and go to the Audio panel to select the Remove Background Noise option. You will find that the background noise is removed automatically.

Step 3: After checking the results, select Export to download the noise-reduced clip to your desktop or upload it immediately to YouTube or Vimeo.

Conclusion
Well, there you have it. In this Audacity Remove Background Noise guide, we have reviewed every possible method you can adopt to get rid of the unnecessary background noise in the Audacity. And if the desired results are still not achieved, we highly recommend using the Wondershare Filmora editing software. Not only will it help you remove the unwanted ambient noise, but it will also allow you to customize your audio or video file further.
02 How to Remove Background Noise in Audacity?
03 Why is Audacity Noise Reduction Not Working?
04 How to Prevent Background Noise in Audio Recording?
05 How to Remove Background Noise in Filmora?
Part 1: Things You Need to Prepare for Background Noise Reduction
Here are few things that you need to consider before you apply the noise reduction to your clips:
1. Noise Sample
A decent sample of the noise you wish to eliminate is perhaps the most crucial aspect of the Audacity remove noise procedure.
This will be used by Audacity to understand the noise and build a noise profile. The noise recording should last for a fair amount of time and be devoid of any other noises.
2. Avoid Copy Pasting Tiny Noise Section in Your Spoken Phrases
When you have a tiny part of noise between your stated words on your audio, please don’t copy/paste it to make a more significant piece of sound for Audacity to examine.
You would not be supplying Audacity with any more information that will help it generate a decent noise profile. The noise profile is what enables Audacity to tell the difference between speech and noise.
3. Minimum 2048 Data Samples Required
To build a noise profile, the Noise Reduction function requires a minimum of 2048 sample data. An audio file with a sampling frequency of 44.1kHz is roughly five hundredths of a second.
Note that this is the minor sound level that Audacity needs to generate a noise profile; however, should you supply a larger sample of the noise, Audacity can typically perform a great job of producing a suitable noise profile. As a result, attempt to capture a few seconds of background noises wherever possible.
4. Establish Recording Level and Record “Silence”
Setting your audio volume and capturing some “quiet” prior to speaking is the best way to achieve this. Instead, when you’ve finished talking, keep your camera/recorder going for a few moments.
Don’t move or create any sounds while capturing the background noises, and keep an ear open for any other noises. You only need to capture the ambient noise for a few moments; two to five seconds will suffice.
Part 2: How to Remove Background Noise in Audacity on Windows and Mac?
Whether you are using Windows or macOS, we will show you a step-by-step process to achieve your results using both software in this part of Audacity remove background music guide.
Remove background noise in Audacity on Windows
Step 1: On your recording, select a few moments of sound. Any segment of noise that incorporates other noises should be avoided.
Step 2: From the Effect menu, select Noise Reduction.
Step 3: Select the Get Noise Profile option whenever the Noise Reduction effect screen appears.
Note: Choose whether to implement the noise removal to the entire waveforms or only a portion of it.
Step 4: To access the Noise Reduction effects window, go to Effects > Noise Reduction. Raise the level of noise reduction progressively while previewing the result.
Step 5: Head over to the File section to Export and Save the result. Audacity does not save sound clips when you select Save Project; instead, you must choose Export. Select the file type you want to store and the place wherever you can save it. Select Save after giving the File Name.
Remove background noise in Audacity on Mac
Step 1: Create a room tone-containing audio file. When you don’t have a separate track for room tone, use a recording with a few moments of quiet in it. Click-and-drag to select a segment with a few minutes of silence using the Selection Tool.
Step 2: Select Noise Reduction from the Effects tab. Select the Get Noise Profile tab in the new tab under Step 1. The screen will shut, and Audacity will take noise profile samples of the indicated area.
Step 3: Click-and-drag to select the whole file, which requires noise reduction with the Selection Tool. To re-open the function, go to the Effect tab and pick Noise Reduction. Make modifications to the following parameters under Step 2:
- Reduce and Residue
- Frequency Smoothing (bands)
- Sensitivity
- Noise Reduction
Step 4: To listen to how the chosen file will look with the selected parameters, select Preview. Re-adjust until you have a sound noise reduction with no interference. When you’re finished, select Reduce and click OK.
Part 3: Why is Audacity Noise Reduction Not Working?
It’s possible that the Noise Reduction function isn’t letting you mop up your recording since your audio isn’t appropriate for it. The disturbance must be continuous, not random or fluctuating, to work for Audacity’s Noise Reduction function.
For example, the Noise Reduction function will not assist if your audio was made in a busy environment with unique noises such as background chatter, random traffic noises, or in an exhibition space or museum. The Noise Reduction feature in Audacity isn’t meant to cope with that kind of distortion. You’ll need to alter your recording approach if you’re capturing voice in either of those situations.
Under the following situations, the Audacity Noise Reduction function might underperform.
- Particular noise in the background, including traffic or people.
- When the harmonics of the sound and voice are comparable.
- There is sound variance where there is fluctuation in the noise.
- The volume of the voice is comparable to or lower than that of the background noise.
- When the noise is irregular or changeable rather than continuous.
- The loudness is deafening.
- The sound is a single click or pop.
Part 4: How to Prevent Background Noise in Audio Recording?
Although Audacity allows eliminating noise very simply, it is still an additional level that takes time to refine your podcast production. These pointers can help you avoid the necessity for noise reduction and cut down on the amount of time you spend processing.
1. Reduce the Computer Fan Noise
Whenever computers become too heated, they can produce a lot of noise. You may limit the amount of software that runs and position your mic away from the keyboard to help lessen this impact and avoid the fan from coming on.
However, even if you observe all of these guidelines, undesired recording sounds may still appear in your program. Fortunately, contemporary software makes this problem quite simple to resolve.
2. Reduce the Gain and Get Close to the Mic
Reduce the gain (sensitivity of the microphone) and go nearer to it. Talking straight into the microphone won’t distort your audio if you reduce the gain, and that would assist your microphone in concentrating on scooping up your voice’s tone.
Bonus Tip: Set your recorder’s (or DAW’s) sensitivity such that your speech peaks between -12 and -10db.
3. Utilize a Versatile Microphone
Condenser and dynamic microphones are the two most common types of podcast microphones. Condenser microphones are significantly more sensitive instruments meant to take up average atmospheric noise, whereas dynamic microphones have a narrower frequency range, picking up fewer ambient noises.
4. Optimize Your Recording Environment
The most significant and most crucial aspect of your podcasts’ sound quality is where you capture it. To optimize your personal podcasting space, we recommend choosing a peaceful, compact area away from HVAC systems, vehicles, external hard drives, background sound, motors, and other distractions. You may also increase the tone of your room by using natural sound absorbents such as curtains, rugs, carpets, and sofas.
Part 5: How to Remove Background Noise in Filmora?
Although there is a lot of software available to eliminate ambient noise, we highly suggest Wondershare Filmora Video Editor to edit audio and video in one place.
In addition to the standard audio editing capabilities, the recently redesigned Filmora currently includes enhanced waveforms, volume Keyframing , peak metering, and audio transitions, giving you a better audio editing interface.
For Win 7 or later (64-bit)
For macOS 10.12 or later
Filmora Video Editor will quickly remove ambient sound from both sound/video. You may also remove the sound from the video with this simple video editor, use the Audio Equalizer or Audio Mixer functions to modify the audio further, and then Export and save the audio in an Mp3 file. Here are the detailed steps:
Step 1: In the Wondershare Filmora Timeline menu, Import your footage. Trim the footage after previewing it and deleting the sections you don’t want to retain.
Step 2: To eliminate the ambient noise immediately, double-click on the video file, and go to the Audio panel to select the Remove Background Noise option. You will find that the background noise is removed automatically.
Step 3: After checking the results, select Export to download the noise-reduced clip to your desktop or upload it immediately to YouTube or Vimeo.
Conclusion
Well, there you have it. In this Audacity Remove Background Noise guide, we have reviewed every possible method you can adopt to get rid of the unnecessary background noise in the Audacity. And if the desired results are still not achieved, we highly recommend using the Wondershare Filmora editing software. Not only will it help you remove the unwanted ambient noise, but it will also allow you to customize your audio or video file further.
Pioneering Your Path to Viral Content: Exquisite Templates for TikTok Videos
TikTok is the video platform that shook the world during the pandemic. It capitalized on people’s shortened attention spans and focused on short-form videos to provide entertainment. Also, it provided people with an easy road to fame and with a solid side hustle.
Are you one of those who aspire to be TikTok’s future top-earner? Try making videos using TikTok video templates! They’ll allow you to churn out high-quality content faster than the competition. In this article, you will learn more about TikTok videos. Furthermore, we’ll introduce you to the 5 best places from where you can find great TikTok video templates.

Get a Knowledge of TikTok Videos
TikTok videos are short-form content. They can be up to 3 minutes in length. And that is their charm. Busy people looking for “bite-sized” content turn to this platform for entertainment.
The TikTok videos that become successful include filters, effects, stickers, voiceovers, and background music. They can be about different topics, so anyone can make them.
An important thing creators should know is the dimension of videos. TikTok videos are made for mobile viewing (though you can watch them using the web app). So, videos are in portrait. That said, the recommended video size is 1080 x 1920 with a 9:16 aspect ratio.
Why Use Templates To Make TikTok Videos?
The competition on TikTok is tough. A content creator can publish multiple videos in one day because they’re short, as long as they have ideas. So, attracting views with your videos is challenging.
If you can’t keep up with how fast-paced other content creators are, you should ensure your videos are of high quality. But what if you run out of ideas?
That is where TikTok video templates come in. They are ready-to-use assets you can edit and personalize to make original videos quickly. By using templates, you can stand toe-to-toe with other content creators on the platform.
Where To Find TikTok Video Templates?
We have established how much Tiktok video templates can help you. But where can you find them? You can find them on many resource sites in the market. The best ones are listed below.
1. Search for High-Quality TikTok Video Templates Using Wondershare Filmora
Free Download For Win 7 or later(64-bit)
Free Download For macOS 10.14 or later
| Number of Templates | 1000+ |
|---|---|
| Price | Filmora for individuals starts at $49.99 per annum. The cross-platform plan costs $59.99 per year, while the perpetual plan costs $79.99. |
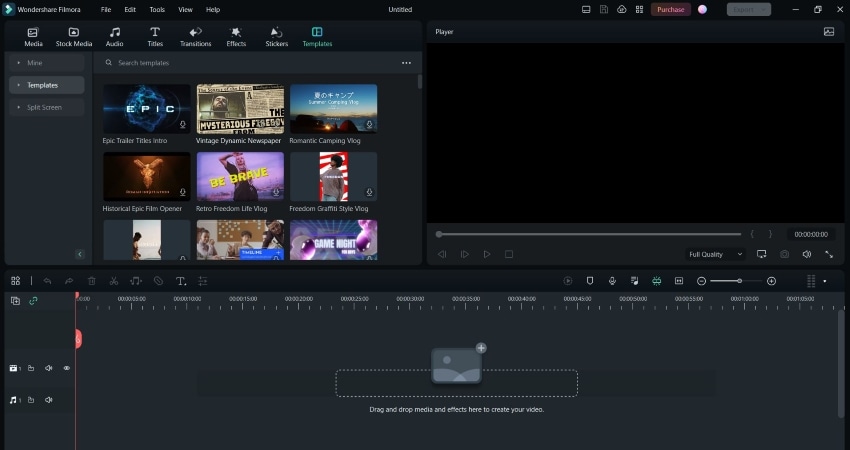
Wondershare Filmora is a popular powerful video editor. It offers video makers lots of tools they can use to make creative videos. That includes video templates you can edit to make awesome videos quickly. Filmora has over 1000 templates, many of which are vertical. You can use these to make TikTok videos.
You can also save your templates on the cloud for future use or to exchange with other creators.
Another great thing is that you don’t have to transfer your files to your computer to make the video. Wondershare Filmora is available on mobile! Thus, you can shoot videos and edit them with templates using the same device. It’s very streamlined.
2. VistaCreate TikTok Video Templates

| Number of Templates | 100,000+ |
|---|---|
| Price | The free version of VistaCreate already gives you access to its video templates. But if you want to access more features, it costs $10 per month. |
VistaCreate is a free online graphic design tool. It offers professionally-designed TikTok video templates you can use to create videos that can go viral very quickly. The best thing is that VistaCreate allows you to publish directly to TikTok. You can even schedule the videos to TikTok business and creator funds accounts.
Here are our top 3 picks for TikTok video templates in VistaCreate:
- Woman Practicing Yoga at the Beach
- Inspirational Quote with Young Girl Traveling in Car
- Young Woman in the Mountains for Travel Inspiration
3. Free TikTok Video Templates From Simplified

| Number of Templates | 1000+ |
|---|---|
| Price | The free version of Simplified already provides access to the thousands of templates it offers. But if you want to unlock more capabilities, the paid plans start at $21 per month, good for 5 users. |
Simplified is an app for video makers which indeed simplifies your workflow. This tool allows you to use and edit TikTok video templates for free. Just pick the template to use, drag your video in, then edit the text, stickers, background music, and effects. Creating videos with a wow factor can’t be easier than that.
There are video templates for different categories on Simplified. So whether you are showing off your pet, participating in a dance challenge, or posting something funny, you can find useful resources on this app.
4. Download Tiktok Video Templates Free in Pexels
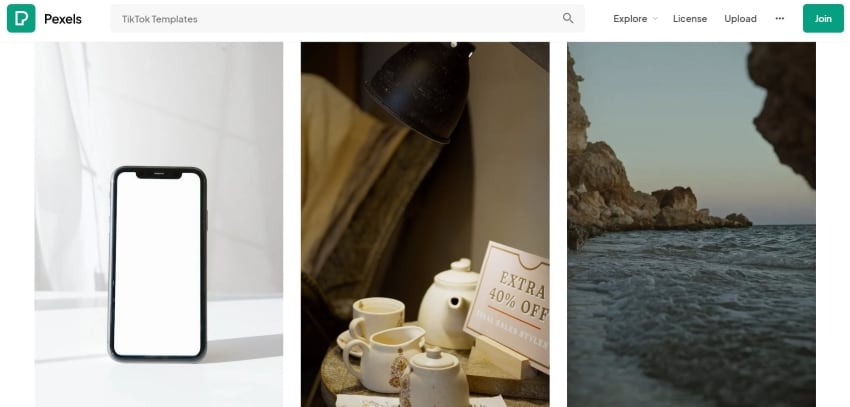
| Number of Templates | 91+ |
|---|---|
| Price | Pexels is free. |
Pexels is a website that provides you with lots of free videos and photos. You can also find video templates on the website. The best thing is that Pexels does not require attribution - though it encourages giving them. Furthermore, Pexels allow you to edit the media you get from the site. You would not get into legal trouble unless you did something they do not allow, like making identifiable people appear in a bad light.
The catch is that Pexels is only a website where you can find and download stock resources. It does not provide you with any editing tools. Therefore, it’s only a good choice if you already have a trusty editor. Or use it in combination with the other options here.
5. UseEnvato Elements To Find Tiktok Video Templates
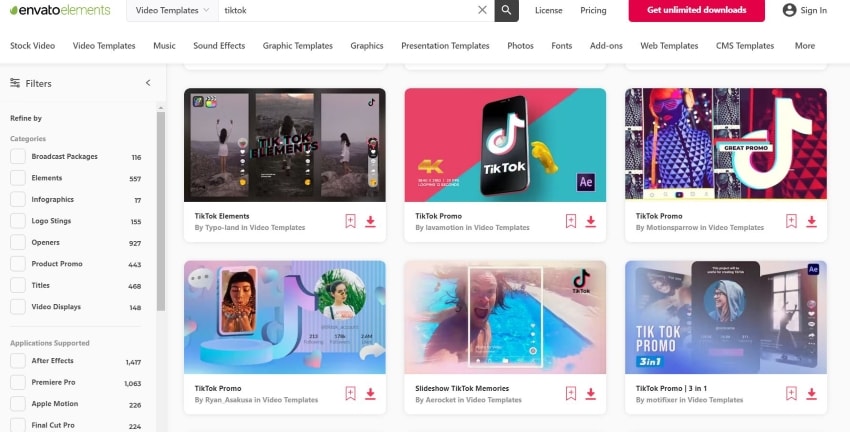
| Number of Templates | 65,000+ |
|---|---|
| Price | For individuals, an Envato Elements subscription costs $16.50. It offers a 30% discount to students. And for teams, the pricing starts at $10.75 per month per member. |
Envato Elements can be a freemium software. If you create a free account, you get access to 12 free hand-selected files per month. So, it can be an option for users on a tight budget.
As for the TikTok video templates available on the platform, there are many of them. You can choose from over 1,050! Animated notifications, quick video intros, transitions, and subscribe notifications - you can find these all in Envato Elements.
Step-by-Step Guide to Creating TikTok Videos With Templates
How to use TikTok video templates? It’s very simple, and we’ll teach you how to do it. For this tutorial, we will be using Wondershare Filmora for mobile. Since it’s a fantastic video editor, Filmora makes things so convenient.
Step1 Download and launch Filmora for mobile.
Step2 Tap “Templates” to go to the Templates tab.

Step3 Select a template to use.

Step4 Filmora will show you a preview of the template. Tap “Make Video” if you want to use it. If you don’t like the template, go back to step 3.

Step5 Import your photo or video clips.

Step6 Tap “Go.” Filmora will automatically replace the videos/photos in the template with your files.
Step7 Watch the preview to see how it looks. Tap “Pro Export” if you are satisfied.

If you want to learn more tricks about creating hot TikTok videos with Filmora for Mobile, watch the video below:
Conclusion
TikTok video templates are ready-to-use assets any TikTok content creator would appreciate. Within a few clicks, they let you enhance your video’s quality by a lot. Templates add background music, effects, and animations to an otherwise plain video. It helps the video stand out in the sea of content that is TikTok.
You can find TikTok video templates from many places. One of the best places to get them is in Wondershare Filmora. What beats templates that are built into an advanced video editor? Filmora also has a mobile app. Thus, you can create amazing TikTok videos on the go.
Free Download For macOS 10.14 or later
| Number of Templates | 1000+ |
|---|---|
| Price | Filmora for individuals starts at $49.99 per annum. The cross-platform plan costs $59.99 per year, while the perpetual plan costs $79.99. |
Wondershare Filmora is a popular powerful video editor. It offers video makers lots of tools they can use to make creative videos. That includes video templates you can edit to make awesome videos quickly. Filmora has over 1000 templates, many of which are vertical. You can use these to make TikTok videos.
You can also save your templates on the cloud for future use or to exchange with other creators.
Another great thing is that you don’t have to transfer your files to your computer to make the video. Wondershare Filmora is available on mobile! Thus, you can shoot videos and edit them with templates using the same device. It’s very streamlined.
2. VistaCreate TikTok Video Templates
| Number of Templates | 100,000+ |
|---|---|
| Price | The free version of VistaCreate already gives you access to its video templates. But if you want to access more features, it costs $10 per month. |
VistaCreate is a free online graphic design tool. It offers professionally-designed TikTok video templates you can use to create videos that can go viral very quickly. The best thing is that VistaCreate allows you to publish directly to TikTok. You can even schedule the videos to TikTok business and creator funds accounts.
Here are our top 3 picks for TikTok video templates in VistaCreate:
- Woman Practicing Yoga at the Beach
- Inspirational Quote with Young Girl Traveling in Car
- Young Woman in the Mountains for Travel Inspiration
3. Free TikTok Video Templates From Simplified
| Number of Templates | 1000+ |
|---|---|
| Price | The free version of Simplified already provides access to the thousands of templates it offers. But if you want to unlock more capabilities, the paid plans start at $21 per month, good for 5 users. |
Simplified is an app for video makers which indeed simplifies your workflow. This tool allows you to use and edit TikTok video templates for free. Just pick the template to use, drag your video in, then edit the text, stickers, background music, and effects. Creating videos with a wow factor can’t be easier than that.
There are video templates for different categories on Simplified. So whether you are showing off your pet, participating in a dance challenge, or posting something funny, you can find useful resources on this app.
4. Download Tiktok Video Templates Free in Pexels
| Number of Templates | 91+ |
|---|---|
| Price | Pexels is free. |
Pexels is a website that provides you with lots of free videos and photos. You can also find video templates on the website. The best thing is that Pexels does not require attribution - though it encourages giving them. Furthermore, Pexels allow you to edit the media you get from the site. You would not get into legal trouble unless you did something they do not allow, like making identifiable people appear in a bad light.
The catch is that Pexels is only a website where you can find and download stock resources. It does not provide you with any editing tools. Therefore, it’s only a good choice if you already have a trusty editor. Or use it in combination with the other options here.
5. UseEnvato Elements To Find Tiktok Video Templates
| Number of Templates | 65,000+ |
|---|---|
| Price | For individuals, an Envato Elements subscription costs $16.50. It offers a 30% discount to students. And for teams, the pricing starts at $10.75 per month per member. |
Envato Elements can be a freemium software. If you create a free account, you get access to 12 free hand-selected files per month. So, it can be an option for users on a tight budget.
As for the TikTok video templates available on the platform, there are many of them. You can choose from over 1,050! Animated notifications, quick video intros, transitions, and subscribe notifications - you can find these all in Envato Elements.
Step-by-Step Guide to Creating TikTok Videos With Templates
How to use TikTok video templates? It’s very simple, and we’ll teach you how to do it. For this tutorial, we will be using Wondershare Filmora for mobile. Since it’s a fantastic video editor, Filmora makes things so convenient.
Step1 Download and launch Filmora for mobile.
Step2 Tap “Templates” to go to the Templates tab.
Step3 Select a template to use.
Step4 Filmora will show you a preview of the template. Tap “Make Video” if you want to use it. If you don’t like the template, go back to step 3.
Step5 Import your photo or video clips.
Step6 Tap “Go.” Filmora will automatically replace the videos/photos in the template with your files.
Step7 Watch the preview to see how it looks. Tap “Pro Export” if you are satisfied.
If you want to learn more tricks about creating hot TikTok videos with Filmora for Mobile, watch the video below:
Conclusion
TikTok video templates are ready-to-use assets any TikTok content creator would appreciate. Within a few clicks, they let you enhance your video’s quality by a lot. Templates add background music, effects, and animations to an otherwise plain video. It helps the video stand out in the sea of content that is TikTok.
You can find TikTok video templates from many places. One of the best places to get them is in Wondershare Filmora. What beats templates that are built into an advanced video editor? Filmora also has a mobile app. Thus, you can create amazing TikTok videos on the go.
Also read:
- Decoding the Language of Likes - Master #7 Most Trending TikTok Glyphs for 2024
- Enhancing Your TikTok Videography with Slow-Motion Techniques for 2024
- In 2024, TikTok Transformation Hacks Best Filter Strategies Uncovered
- In 2024, Beyond the Blue Feed Top 5 Platforms Excluding TikTok
- Mastering Mobile Video Record Your Snapchat Stories
- [New] The Essentials of TikTok Promotion Best Practices and Peak Examples for 2024
- [Updated] From Boredom to Virality TikTok Videos Shaped by Mac Edits
- [New] 2024 Approved The Art of Text Overlay in Short Form Video Content
- [New] Crafting a Distinctive Image with Creative Personal Frames on TikTok
- [Updated] In 2024, Ideal Badge Erasers Perfect for Mobile Devices & iOS/Android
- [New] In 2024, Direct Conversion From TikTok Videos to Professional MP4s
- 2024 Approved How to Delete a TikTok Account Permanently?
- How to Do Slow Mo On Tik Tok, In 2024
- [New] 2024 Approved Mastering the Art of Engaging Viral TikTok Reaction Videos
- In 2024, Spotlight on TikTok's Newest Dance Moves
- [New] 2024 Approved Transforming Text Into Voice for TikTok Enthusiasts
- 2024 Approved Techniques to Dodge TikTok's Hidden Ban
- 2024 Approved Unleash Your Inner DJ with Top 20 TikTok Hits
- [New] Cracking the Code to Reinstating Your TikTok Profile for 2024
- 2024 Approved Become a TikTok Phenomenon with Self-Cloning Insights
- Building Brands Exclusive 30+ TikTok Bio Approaches with Filmora Insight
- [Updated] Top 7 TikTok Emojis Unveiling Hidden Gems for 2024
- [Updated] Viral Influencers on TikTok to Elevate Your Spirit for 2024
- 2024 Approved Chuckle Chronicle Top Talents in Today’s TikTok Humor
- [New] Gripping Gurus on TikTok Top 15 for Aspiring Influencers
- 2024 Approved Pioneering Your Place with Premium Desktop TikTok Videos
- Transform Your TikTok Voice with Ease
- Hot TikTok Picks for Your Amazon Shopping Spree for 2024
- Laugh Ledger Noteworthy Personalities in TikTok for 2024
- [Updated] In 2024, Orchestrating a Harmonious TikTok Finale
- [New] 2024 Approved Crafting Seamless TikTok Videos Through Stitching
- [Updated] 2024 Approved Unblocked The Ultimate Guide to TikTok Video Downloads for iPhone
- In 2024, Unlock the Power of Live Broadcasting with TikTok From PC
- [Updated] In 2024, The Ultimate Guide to Incorporating Siri Commands in TikTok Videos
- [New] 2024 Approved Be Part of the Sensation Popular TikTok Challenges to Test
- [Updated] In 2024, Beyond Boundaries How to Validate Your TikTok Video Rights
- The Ultimate Guide to Voiceovers in TikTok Amplifying Your Presence for 2024
- In 2024, Exclusive MP4 Extraction Software for TikTok Content
- [Updated] In 2024, Boost Your TikTok Account with These Essential Analytics Tools
- [Updated] Soothing 20 Country Songs Your Guide to Serene Dancing on TikTok for 2024
- [Updated] Noise Reduction How to Remove Background Noise in Audacity?
- [Updated] 20 Best TikTok Caption Ideas to Engage Your Next Audience
- Transforming Ordinary to Extraordinary Edit TikTok Vids on Mac for 2024
- [Updated] Chrome/Android/iOS Users' Guide to Perfecting TikTok Video Posts
- [New] Perfecting Slow Motion Videos A Step-by-Step Guidebook
- 2024 Approved Guide to Adding Dynamic Captions to Instagram Media
- Updated In 2024, Brighten Up Best Video Editing Tools for Luminance Control
- [New] 2024 Approved ScreenCapture Pro-Tips Record Your Television Easily
- [New] In 2024, Best of Breed Top 9 Microphones Recorders Online
- In 2024, How To Unlock SIM Cards Of Sony Without PUK Codes
- [New] 2024 Approved Frozen Pleasure Recording Review Deep Dive
- A Working Guide For Pachirisu Pokemon Go Map On Sony Xperia 10 V | Dr.fone
- How to Use Pokémon Emerald Master Ball Cheat On Realme Narzo 60 5G | Dr.fone
- Best Ways on How to Unlock/Bypass/Swipe/Remove Samsung Galaxy XCover 6 Pro Tactical Edition Fingerprint Lock
- [Updated] 2024 Approved The Art of Visual Storytelling in Your Instagram Highlight Images
- Hear the HD Story From YouTube to Twitter's Vids
- [Updated] The Rotation Riddle Decoding the Secrets of Video Swapping on Social Media for 2024
- 2024 Approved Unveiling the Aural Treasures Within Videos Techniques Auditory Extraction
- [New] In 2024, LiveTV and Facebook Integrating FB Livestreams
- In 2024, How To Change Your SIM PIN Code on Your Xiaomi Redmi Note 12 Pro+ 5G Phone
- Updated The Complete Tutorial on Utilizing Vocaroo for Audio Preservation
- Perfect Selfies Tips for Instagram Story Magnification
- How do i sign a .xltx files free
- In 2024, 5 Solutions For Poco C55 Unlock Without Password
- Title: "[Updated] In 2024, Achieving Pure Sound Filtering Out Auditory Interference"
- Author: Kenneth
- Created at : 2024-05-23 01:38:13
- Updated at : 2024-05-24 01:38:13
- Link: https://tiktok-video-files.techidaily.com/updated-in-2024-achieving-pure-sound-filtering-out-auditory-interference/
- License: This work is licensed under CC BY-NC-SA 4.0.
