![[Updated] From Watcher to Participant TikTok Live Integration for 2024](https://thmb.techidaily.com/fa0f0d9aa480a84d4958b92625d7efd743147dd9e7afea427f137746eefc2011.png)
"[Updated] From Watcher to Participant TikTok Live Integration for 2024"
From Watcher to Participant: TikTok Live Integration
With the immense growth of TikTok, many people like to use this social app for various purposes. For example, content creators can build their personal community on TikTok to interact with their followers. You can also conduct a question-answer session with your followers on TikTok through a live stream.
Moreover, TikTok also allows you to join someone’s live stream as a guest. Through this feature, you can join the live streaming of your friend instantly. Through this article, you can learn how to join someone’s live on TikTok quickly.
Part 1: How to Join Someone’s Live on TikTok
Is your favorite celebrity live on TikTok? If your favorite celebrity is doing a live stream on TikTok, you may want to interact with him directly. TikTok allows you to join someone’s live on TikTok quickly by sending a guest request. To learn how to join live on TikTok, follow the below steps:
Step1 Select the Live Option
Open your TikTok app on your phone to access the “Discover” page, and type “Live” on the search bar. By doing so, you can find all the live streaming easily. Now select the live stream you want to join in order to proceed.

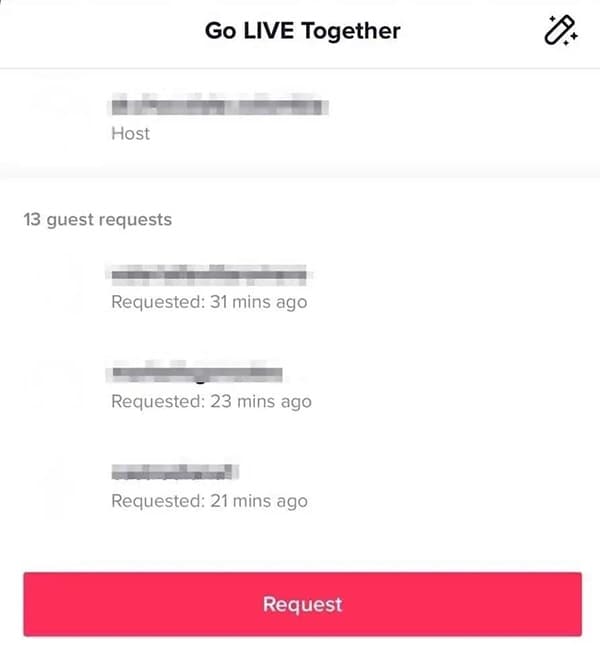
Step2 Send a Guest Request
Once you have found your desired live stream, tap on the “Pink Blue Circles” to send a guest request. Now tap on “Request” to give confirmation. By selecting this option, your guest request will be sent. After sending the guest request, wait for the host to accept it.
Part 2: How to Invite Others to Join Your Live on TikTok
Have you ever invited someone to join your live streaming on TikTok? Being a content creator or an influencer on TikTok, it’s essential to connect with your fans frequently. To communicate with your TikTok audience better, you should know how to invite others on your live stream. By inviting others, you can communicate with your fans directly.
Prerequisites of Going Live on TikTok
Before learning how to invite others on TikTok, let’s shed light on the requirements of going live on this social app. The reason is that not everyone can go for live streaming on TikTok, as there are certain restrictions you need to keep in your mind.
- To start live streaming on your TikTok, you should have at least 1000 followers.
- You should be 16 years old or above to access the live stream feature.
- To use virtual gifts during a live stream on TikTok, you should be 18 years old or above.
Steps to Invite Others to Join Your Live on TikTok Easily
Are you excited to invite your fan to your live stream on TikTok? Check the below steps to invite others to join your TikTok live:
Step1 Go to the Live Option
Open your TikTok app on your mobile phone. After opening it, tap on the “Live” option from the right side. Now you can add a title to your TikTok Live.
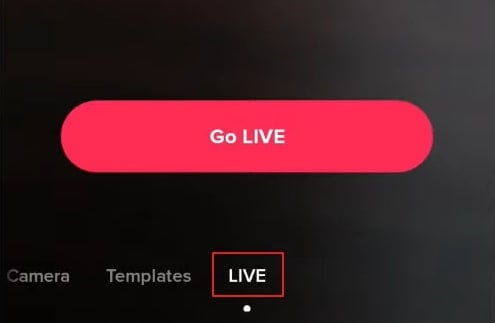
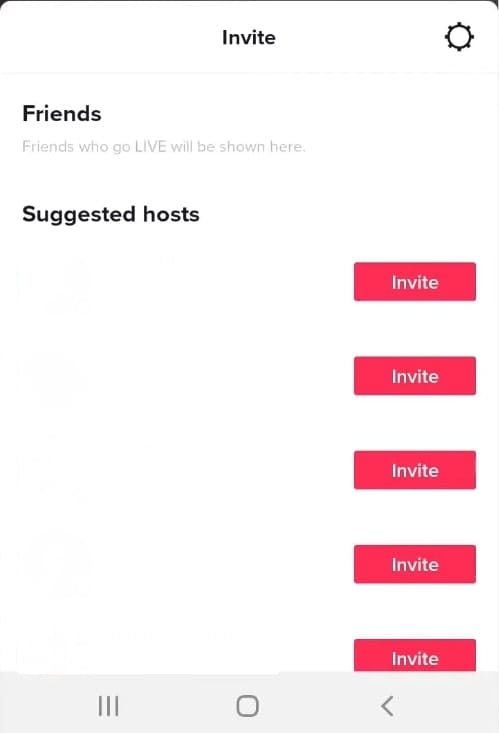
Step2 Invite your Desired User
After adding the title, tap on the “Go Live” button. Once the live streaming initiates, you have to press the “Pink Blue Circle” icon from the bottom left corner. It will open a list of the suggested users. Select the preferred user you want to invite and tap on the “Invite” button. Your selected user will have 20 seconds to accept or reject your request.
Bonus Tip: Easily Record and Edit Someone’s Stream with Filmora
Are you willing to record and edit a live stream on TikTok? If you want to efficiently screen record any live streaming session on TikTok, we highly recommend using Wondershare Filmora . This software provides a professional screen recorder that allows you to capture your desired window or screen. You can customize the settings to record a live stream in your preferred resolution. Thus, by using the screen recorder of Filmora, you can record any live streaming to access it anytime.
Free Download For Win 7 or later(64-bit)
Free Download For macOS 10.14 or later
Along with a screen recorder , Filmora also provides a video editor. If you find flaws in your recorded live stream, the editor of Filmora can help you. By using a video editor, you can enhance your recorded video by adding effects or modifying its speed. There are some advanced editing features that you can explore and use on Filmora. To learn about them, check the below points:
Key Editing Features of Wondershare Filmora
- Speech-to-Text: To increase your editing efficiency, Filmora offers a Speech-to-Text feature. This feature automatically converts your speech to subtitles. Through advanced speech recognition capabilities in this tool, you can generate subtitles in your video automatically and without any hassle. Also, this feature supports up to 16 different languages.
- Keyframing: Do you want to add a dynamic effect to your video? The keyframing feature allows you to add smooth and professional animated effects instantly. It provides 80 preset animation templates you can quickly apply to your video. Moreover, you can also modify the parameters by setting the transparency and view in every keyframe view.
- AI Portrait: Are you annoyed by the dull backgrounds in your video? Through the AI portrait feature, you can remove backgrounds from your video with great precision. This feature also offers more than 70 stickers and AI effects that you can apply. Furthermore, it also recognizes the faces in your video through AI technology. With face recognition, you can apply AI stickers easily.

Conclusion
TikTok has made a significant impact on the social media industry. Due to its high influencing power, many celebrities and famous personalities are now joining TikTok to increase their reach. If you want to invite someone to your TikTok live, this article will help you. We have also provided detailed instructions on how to join someone’s live on TikTok quickly. Also, in order to edit and screen record live streaming on TikTok, Wondershare Filmora is a highly compatible and functional tool.
Free Download For macOS 10.14 or later
Along with a screen recorder , Filmora also provides a video editor. If you find flaws in your recorded live stream, the editor of Filmora can help you. By using a video editor, you can enhance your recorded video by adding effects or modifying its speed. There are some advanced editing features that you can explore and use on Filmora. To learn about them, check the below points:
Key Editing Features of Wondershare Filmora
- Speech-to-Text: To increase your editing efficiency, Filmora offers a Speech-to-Text feature. This feature automatically converts your speech to subtitles. Through advanced speech recognition capabilities in this tool, you can generate subtitles in your video automatically and without any hassle. Also, this feature supports up to 16 different languages.
- Keyframing: Do you want to add a dynamic effect to your video? The keyframing feature allows you to add smooth and professional animated effects instantly. It provides 80 preset animation templates you can quickly apply to your video. Moreover, you can also modify the parameters by setting the transparency and view in every keyframe view.
- AI Portrait: Are you annoyed by the dull backgrounds in your video? Through the AI portrait feature, you can remove backgrounds from your video with great precision. This feature also offers more than 70 stickers and AI effects that you can apply. Furthermore, it also recognizes the faces in your video through AI technology. With face recognition, you can apply AI stickers easily.
Conclusion
TikTok has made a significant impact on the social media industry. Due to its high influencing power, many celebrities and famous personalities are now joining TikTok to increase their reach. If you want to invite someone to your TikTok live, this article will help you. We have also provided detailed instructions on how to join someone’s live on TikTok quickly. Also, in order to edit and screen record live streaming on TikTok, Wondershare Filmora is a highly compatible and functional tool.
The Art of Recording TikTok Videos: Expert Insights and Filmmaking Magic
Whether sardonic, informative, or both, voiceovers can improve a TikTok video for humor and clarity.
What do sewing how-to videos, cooking tutorials, and daily vlogs have in common? They all probably are dependent on TikTok’s voiceover feature, which can be helpful in the inbuilt editing suite of the TikTok app.
Ever wished to record a TikTok and save it for later without letting the publisher know? Then, it is always the best idea to learn how to screen record on TikTok. This article will help you learn multiple ways of screen recording on TikTok without you having to worry about the other person knowing.
And, we’ll also look at how to do a voiceover on TikTok using the step-by-step guide mentioned below.
In this article
01 How to Screen Record on TikTok?
02 How to Add Voiceover to the TikTok Video?
03 Add Voiceover to TikTok Video with Extra Fusion: Wondershare Filmora
Part 1: How to Screen Record on TikTok?
Have you ever accidentally taken a screenshot of someone’s Instagram story or screen recorded it for future reference and got scared that the person may have got notified?
While Instagram had the feature of notifying users if their story or picture has been screen recorded, it has recently changed to restrict this notification to images and videos sent via private DMs.
However, TikTokers can rest assured as TikTok has never had a similar notification feature, and you can safely screen record TikTok without mentioning the publisher.
How to Record Computer Screens on Windows
PCs allow software products useful for various purposes. For example, if you would like to record your PC screen while using Windows-based software, you’ll be required a powerful screen recorder that lets you set up a new screencasting session in just a few simple steps.
Here are some of the steps you need to consider!
Step 1: Download Wondershare Filmora
Download Wondershare Filmora onto your computer and then launch the software.
Wondershare Filmora
Get started easily with Filmora’s powerful performance, intuitive interface, and countless effects!
Try It Free Try It Free Try It Free Learn More >

Just visit the browser and type the URL ‘tiktok.com’ in the search bar. Then, look for the TikTok video you would like to record.
Besides providing functions that activate you to control the screen recording procedure entirely, Wondershare Filmora is also a video editor program that lets you manipulate your videos in any way you want.
You must double-click on its desktop icon and open the Full Feature mode right after launching the software. Now, hit the Record tab and choose the Record PC screen option.
The Wondershare Screen Recorder window will appear on the screen so you can modify the settings for your upcoming screencasting session.

You’ll see the Settings icon in the window’s lower right corner and then click it. For example, you can select the computer’s hard drive destination where the recording will be saved, modify the frame rate or set the quality of the recording from the Quality drop-down menu.

Hit the Microphone icon to choose the mic you’ll be using to record narration, and you can select the Speakers icon if you want to disable or enable the computer’s speakers during the session of screen recording.
You’ll see the Settings icon in the window’s lower right corner and then click it. For example, you can select the computer’s hard drive destination where the recording will be saved, modify the frame rate or set the quality of the recording from the Quality drop-down menu.

Mark the Mouse checkbox if you wish the mouse clicks to display in the recording, and you can easily place the maximum duration of a recording session. It is done by inserting the preferred default screen recording duration into the Record Timer box.

Hit the Rec button to begin a new screencasting session, and the software will start recording after a three-second countdown.
Tap the F9 button on the keyboard to stop recording. It will automatically open the file in Filmora’s video editor so you can edit it before publishing online.
Part 2: How to Add Voiceover to the TikTok Video?
Steps to add a voiceover to your TikTok video.
Upload or record a new video by hitting the + at the menu’s center at the screen’s bottom area.
Hit the microphone icon on the screen’s upper right corner once you’re over with the recording and trimming clips to your desired edit. Beneath, the microphone icon must mention “Voiceover.”

Source: mashable.com
Now, you can record a voiceover timed to Video’s every frame here.
Hit the “Save“ button once you’re satisfied with the voiceover

Hitting the “Save“ button will offer you back to the video’s preview, where you can add filters, text, stickers, and various sounds.
It is needed to add effects to your voiceover by hitting the “voice effects”. Here, you can control the narrator’s volume as well.
Also, make sure to enable automatic captions to make sure your video is more accessible!
Tap the Next button once you’re over with your Video. Then, you can edit the Video’s privacy settings, add a caption, and select a cover.
Part 3: Add Voiceover to TikTok Video with Extra Fusion: Wondershare Filmora
Do you want to include your voice in a video, create a voiceover demo for sharing and uploading on social networking platforms, or frame a documentary for important content?
All you need is an ideal video editing program similar to the Wondershare Filmora Video Editor.
The Filmora’s voiceover feature allows you to record your voice or add voice-over files to Video easily. In addition, you can customize the pitch, speed, and volume of the recorded voiceover and apply fade-in and fade-out effects. I’ll share how to register and add voiceover to a video with Filmora on your computer in this post.
Firstly, you can edit your Video in Filmora and then record the voiceover afterward. Or, you can first record the voiceover and then edit the Video around.
Check the steps below on how to make TikTok videos with voiceover via Wondershare Filmora.
Wondershare Filmora
Get started easily with Filmora’s powerful performance, intuitive interface, and countless effects!
Try It Free Try It Free Try It Free Learn More >
Record Voiceover and Add it to Video
We suggest you record the voiceover first in most cases so the sound will become pretty natural.
Step 1: Connect Microphone to PC or laptop
Connect the microphone to your laptop/PC when you’re ready to begin. It’s advisable to use some professional external microphones to capture high-quality sound.
Step 2: Record voiceover
Tap the Wondershare Filmora icon to launch this software. Then, select the New Project option in the beginning interface to create a new one.
Enter the Record tab and choose the “Record a Voiceover” option to arouse the Record Audio windows.
Or hit the microphone icon, and you only need 3 seconds of countdown to begin speaking.
Click the microphone icon again after you finish the above. Then, a new Record file option will be automatically present on the audio track.
Step 3: Edit Recorded Voiceover to Video
To edit the recorded voiceover, you can adjust audio settings, such as changing the Speed, Pitch, Volume, etc.

You can cut and trim out unnecessary sound sections from the recorded voiceover or apply the fade effects to the voiceover for a smoother transition.
Step 4: Sync Voiceover to Video
Now, it’s time to synchronize the recorded voiceover to video to create a compelling video.
The Wondershare Filmora allows up to 100 audio tracks; you can also add some background music to the voiceover.
Then import and drag-n-drop the video content to the video track, drag and drop the soundtrack to the video’s right-side position. Keep the voice and video track in the exact video duration if required.
Here’s how to sync voiceover to video!
Now, sync the recorded voiceover to Video to create a video. Since Filmora is compatible with 100 plus audio tracks, you can add different background music to the voiceover.
Then import and drag-n-drop the video content to the video track, drag and drop the soundtrack to the Video’s right side position. You can keep the Video and audio track in the same video duration.

Note: If you’ve recorded the iPhone voiceover or other device already, you can import it in the Project Library if you wish to add it to the Video and then sync it to Video.
Here is the ultimate step-by-step guide about adding titles to videos after knowing how to do a voiceover on TikTok.
Step 5: Export and save the new file
Click the “Export“ tab to export your new video file after you complete the project. You can either save the Video to different formats or directly share it on other social media platforms.
Additionally, you can even burn a DVD in minutes to watch it on TV.
How to Record and Add Voice over File during Filmora’s Video Editing Process
If you’ve recorded the voice over on your iPhone or another device already, even via the Wondershare Filmora, and wish to add it to the Video, visit the steps mentioned below:
1. Upload the video to Filmora
After logging in to Filmora’s main editing interface, click “Import” or drag-drop your video and voiceover file to the project library.
Filmora video editing software is compatible with a vast range of formats, so there will be no need to convert the files before import.
Drag and drop the files or video content to the Video Timeline when all the files get imported.
2. Record Voiceover in Video Editing
3. Edit voiceover and Export
You can then edit the recorded voiceover for TikTok to perfectly fit the Video and export it to your laptop/PC or directly upload it to YouTube.
For improving the sound, Filmora features more audio editing tools.
Conclusion
This article offered you a step-by-step guide on how to record a TikTok. It also displays four different screen recording methods, along with how to do a voiceover on TikTok.
Now, don’t ever worry about losing out on your favorite TikTok without the original publisher knowing via screen record TikTok via Wondershare Filmora.
02 How to Add Voiceover to the TikTok Video?
03 Add Voiceover to TikTok Video with Extra Fusion: Wondershare Filmora
Part 1: How to Screen Record on TikTok?
Have you ever accidentally taken a screenshot of someone’s Instagram story or screen recorded it for future reference and got scared that the person may have got notified?
While Instagram had the feature of notifying users if their story or picture has been screen recorded, it has recently changed to restrict this notification to images and videos sent via private DMs.
However, TikTokers can rest assured as TikTok has never had a similar notification feature, and you can safely screen record TikTok without mentioning the publisher.
How to Record Computer Screens on Windows
PCs allow software products useful for various purposes. For example, if you would like to record your PC screen while using Windows-based software, you’ll be required a powerful screen recorder that lets you set up a new screencasting session in just a few simple steps.
Here are some of the steps you need to consider!
Step 1: Download Wondershare Filmora
Download Wondershare Filmora onto your computer and then launch the software.
Wondershare Filmora
Get started easily with Filmora’s powerful performance, intuitive interface, and countless effects!
Try It Free Try It Free Try It Free Learn More >
Just visit the browser and type the URL ‘tiktok.com’ in the search bar. Then, look for the TikTok video you would like to record.
Besides providing functions that activate you to control the screen recording procedure entirely, Wondershare Filmora is also a video editor program that lets you manipulate your videos in any way you want.
You must double-click on its desktop icon and open the Full Feature mode right after launching the software. Now, hit the Record tab and choose the Record PC screen option.
The Wondershare Screen Recorder window will appear on the screen so you can modify the settings for your upcoming screencasting session.
You’ll see the Settings icon in the window’s lower right corner and then click it. For example, you can select the computer’s hard drive destination where the recording will be saved, modify the frame rate or set the quality of the recording from the Quality drop-down menu.
Hit the Microphone icon to choose the mic you’ll be using to record narration, and you can select the Speakers icon if you want to disable or enable the computer’s speakers during the session of screen recording.
You’ll see the Settings icon in the window’s lower right corner and then click it. For example, you can select the computer’s hard drive destination where the recording will be saved, modify the frame rate or set the quality of the recording from the Quality drop-down menu.
Mark the Mouse checkbox if you wish the mouse clicks to display in the recording, and you can easily place the maximum duration of a recording session. It is done by inserting the preferred default screen recording duration into the Record Timer box.
Hit the Rec button to begin a new screencasting session, and the software will start recording after a three-second countdown.
Tap the F9 button on the keyboard to stop recording. It will automatically open the file in Filmora’s video editor so you can edit it before publishing online.
Part 2: How to Add Voiceover to the TikTok Video?
Steps to add a voiceover to your TikTok video.
Upload or record a new video by hitting the + at the menu’s center at the screen’s bottom area.
Hit the microphone icon on the screen’s upper right corner once you’re over with the recording and trimming clips to your desired edit. Beneath, the microphone icon must mention “Voiceover.”
Source: mashable.com
Now, you can record a voiceover timed to Video’s every frame here.
Hit the “Save“ button once you’re satisfied with the voiceover
Hitting the “Save“ button will offer you back to the video’s preview, where you can add filters, text, stickers, and various sounds.
It is needed to add effects to your voiceover by hitting the “voice effects”. Here, you can control the narrator’s volume as well.
Also, make sure to enable automatic captions to make sure your video is more accessible!
Tap the Next button once you’re over with your Video. Then, you can edit the Video’s privacy settings, add a caption, and select a cover.
Part 3: Add Voiceover to TikTok Video with Extra Fusion: Wondershare Filmora
Do you want to include your voice in a video, create a voiceover demo for sharing and uploading on social networking platforms, or frame a documentary for important content?
All you need is an ideal video editing program similar to the Wondershare Filmora Video Editor.
The Filmora’s voiceover feature allows you to record your voice or add voice-over files to Video easily. In addition, you can customize the pitch, speed, and volume of the recorded voiceover and apply fade-in and fade-out effects. I’ll share how to register and add voiceover to a video with Filmora on your computer in this post.
Firstly, you can edit your Video in Filmora and then record the voiceover afterward. Or, you can first record the voiceover and then edit the Video around.
Check the steps below on how to make TikTok videos with voiceover via Wondershare Filmora.
Wondershare Filmora
Get started easily with Filmora’s powerful performance, intuitive interface, and countless effects!
Try It Free Try It Free Try It Free Learn More >
Record Voiceover and Add it to Video
We suggest you record the voiceover first in most cases so the sound will become pretty natural.
Step 1: Connect Microphone to PC or laptop
Connect the microphone to your laptop/PC when you’re ready to begin. It’s advisable to use some professional external microphones to capture high-quality sound.
Step 2: Record voiceover
Tap the Wondershare Filmora icon to launch this software. Then, select the New Project option in the beginning interface to create a new one.
Enter the Record tab and choose the “Record a Voiceover” option to arouse the Record Audio windows.
Or hit the microphone icon, and you only need 3 seconds of countdown to begin speaking.
Click the microphone icon again after you finish the above. Then, a new Record file option will be automatically present on the audio track.
Step 3: Edit Recorded Voiceover to Video
To edit the recorded voiceover, you can adjust audio settings, such as changing the Speed, Pitch, Volume, etc.
You can cut and trim out unnecessary sound sections from the recorded voiceover or apply the fade effects to the voiceover for a smoother transition.
Step 4: Sync Voiceover to Video
Now, it’s time to synchronize the recorded voiceover to video to create a compelling video.
The Wondershare Filmora allows up to 100 audio tracks; you can also add some background music to the voiceover.
Then import and drag-n-drop the video content to the video track, drag and drop the soundtrack to the video’s right-side position. Keep the voice and video track in the exact video duration if required.
Here’s how to sync voiceover to video!
Now, sync the recorded voiceover to Video to create a video. Since Filmora is compatible with 100 plus audio tracks, you can add different background music to the voiceover.
Then import and drag-n-drop the video content to the video track, drag and drop the soundtrack to the Video’s right side position. You can keep the Video and audio track in the same video duration.
Note: If you’ve recorded the iPhone voiceover or other device already, you can import it in the Project Library if you wish to add it to the Video and then sync it to Video.
Here is the ultimate step-by-step guide about adding titles to videos after knowing how to do a voiceover on TikTok.
Step 5: Export and save the new file
Click the “Export“ tab to export your new video file after you complete the project. You can either save the Video to different formats or directly share it on other social media platforms.
Additionally, you can even burn a DVD in minutes to watch it on TV.
How to Record and Add Voice over File during Filmora’s Video Editing Process
If you’ve recorded the voice over on your iPhone or another device already, even via the Wondershare Filmora, and wish to add it to the Video, visit the steps mentioned below:
1. Upload the video to Filmora
After logging in to Filmora’s main editing interface, click “Import” or drag-drop your video and voiceover file to the project library.
Filmora video editing software is compatible with a vast range of formats, so there will be no need to convert the files before import.
Drag and drop the files or video content to the Video Timeline when all the files get imported.
2. Record Voiceover in Video Editing
3. Edit voiceover and Export
You can then edit the recorded voiceover for TikTok to perfectly fit the Video and export it to your laptop/PC or directly upload it to YouTube.
For improving the sound, Filmora features more audio editing tools.
Conclusion
This article offered you a step-by-step guide on how to record a TikTok. It also displays four different screen recording methods, along with how to do a voiceover on TikTok.
Now, don’t ever worry about losing out on your favorite TikTok without the original publisher knowing via screen record TikTok via Wondershare Filmora.
Also read:
- [New] 2024 Approved Easy Steps to Alter Your Voice on the Latest TikTok Updates
- [New] Quickly Setup Snapchat App on Your Mac OS X
- [New] Screen Solidarities Picking the Right Media Company
- [Updated] In 2024, Unlock the Potential of Mac for Top-Tier OOTD TikToks
- Audience Allure Techniques for Creating Engaging Snap Advertising
- Crafting a Vocal Identity Steps for Impactful Video Overdubs for 2024
- In 2024, A Closer Look at Non-TikTok Apps Leading the Next Wave
- In 2024, Android to Apple How To Transfer Photos From Huawei Nova Y91 to iPad Easily | Dr.fone
- In 2024, Quick Glance Fastest Photo Viewer in 11 OS
- In 2024, Start Filming Right The Newbie's Guide to Video Gear
- Savory Scenes From TikTok Kitchens Recipes to Try Now for 2024
- Title: [Updated] From Watcher to Participant TikTok Live Integration for 2024
- Author: Kenneth
- Created at : 2024-09-27 16:49:12
- Updated at : 2024-09-30 16:33:32
- Link: https://tiktok-video-files.techidaily.com/updated-from-watcher-to-participant-tiktok-live-integration-for-2024/
- License: This work is licensed under CC BY-NC-SA 4.0.