
!["[Updated] Fixed TikTok Freezes on Chromebook - Quick Tips for 2024"](https://www.lifewire.com/thmb/rQ3q4SoJdzdvXlfXUbIk9JHjOFk=/400x300/filters:no_upscale():max_bytes(150000):strip_icc()/watchcnnplus-7287fbb439934fd7a21cd7c8389b3147.jpg)
"[Updated] Fixed TikTok Freezes on Chromebook - Quick Tips for 2024"
Fixed TikTok Freezes on Chromebook - Quick Tips
If your TikTok application is not operating correctly, there are a few methods to repair it. Whether the app is not launching at all, crashes regularly, or couldn’t play videos, follow the steps below to repair TikTok not functioning. TikTok provides two methods for its customers to experience the social media site. One is through viewing hundreds of videos every day from different individuals all around the globe. The second is by generating your videos for people to see and enjoy. Many users have complained that they experienced an issue while playing or loading TikTok videos. TikTok videos occasionally do not play due to internet-related difficulties, Asia TikTok servers, and device reasons.
Sometimes TikTok video delays owing to internet-related difficulties, server issues, and device issues. These challenges may be understood and addressed simply by following basic but effective measures mentioned in the article below. Many more difficulties tend to slow TikTok and impair the usual operation of the app. Because of such challenges, TikTok does not frequently reply when playing and downloading videos. You may record any of your videos and publish them on the TikTok app. If you run out of ideas, you may complete the TikTok challenges that are hot online. However, occasionally, you meet an issue while you are utilizing TikTok. Many users have stated that they find difficulty while playing or loading TikTok videos. Here, we will go through the major causes why do TikTok videos not playing and the permanent remedies to these difficulties.
Part 1. The Reasons for TikTok Application Bugs
It may be a trite cliché, but that’s only because it is true. A lot of electronics issues get fixed by turning it off and back on again. TikTok is presently one of the most popular applications when it comes to entertaining material. While TikTok rarely has any faults and is typically a dependable app, services can face glitches. However, it still disappoints some consumers due to existing system flaws, malfunctions, and other similar concerns.
- Check the Google Play Store or the App Store for awaiting updates. An app may start nagging after you’ve missed an update or two.
- Take a check at your phone notification settings to see whether they enable TikTok to give you alerts.
- Slow mobile data connection might cause downloads of movies to function badly, and may ultimately lead to app issues.
- In certain circumstances, TikTok difficulties are caused by weak cellular data or Wi-Fi connectivity.
- Server outages and code problems are only some of the typical reasons why TikTok may fail to perform correctly
- There may have been an issue during the installation, which causes some of the app functions not to operate properly.
Part 2. Types of TikTok Bugs Leads to TikTok Not Working
On TikTok’s side, the TikTok issues might be caused by glitches or flaws in the software. There may also be an issue with TikTok’s server resulting in TikTok problems. Regular updates generally solve issues on the TikTok app. Some mistakes are more prevalent than others. While others emerge relatively infrequently. Although, the more familiar the issue, the more readily it may be rectified. However, for unusual TikTok issues, you need to become more technical or obtain assistance from official sources like customer support. TikTok faults might come from both your side and from TikTok. Locally, your settings might mix up with the app resulting in TikTok issues. Other applications in your phone might potentially interact with TikTok resulting in multiple TikTok failures.
You can correct common mistakes easily, and we will show you how. Here is a list of recurrent TikTok faults that you discover every day:
- TikTok is not connecting to the internet.
- TikTok is not loading videos.
- Not saving videos.
- TikTok app is crashing regularly.
- TikTok video not functioning after sharing.
- The app is not letting me log in.
- TikTok server is not responding.
- TikTok is not removing my account.
- Not removing my video.
If you experience a frequent mistake like the TikTok bugs mentioned above, you’re in luck. We could just have the answer for them in this tutorial.
Part 3. All Methods to Fix ‘TikTok Not Working’ Due to Bugs


1. Fix TikTok Bugs on Android
The major cause of this condition is excessive video watching. As a consequence, TikTok collects additional caches, which are kept in the phone memory. As result, there is not enough capacity to conserve phone data, hence TikTok videos are slow, and there are crashing and hanging difficulties.
The remedy to this issue is to clean the TikTok app’s caches and data. This approach is based on the steps indicated below:
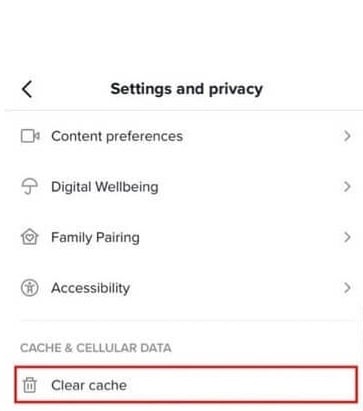
- Launch the TikTok app.
- Go to your profile page and select one of the three possibilities indicated by three dots.

- Then pick the option to clean caches. Following these easy procedures will swiftly cure your issue.
2. Fix TikTok Not Working on iPhone
To begin, we suggest resetting the TikTok iOS app as a general approach. Temporary difficulties that emerged during the app’s functioning may be fixed with a simple restart. As a consequence, these app problems might be to fault for any troubles with getting into your TikTok account. Plus, this is an excellent step to attempt after other changes to begin a fresh new session of the TikTok platform.
To Restart Your TikTok iOS App:
- First, close the TikTok app entirely by deleting it from your Recent Apps or App Switcher.
- Then, from your homepage, reopen the TikTok app.
3. Fix TikTok Bugs on Chrome
Alternatively, you may try going to TikTok.com in a web browser (ideally on another device) and check whether it loads and operates correctly. If it does not, chances are that the problem is not with your phone and there is an outage of some type.

First, try shutting the app completely altogether and relaunching it. This looks to be a simple remedy for some customers.
If comments still aren’t functioning after a restart, users can try logging out and back in.
As a final option, you may remove the software totally and re-download it for a reinstall.
4. Clear TikTok App Cache
If your TikTok app is not operating, it’s probably an issue with damaged cache data. If you notice, your TikTok app plays certain videos offline when you start it. It’s not magic. The cache memory saves certain data temporarily to let the software operate quicker and function effectively. If your TikTok is acting improperly, deleting the cached data may help solve it. Follow the instructions below to do so.
Launch the Settings app from your app menu, then click on the Apps & Notifications.
From there, click on the option to see all applications. Usually “App details”, “Manage Applications”, or “See all apps”.
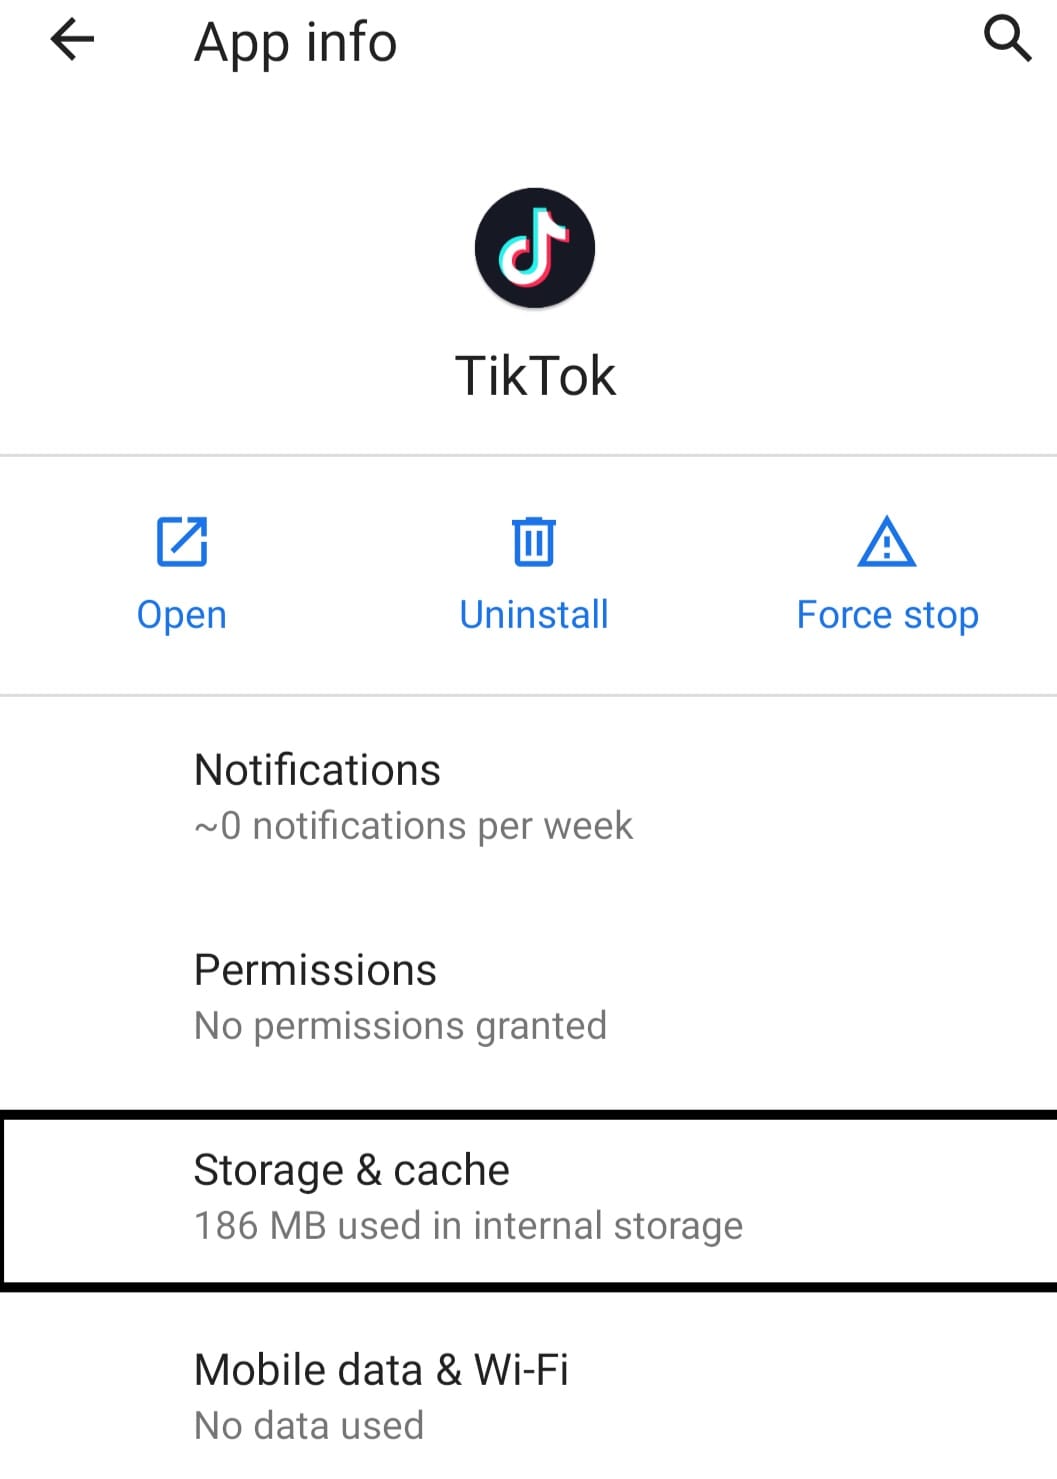
- After showing the list of applications on your phone, select TikTok and launch it. Tap Storage & cache on the TikTok app information screen.
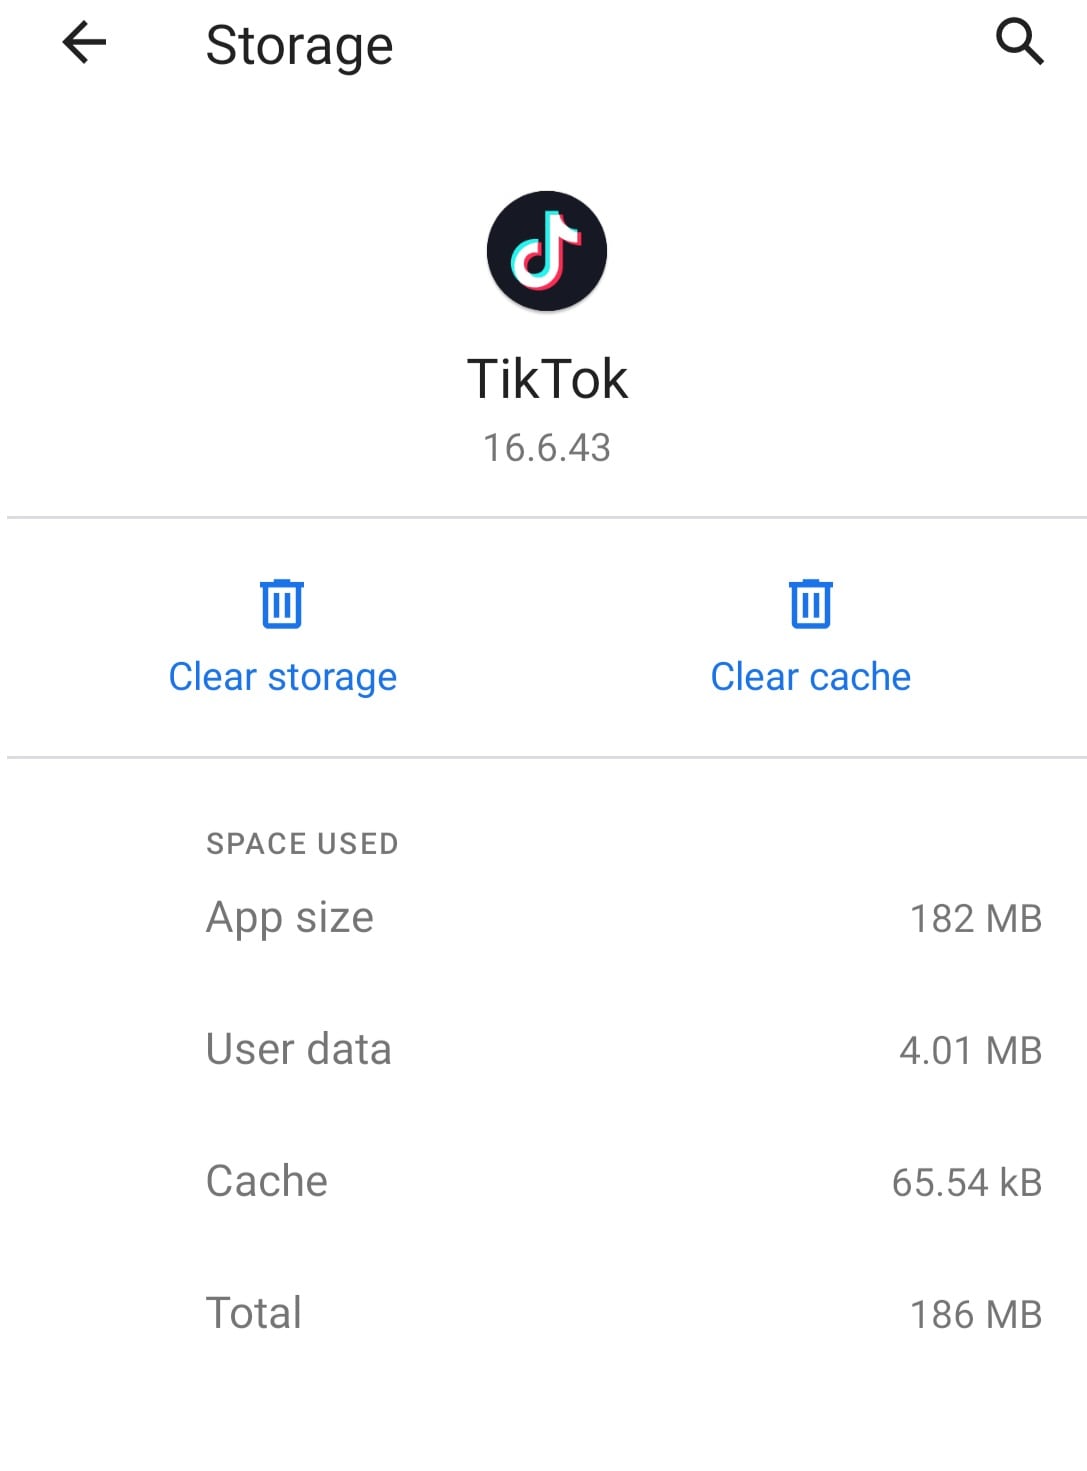
- Finally, press Clear cache to delete the stored data. Now touch the back button once and tap on the Force stop button to quit the TikTok app. After that, re-launch the TikTok app to see whether it rectifies the issue or try another method below.
5. Reset the Network
TikTok has become a very frequently used app globally, however occasionally its users have to confront certain challenges. Sometimes when viewing or recording a video, an error does not allow the app to play the video. This issue is not directly connected to the app; however, we may solve this mistake by utilizing alternative ways such as network difficulties. Sometimes our network is giving trouble to the system, and it is not supporting the videos we wish to play. So, the first and foremost duty to remove this problem is to examine our connection. To solve the connection difficulties or ISP APN, we need to take the following steps:
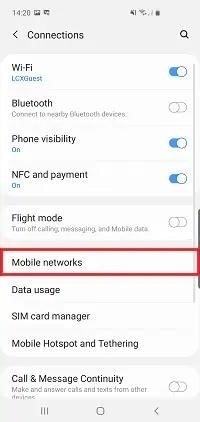
Open the settings and click on the network and internet option. From there, click on the mobile network > Open ‘Advanced Options’
Click on the access point names and select the three full stops in the upper right corner of your phone’s screen.
Then click on reset to default. After performing these instructions leave the settings, then go to your home screen and switch on the mobile data. Then play the video to see whether the fault is fixed.
6. Restart the Devices
If TikTok works on another device or browser from the list above, your device seems to be the issue. If the issue continues, consider deleting the program and reinstalling it from the App Store for iOS users or Play Store for Android users. The first thing to do in the case of an application problem on your iPhone device is to switch off then on again. To achieve this, these are the steps to follow:
For iOS:
To begin, touch and hold the Power button until you receive the “Slide to Power Off” option on your screen. Then move the slider to the right until the screen on your iPhone or iPad becomes dark.
Wait at least 10 seconds after shutting off your iPhone before hitting and holding the Power button until the Apple logo shows on the screen.

- Finally, wait for your device to completely boot up before trying to log in to your TikTok account to verify whether the TikTok login problem has been fixed.

For Android:
Firstly, find the Power button on your smartphone and hold down the power button until the Power Options menu comes on the screen.
After that, hit the Restart button and wait for your device’s screen to turn off fully.

- Finally, wait for your device to power up entirely. This process may take many minutes to conclude.
Part 4: Conclusion
Sometimes all that TikTok needs is an update. Someone else has undoubtedly run across whatever difficulty you are having earlier and the developer may have published an update that fixes the problem already. If none of the alternatives above work, remove your TikTok app according to your device. Go to the App Store or Google Play Store. Search for the TikTok application and install it. If you are on an Android smartphone, go to the Play Store, search for TikTok, and check if there is an update available. For an iOS device, visit the App Store, press on your profile symbol, then scroll down to check if there’s an update. Summing up, these are the few reliable ways to fix your TikTok bugs handily.
Part 2. Types of TikTok Bugs Leads to TikTok Not Working
On TikTok’s side, the TikTok issues might be caused by glitches or flaws in the software. There may also be an issue with TikTok’s server resulting in TikTok problems. Regular updates generally solve issues on the TikTok app. Some mistakes are more prevalent than others. While others emerge relatively infrequently. Although, the more familiar the issue, the more readily it may be rectified. However, for unusual TikTok issues, you need to become more technical or obtain assistance from official sources like customer support. TikTok faults might come from both your side and from TikTok. Locally, your settings might mix up with the app resulting in TikTok issues. Other applications in your phone might potentially interact with TikTok resulting in multiple TikTok failures.
You can correct common mistakes easily, and we will show you how. Here is a list of recurrent TikTok faults that you discover every day:
- TikTok is not connecting to the internet.
- TikTok is not loading videos.
- Not saving videos.
- TikTok app is crashing regularly.
- TikTok video not functioning after sharing.
- The app is not letting me log in.
- TikTok server is not responding.
- TikTok is not removing my account.
- Not removing my video.
If you experience a frequent mistake like the TikTok bugs mentioned above, you’re in luck. We could just have the answer for them in this tutorial.
Part 3. All Methods to Fix ‘TikTok Not Working’ Due to Bugs
1. Fix TikTok Bugs on Android
The major cause of this condition is excessive video watching. As a consequence, TikTok collects additional caches, which are kept in the phone memory. As result, there is not enough capacity to conserve phone data, hence TikTok videos are slow, and there are crashing and hanging difficulties.
The remedy to this issue is to clean the TikTok app’s caches and data. This approach is based on the steps indicated below:
- Launch the TikTok app.
- Go to your profile page and select one of the three possibilities indicated by three dots.
- Then pick the option to clean caches. Following these easy procedures will swiftly cure your issue.
2. Fix TikTok Not Working on iPhone
To begin, we suggest resetting the TikTok iOS app as a general approach. Temporary difficulties that emerged during the app’s functioning may be fixed with a simple restart. As a consequence, these app problems might be to fault for any troubles with getting into your TikTok account. Plus, this is an excellent step to attempt after other changes to begin a fresh new session of the TikTok platform.
To Restart Your TikTok iOS App:
- First, close the TikTok app entirely by deleting it from your Recent Apps or App Switcher.
- Then, from your homepage, reopen the TikTok app.
3. Fix TikTok Bugs on Chrome
Alternatively, you may try going to TikTok.com in a web browser (ideally on another device) and check whether it loads and operates correctly. If it does not, chances are that the problem is not with your phone and there is an outage of some type.
First, try shutting the app completely altogether and relaunching it. This looks to be a simple remedy for some customers.
If comments still aren’t functioning after a restart, users can try logging out and back in.
As a final option, you may remove the software totally and re-download it for a reinstall.
4. Clear TikTok App Cache
If your TikTok app is not operating, it’s probably an issue with damaged cache data. If you notice, your TikTok app plays certain videos offline when you start it. It’s not magic. The cache memory saves certain data temporarily to let the software operate quicker and function effectively. If your TikTok is acting improperly, deleting the cached data may help solve it. Follow the instructions below to do so.
Launch the Settings app from your app menu, then click on the Apps & Notifications.
From there, click on the option to see all applications. Usually “App details”, “Manage Applications”, or “See all apps”.
- After showing the list of applications on your phone, select TikTok and launch it. Tap Storage & cache on the TikTok app information screen.
- Finally, press Clear cache to delete the stored data. Now touch the back button once and tap on the Force stop button to quit the TikTok app. After that, re-launch the TikTok app to see whether it rectifies the issue or try another method below.
5. Reset the Network
TikTok has become a very frequently used app globally, however occasionally its users have to confront certain challenges. Sometimes when viewing or recording a video, an error does not allow the app to play the video. This issue is not directly connected to the app; however, we may solve this mistake by utilizing alternative ways such as network difficulties. Sometimes our network is giving trouble to the system, and it is not supporting the videos we wish to play. So, the first and foremost duty to remove this problem is to examine our connection. To solve the connection difficulties or ISP APN, we need to take the following steps:
Open the settings and click on the network and internet option. From there, click on the mobile network > Open ‘Advanced Options’
Click on the access point names and select the three full stops in the upper right corner of your phone’s screen.
Then click on reset to default. After performing these instructions leave the settings, then go to your home screen and switch on the mobile data. Then play the video to see whether the fault is fixed.
6. Restart the Devices
If TikTok works on another device or browser from the list above, your device seems to be the issue. If the issue continues, consider deleting the program and reinstalling it from the App Store for iOS users or Play Store for Android users. The first thing to do in the case of an application problem on your iPhone device is to switch off then on again. To achieve this, these are the steps to follow:
For iOS:
To begin, touch and hold the Power button until you receive the “Slide to Power Off” option on your screen. Then move the slider to the right until the screen on your iPhone or iPad becomes dark.
Wait at least 10 seconds after shutting off your iPhone before hitting and holding the Power button until the Apple logo shows on the screen.
- Finally, wait for your device to completely boot up before trying to log in to your TikTok account to verify whether the TikTok login problem has been fixed.
For Android:
Firstly, find the Power button on your smartphone and hold down the power button until the Power Options menu comes on the screen.
After that, hit the Restart button and wait for your device’s screen to turn off fully.
- Finally, wait for your device to power up entirely. This process may take many minutes to conclude.
Part 4: Conclusion
Sometimes all that TikTok needs is an update. Someone else has undoubtedly run across whatever difficulty you are having earlier and the developer may have published an update that fixes the problem already. If none of the alternatives above work, remove your TikTok app according to your device. Go to the App Store or Google Play Store. Search for the TikTok application and install it. If you are on an Android smartphone, go to the Play Store, search for TikTok, and check if there is an update available. For an iOS device, visit the App Store, press on your profile symbol, then scroll down to check if there’s an update. Summing up, these are the few reliable ways to fix your TikTok bugs handily.
Silencing Ambient Wrongdoers: A Comprehensible Guide on Audacity’s Noise Reduction
The most frequent request you’ll get from video makers is to eliminate irritating noises like rumbling or humming from an original clip. Almost all of the time, capturing high-quality audio during filming is challenging since the conversation is often hard to hear or is made unclear due to surrounding noises, such as the dreadful air conditioners or fans.
To get rid of all these awful noises, this Audacity Noise Reduction feature will serve you a significant purpose in removing unwanted background noise for your future videos. Without further ado, let’s get started!
In this article
01 Things You Need to Prepare for Background Noise Reduction
02 How to Remove Background Noise in Audacity?
03 Why is Audacity Noise Reduction Not Working?
04 How to Prevent Background Noise in Audio Recording?
05 How to Remove Background Noise in Filmora?
Part 1: Things You Need to Prepare for Background Noise Reduction
Here are few things that you need to consider before you apply the noise reduction to your clips:
1. Noise Sample
A decent sample of the noise you wish to eliminate is perhaps the most crucial aspect of the Audacity remove noise procedure.
This will be used by Audacity to understand the noise and build a noise profile. The noise recording should last for a fair amount of time and be devoid of any other noises.
2. Avoid Copy Pasting Tiny Noise Section in Your Spoken Phrases
When you have a tiny part of noise between your stated words on your audio, please don’t copy/paste it to make a more significant piece of sound for Audacity to examine.
You would not be supplying Audacity with any more information that will help it generate a decent noise profile. The noise profile is what enables Audacity to tell the difference between speech and noise.
3. Minimum 2048 Data Samples Required
To build a noise profile, the Noise Reduction function requires a minimum of 2048 sample data. An audio file with a sampling frequency of 44.1kHz is roughly five hundredths of a second.
Note that this is the minor sound level that Audacity needs to generate a noise profile; however, should you supply a larger sample of the noise, Audacity can typically perform a great job of producing a suitable noise profile. As a result, attempt to capture a few seconds of background noises wherever possible.
4. Establish Recording Level and Record “Silence”
Setting your audio volume and capturing some “quiet” prior to speaking is the best way to achieve this. Instead, when you’ve finished talking, keep your camera/recorder going for a few moments.
Don’t move or create any sounds while capturing the background noises, and keep an ear open for any other noises. You only need to capture the ambient noise for a few moments; two to five seconds will suffice.
Part 2: How to Remove Background Noise in Audacity on Windows and Mac?
Whether you are using Windows or macOS, we will show you a step-by-step process to achieve your results using both software in this part of Audacity remove background music guide.
Remove background noise in Audacity on Windows
Step 1: On your recording, select a few moments of sound. Any segment of noise that incorporates other noises should be avoided.

Step 2: From the Effect menu, select Noise Reduction.

Step 3: Select the Get Noise Profile option whenever the Noise Reduction effect screen appears.

Note: Choose whether to implement the noise removal to the entire waveforms or only a portion of it.
Step 4: To access the Noise Reduction effects window, go to Effects > Noise Reduction. Raise the level of noise reduction progressively while previewing the result.

Step 5: Head over to the File section to Export and Save the result. Audacity does not save sound clips when you select Save Project; instead, you must choose Export. Select the file type you want to store and the place wherever you can save it. Select Save after giving the File Name.

Remove background noise in Audacity on Mac
Step 1: Create a room tone-containing audio file. When you don’t have a separate track for room tone, use a recording with a few moments of quiet in it. Click-and-drag to select a segment with a few minutes of silence using the Selection Tool.

Step 2: Select Noise Reduction from the Effects tab. Select the Get Noise Profile tab in the new tab under Step 1. The screen will shut, and Audacity will take noise profile samples of the indicated area.

Step 3: Click-and-drag to select the whole file, which requires noise reduction with the Selection Tool. To re-open the function, go to the Effect tab and pick Noise Reduction. Make modifications to the following parameters under Step 2:
- Reduce and Residue
- Frequency Smoothing (bands)
- Sensitivity
- Noise Reduction

Step 4: To listen to how the chosen file will look with the selected parameters, select Preview. Re-adjust until you have a sound noise reduction with no interference. When you’re finished, select Reduce and click OK.
Part 3: Why is Audacity Noise Reduction Not Working?
It’s possible that the Noise Reduction function isn’t letting you mop up your recording since your audio isn’t appropriate for it. The disturbance must be continuous, not random or fluctuating, to work for Audacity’s Noise Reduction function.
For example, the Noise Reduction function will not assist if your audio was made in a busy environment with unique noises such as background chatter, random traffic noises, or in an exhibition space or museum. The Noise Reduction feature in Audacity isn’t meant to cope with that kind of distortion. You’ll need to alter your recording approach if you’re capturing voice in either of those situations.
Under the following situations, the Audacity Noise Reduction function might underperform.
- Particular noise in the background, including traffic or people.
- When the harmonics of the sound and voice are comparable.
- There is sound variance where there is fluctuation in the noise.
- The volume of the voice is comparable to or lower than that of the background noise.
- When the noise is irregular or changeable rather than continuous.
- The loudness is deafening.
- The sound is a single click or pop.
Part 4: How to Prevent Background Noise in Audio Recording?
Although Audacity allows eliminating noise very simply, it is still an additional level that takes time to refine your podcast production. These pointers can help you avoid the necessity for noise reduction and cut down on the amount of time you spend processing.
1. Reduce the Computer Fan Noise
Whenever computers become too heated, they can produce a lot of noise. You may limit the amount of software that runs and position your mic away from the keyboard to help lessen this impact and avoid the fan from coming on.
However, even if you observe all of these guidelines, undesired recording sounds may still appear in your program. Fortunately, contemporary software makes this problem quite simple to resolve.
2. Reduce the Gain and Get Close to the Mic
Reduce the gain (sensitivity of the microphone) and go nearer to it. Talking straight into the microphone won’t distort your audio if you reduce the gain, and that would assist your microphone in concentrating on scooping up your voice’s tone.
Bonus Tip: Set your recorder’s (or DAW’s) sensitivity such that your speech peaks between -12 and -10db.
3. Utilize a Versatile Microphone
Condenser and dynamic microphones are the two most common types of podcast microphones. Condenser microphones are significantly more sensitive instruments meant to take up average atmospheric noise, whereas dynamic microphones have a narrower frequency range, picking up fewer ambient noises.
4. Optimize Your Recording Environment
The most significant and most crucial aspect of your podcasts’ sound quality is where you capture it. To optimize your personal podcasting space, we recommend choosing a peaceful, compact area away from HVAC systems, vehicles, external hard drives, background sound, motors, and other distractions. You may also increase the tone of your room by using natural sound absorbents such as curtains, rugs, carpets, and sofas.
Part 5: How to Remove Background Noise in Filmora?
Although there is a lot of software available to eliminate ambient noise, we highly suggest Wondershare Filmora Video Editor to edit audio and video in one place.
In addition to the standard audio editing capabilities, the recently redesigned Filmora currently includes enhanced waveforms, volume Keyframing , peak metering, and audio transitions, giving you a better audio editing interface.
For Win 7 or later (64-bit)
For macOS 10.12 or later
Filmora Video Editor will quickly remove ambient sound from both sound/video. You may also remove the sound from the video with this simple video editor, use the Audio Equalizer or Audio Mixer functions to modify the audio further, and then Export and save the audio in an Mp3 file. Here are the detailed steps:
Step 1: In the Wondershare Filmora Timeline menu, Import your footage. Trim the footage after previewing it and deleting the sections you don’t want to retain.

Step 2: To eliminate the ambient noise immediately, double-click on the video file, and go to the Audio panel to select the Remove Background Noise option. You will find that the background noise is removed automatically.

Step 3: After checking the results, select Export to download the noise-reduced clip to your desktop or upload it immediately to YouTube or Vimeo.

Conclusion
Well, there you have it. In this Audacity Remove Background Noise guide, we have reviewed every possible method you can adopt to get rid of the unnecessary background noise in the Audacity. And if the desired results are still not achieved, we highly recommend using the Wondershare Filmora editing software. Not only will it help you remove the unwanted ambient noise, but it will also allow you to customize your audio or video file further.
02 How to Remove Background Noise in Audacity?
03 Why is Audacity Noise Reduction Not Working?
04 How to Prevent Background Noise in Audio Recording?
05 How to Remove Background Noise in Filmora?
Part 1: Things You Need to Prepare for Background Noise Reduction
Here are few things that you need to consider before you apply the noise reduction to your clips:
1. Noise Sample
A decent sample of the noise you wish to eliminate is perhaps the most crucial aspect of the Audacity remove noise procedure.
This will be used by Audacity to understand the noise and build a noise profile. The noise recording should last for a fair amount of time and be devoid of any other noises.
2. Avoid Copy Pasting Tiny Noise Section in Your Spoken Phrases
When you have a tiny part of noise between your stated words on your audio, please don’t copy/paste it to make a more significant piece of sound for Audacity to examine.
You would not be supplying Audacity with any more information that will help it generate a decent noise profile. The noise profile is what enables Audacity to tell the difference between speech and noise.
3. Minimum 2048 Data Samples Required
To build a noise profile, the Noise Reduction function requires a minimum of 2048 sample data. An audio file with a sampling frequency of 44.1kHz is roughly five hundredths of a second.
Note that this is the minor sound level that Audacity needs to generate a noise profile; however, should you supply a larger sample of the noise, Audacity can typically perform a great job of producing a suitable noise profile. As a result, attempt to capture a few seconds of background noises wherever possible.
4. Establish Recording Level and Record “Silence”
Setting your audio volume and capturing some “quiet” prior to speaking is the best way to achieve this. Instead, when you’ve finished talking, keep your camera/recorder going for a few moments.
Don’t move or create any sounds while capturing the background noises, and keep an ear open for any other noises. You only need to capture the ambient noise for a few moments; two to five seconds will suffice.
Part 2: How to Remove Background Noise in Audacity on Windows and Mac?
Whether you are using Windows or macOS, we will show you a step-by-step process to achieve your results using both software in this part of Audacity remove background music guide.
Remove background noise in Audacity on Windows
Step 1: On your recording, select a few moments of sound. Any segment of noise that incorporates other noises should be avoided.
Step 2: From the Effect menu, select Noise Reduction.
Step 3: Select the Get Noise Profile option whenever the Noise Reduction effect screen appears.
Note: Choose whether to implement the noise removal to the entire waveforms or only a portion of it.
Step 4: To access the Noise Reduction effects window, go to Effects > Noise Reduction. Raise the level of noise reduction progressively while previewing the result.
Step 5: Head over to the File section to Export and Save the result. Audacity does not save sound clips when you select Save Project; instead, you must choose Export. Select the file type you want to store and the place wherever you can save it. Select Save after giving the File Name.
Remove background noise in Audacity on Mac
Step 1: Create a room tone-containing audio file. When you don’t have a separate track for room tone, use a recording with a few moments of quiet in it. Click-and-drag to select a segment with a few minutes of silence using the Selection Tool.
Step 2: Select Noise Reduction from the Effects tab. Select the Get Noise Profile tab in the new tab under Step 1. The screen will shut, and Audacity will take noise profile samples of the indicated area.
Step 3: Click-and-drag to select the whole file, which requires noise reduction with the Selection Tool. To re-open the function, go to the Effect tab and pick Noise Reduction. Make modifications to the following parameters under Step 2:
- Reduce and Residue
- Frequency Smoothing (bands)
- Sensitivity
- Noise Reduction
Step 4: To listen to how the chosen file will look with the selected parameters, select Preview. Re-adjust until you have a sound noise reduction with no interference. When you’re finished, select Reduce and click OK.
Part 3: Why is Audacity Noise Reduction Not Working?
It’s possible that the Noise Reduction function isn’t letting you mop up your recording since your audio isn’t appropriate for it. The disturbance must be continuous, not random or fluctuating, to work for Audacity’s Noise Reduction function.
For example, the Noise Reduction function will not assist if your audio was made in a busy environment with unique noises such as background chatter, random traffic noises, or in an exhibition space or museum. The Noise Reduction feature in Audacity isn’t meant to cope with that kind of distortion. You’ll need to alter your recording approach if you’re capturing voice in either of those situations.
Under the following situations, the Audacity Noise Reduction function might underperform.
- Particular noise in the background, including traffic or people.
- When the harmonics of the sound and voice are comparable.
- There is sound variance where there is fluctuation in the noise.
- The volume of the voice is comparable to or lower than that of the background noise.
- When the noise is irregular or changeable rather than continuous.
- The loudness is deafening.
- The sound is a single click or pop.
Part 4: How to Prevent Background Noise in Audio Recording?
Although Audacity allows eliminating noise very simply, it is still an additional level that takes time to refine your podcast production. These pointers can help you avoid the necessity for noise reduction and cut down on the amount of time you spend processing.
1. Reduce the Computer Fan Noise
Whenever computers become too heated, they can produce a lot of noise. You may limit the amount of software that runs and position your mic away from the keyboard to help lessen this impact and avoid the fan from coming on.
However, even if you observe all of these guidelines, undesired recording sounds may still appear in your program. Fortunately, contemporary software makes this problem quite simple to resolve.
2. Reduce the Gain and Get Close to the Mic
Reduce the gain (sensitivity of the microphone) and go nearer to it. Talking straight into the microphone won’t distort your audio if you reduce the gain, and that would assist your microphone in concentrating on scooping up your voice’s tone.
Bonus Tip: Set your recorder’s (or DAW’s) sensitivity such that your speech peaks between -12 and -10db.
3. Utilize a Versatile Microphone
Condenser and dynamic microphones are the two most common types of podcast microphones. Condenser microphones are significantly more sensitive instruments meant to take up average atmospheric noise, whereas dynamic microphones have a narrower frequency range, picking up fewer ambient noises.
4. Optimize Your Recording Environment
The most significant and most crucial aspect of your podcasts’ sound quality is where you capture it. To optimize your personal podcasting space, we recommend choosing a peaceful, compact area away from HVAC systems, vehicles, external hard drives, background sound, motors, and other distractions. You may also increase the tone of your room by using natural sound absorbents such as curtains, rugs, carpets, and sofas.
Part 5: How to Remove Background Noise in Filmora?
Although there is a lot of software available to eliminate ambient noise, we highly suggest Wondershare Filmora Video Editor to edit audio and video in one place.
In addition to the standard audio editing capabilities, the recently redesigned Filmora currently includes enhanced waveforms, volume Keyframing , peak metering, and audio transitions, giving you a better audio editing interface.
For Win 7 or later (64-bit)
For macOS 10.12 or later
Filmora Video Editor will quickly remove ambient sound from both sound/video. You may also remove the sound from the video with this simple video editor, use the Audio Equalizer or Audio Mixer functions to modify the audio further, and then Export and save the audio in an Mp3 file. Here are the detailed steps:
Step 1: In the Wondershare Filmora Timeline menu, Import your footage. Trim the footage after previewing it and deleting the sections you don’t want to retain.
Step 2: To eliminate the ambient noise immediately, double-click on the video file, and go to the Audio panel to select the Remove Background Noise option. You will find that the background noise is removed automatically.
Step 3: After checking the results, select Export to download the noise-reduced clip to your desktop or upload it immediately to YouTube or Vimeo.
Conclusion
Well, there you have it. In this Audacity Remove Background Noise guide, we have reviewed every possible method you can adopt to get rid of the unnecessary background noise in the Audacity. And if the desired results are still not achieved, we highly recommend using the Wondershare Filmora editing software. Not only will it help you remove the unwanted ambient noise, but it will also allow you to customize your audio or video file further.
Also read:
- [Updated] In 2024, Stand Out with These 20 Must-Try TikTok Caption Ideas
- Analyzing Team Chat Platforms Is Slack Superior to Discord in Performance?
- [Updated] Enhancing Your TikTok Videos With Easeful Text Integration
- [Updated] In 2024, A Deep Dive Into TikTok's PFP Significance
- [Updated] 2024 Approved Crafting a Blueprint for Impressive Social Media Marketing Plays on TikTok
- [Updated] Discover New Social Horizons Beyond the Popularity of TikTok for 2024
- [New] Save Your Favorite TikTok Content - Securely on Devices
- Rhythmic Revolution Top Tracks Reshaping the Rap Scene on TikTok for 2024
- [New] 2024 Approved Accelerate Your Library Quick TikTok Download Strategies
- [New] Elevate Your TikToks The Art of Video Patchwork for 2024
- Zen-Zapped Grooves Top 20 Soothing Country Music for Easy Dancing (TikTok)
- [Updated] 2024 Approved Top 10 FREE TikTok Video Editors Compatible with MacOS
- 2024 Approved Unraveling TikTok's Symbolic Use of 'PFP'
- 2024 Approved Chrome/Android/iOS Users' Guide to Perfecting TikTok Video Posts
- [New] 2024 Approved How to Use TikTok Hashtags to Increase Your Post Reach
- In 2024, Premier Selection of TikTok Video Editors
- 2024 Approved Safe Sharing Starts Here The Copyright Check for TikTok Videos
- [Updated] In 2024, Savory Sensations Pioneers of Online Cuisine
- [Updated] 2024 Approved Top 5 Alternatives to TikTok You Should Know [Updated ]
- [Updated] Discovering the Charm #7 Most Popular TikTok Emojis & Secret Symbols
- [New] In 2024, Live Streaming on TikTok/Musical.ly
- 2024 Approved A Compreenasion of Siri Integration Into TikTok Filmmaking
- [New] 2024 Approved Hot Dishes From Hot TikTokers
- [New] Step-By-Step Techniques for Adding Text on TikTok for 2024
- [New] The Art of Eating 10 Social Media Staples for 2024
- [New] In 2024, Navigating Social Media Imitation How to Clone Yourself with Finesse on TikTok
- Unveiling the Secrets of Superior TikTok Captions (Top 5 Strategies) for 2024
- 2024 Approved Streamlining Communication Utilizing Masks and Filters
- In 2024, How to Remove and Reset Face ID on Apple iPhone 14 Pro Max | Dr.fone
- Best Nubia Red Magic 8S Pro+ Pattern Lock Removal Tools Remove Android Pattern Lock Without Losing Data
- New Top-Rated Free iPhone Video Rotators You Need
- [New] In 2024, A Beginner's Guide to Recording Sims 4 Sessions
- Updated 2024 Approved The Ultimate Video Editors Handbook Download and Learn
- 2024 Approved Unbranded Video Editing on Android Top 10 Free Apps Reviewed
- How to Bypass Google FRP Lock from Xiaomi Redmi 13C Devices
- Updated In 2024, What Is an AI Presentation Maker? | Wondershare Virbo Glossary
- How To Unbrick a Dead Xiaomi Redmi Note 12 4G | Dr.fone
- Restore Missing App Icon on Motorola Moto E13 Step-by-Step Solutions | Dr.fone
- [New] How to Turn Off IGTV, In 2024
- [Updated] Quick Start Saving Videos of Your Switch Experiences for 2024
- Title: "[Updated] Fixed TikTok Freezes on Chromebook - Quick Tips for 2024"
- Author: Kenneth
- Created at : 2024-05-23 01:46:24
- Updated at : 2024-05-24 01:46:24
- Link: https://tiktok-video-files.techidaily.com/updated-fixed-tiktok-freezes-on-chromebook-quick-tips-for-2024/
- License: This work is licensed under CC BY-NC-SA 4.0.
