
!["[Updated] 2024 Approved Mastering TikTok's Financial Landscape - A Creator's Manual"](https://www.lifewire.com/thmb/3Bke3hlqX0FGbXp2BrzfZHM5AKw=/400x300/filters:no_upscale():max_bytes(150000):strip_icc()/is-discord-down-or-is-it-just-you-5025695-c342552e6c4c4383b284301c8b56d664.jpg)
"[Updated] 2024 Approved Mastering TikTok's Financial Landscape - A Creator's Manual"
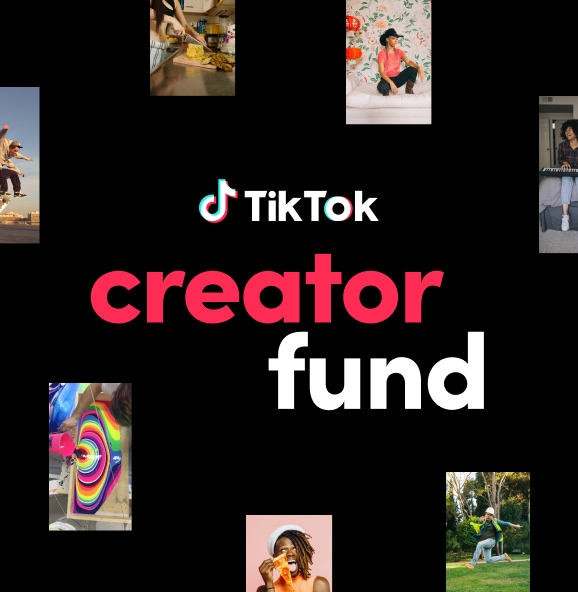
Mastering TikTok’s Financial Landscape - A Creator’s Manual
TikTok Creator Fund: How to Join it and Make Money

Shanoon Cox
Mar 27, 2024• Proven solutions
TikTok – a platform entrenched in creativity – has become one of the most popular social media sites in the world in a short period. With more than 800 million monthly users worldwide, this short-form video app is now an unstoppable growth. Over the recent years, it has become the central hub for the young and ambitious creators of the world.
You know how to make TikTok videos, and you even post them regularly to build your brand – but did you know as a content creator you could also get paid for posting TikToks?


Building on its efforts to support content creators monetize their content, the popular video-sharing platform has launched TikTok Creator Fund to allow creators to earn money from their videos. The introduction of the fund program is in alliance with TikTok’s commitment to encouraging those who dream of making careers using their creative talent. The platform wants to push its users to take their ambition, creativity, and imagination to the next level.
Source: newsroom.tiktok.com
Interested in joining this program but have no idea of who can apply, where to apply, and how to join the TikTok creator fund? Fret not! You’ve come to the right place.
Check out below to find out the answer and be ready to kick-start your TikTok career!
- Part 1: What is TikTok Creator Fund?
- Part 2: Who is Eligible to Apply to the Creator Fund?
- Part 3: Is the TikTok Creator Fund Worth Joining?
- Part 4: How to Join the TikTok Creator Fund?
- Part 5: Top 5 Highest Paid TikTokers
Part 1: What is TikTok Creator Fund?
TikTok’s Creator Fund program is a $200 million cash fund, growing to $1billion over the next 3 years, to reward TikTokers for creating authentic, entertaining, and engaging video content. Launched in 2020, the TikTok creator fund is the opportunity of a lifetime for determined video creators to earn per view on their original content.
From artists to educators, singers to dancers, comedians to bodybuilders, the TikTok creator fund allows the brightest TikTokers to earn money through their creative content. It is a type of incentive for the creators and a way for TikTok to express their gratitude to the creator community for their creativity and ingenuity. The goal of the fund is to support the brightest and best TikTok creators who draw audiences to the platform.
Part 2: Who is Eligible to Apply to the Creator Fund?
TikTokers can apply for funding through the creator fund and generate income from their videos. Although there’s no limit on the number of creators who can join, there are certain TikTok creator fund requirements that creators have to meet to be able to access the program.
The initial criteria for applying to the TikTok creator fund are:
- Must be at least 18 years of age
- Should have at least 10, 000 followers
- Must be based in the US, UK, France, Spain, Germany, or Italy
- Should have at least 100,000 views in the last 30 days
- Only post “original content” in line with the TikTok Community Guidelines

Source: newsroom.tiktok.com
In other words, the creator fund is for content creators who have already proven their ability to make popular content. If you do not meet the above requirements, you won’t be able to access the creator fund or the income it provides. So, unless you have a moderate level of popularity on TikTok, you won’t be able to qualify to receive money from the creator fund. However, you can set your focus on the creator fund program and grow your account to match the TikTok Creator Fund requirements!
Part 3: Is the TikTok Creator Fund Worth Joining?
TikTok’s creator fund offers the opportunity to ambitious creators to make additional earning with their content. So, if you are a TikToker who enjoys making video content and want to and turn your creativity into a career, joining the creator fund program might be worth it.
Some of the many reasons why you should fill the TikTok creator fund application and join this program are:
- The creator fund program was created to help new TikTokers gain followers and keep them entertained while they grow their audience.
- It is an excellent opportunity and way to build an income and earn money through the videos that you post. Since the fund is open to all types of content, you can earn money doing what you enjoy.
Part 4: How to Join the TikTok Creator Fund?
Once you meet the eligibility requirements for the creator fund, you can easily apply to join and be accepted into this program. Joining the program will enable you to earn income through TikTok and make money by doing what you enjoy – creating videos.
Here’s a simple tutorial on how to join the TikTok creator fund:
Step-1: Log in to your profile
Step-2: Click on the three dots in the top right corner of the screen
Step-3: Click on Manage Account and scroll down to choose Switch to Pro Account.
Step-4: Then, choose Creator.
Step-5: Once you are done switching to Pro, go to your profile once again.
Step-6: Click on the three dots in your screen’s top-right corner.
Step-7: Scroll down and select Creator.
Step-8: You’ll see Insights and the TikTok Creator Fund. Ensure you choose the latter.
Next, you will be taken to the application process where you have to confirm you are at least 18-years-old. You may have to upload your ID for this. Also, you have to verify your location. Make sure you do not forget to read and accept the Terms and Conditions.
Alternatively, there is another way for you to apply. You can follow the below steps:
Step-1: Go to your inbox, click on the All Activity section on the top of your screen,
Step-2: Tap From TikTok where you will see notifications from TikTok.
Step-3: Find a notification saying: “Turn your creativity into opportunity! Apply to the TikTok Creator Fund.”
Step-4: The message will redirect to a new screen, thus letting you know your eligibility
Step-5: Fill the TikTok Creator Fund application form
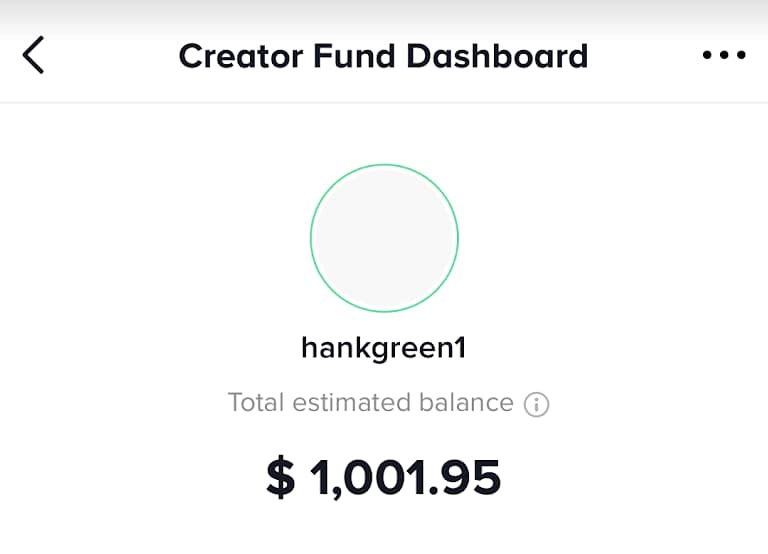
Step-6: When you are taken to the Creator Fund Dashboard, it denotes your application is approved.
Source: saleslovesmarketing.co
Part 5: Top 5 Highest Paid TikTokers
Before we delve into the richest TikTokers, it is recommended to know what TikTok creator Fund pays to users. So far, TikTok hasn’t officially announced what or how much it pays its creators. The creator fund isn’t a grant or an ad revenue-sharing program. However, influencers who are enrolled in the Creator Fund have reported that TikTok pays them between 2 and 4 cents per 1000 views.
TikTok Creator Fund payout depends on a range of factors in relation to your profile and the content you create. These factors include views count and their authenticity, number of engagement, the region where the views come from, and total followers compared to likes. Performance on this social media platform is dynamic as it changes naturally. Besides, the daily funding amount can differ depending on the number of videos released on that day. So, the specific amount differs from one person to another.
Now that you have an idea of the creator fund payout, you might be wondering about top TikTok creators who have monetized their content. Here’s a list of TikTok’s 5 highest paid TikTokers based on Forbes’ list of the highest-earning stars in 2020:
1.Addison Rae Easterling
Louisiana-native Addison Rae is TikTok’s top-earning star who earns $5 million in just a year. With sponsored posts, collaborations with the Hype House and many business opportunities, Addison has reached household name status.
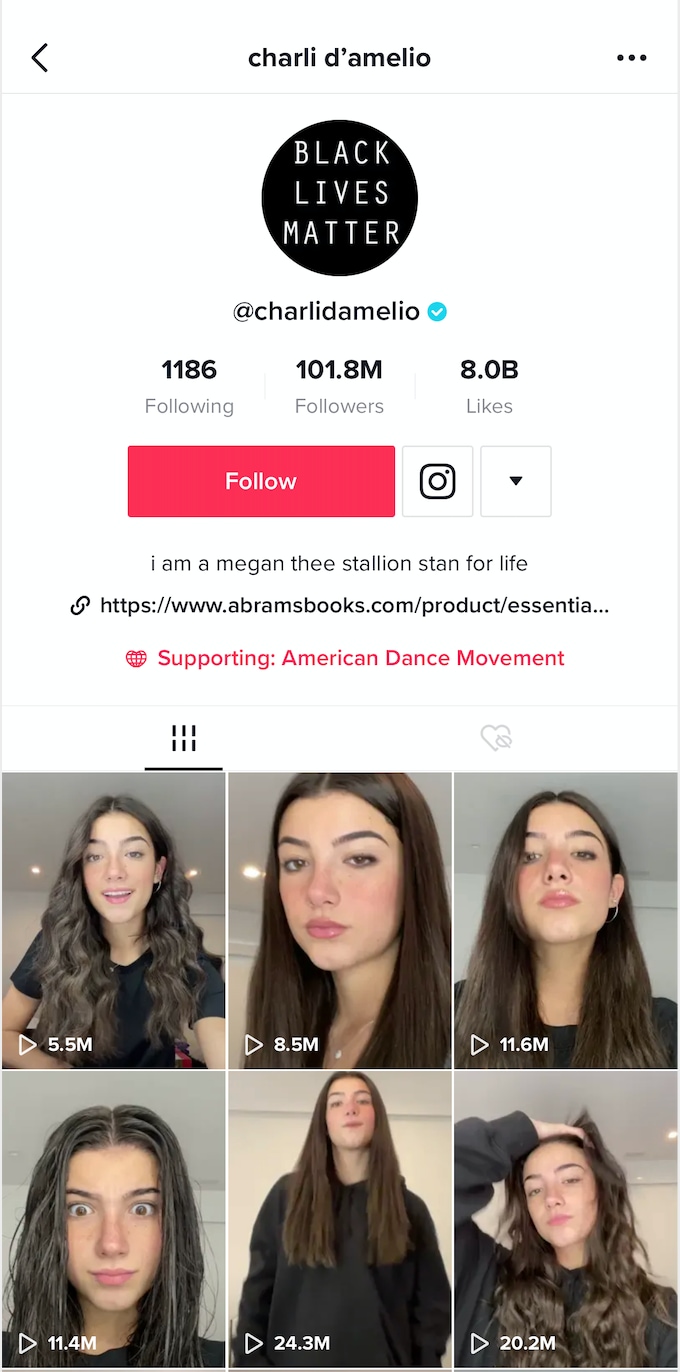
2.Charli D’Amelio
According to Forbes’ 2020 breakdown, 16-year-old Charli D’Amelio has earned $4 million. She does sponsored content on TikTok and has also managed to leverage those efforts into large endorsement deals with reputed brands.
3.Dixie D’Amelio
Dixie’s fame goes in sync with her sister Charli’s as they appear in many of each other’s videos. With earnings of $2.9 million, she is among the top three on the list. The D’Amelios signed joint deals with many companies and Dixie is striking out on her own with her music career.
4.Loren Gray
Thanks to her immense popularity on TikTok, Loren Gray made a casual $2.4 million. In addition to the usual sponsored content and endorsement deals, she has turned her online success into a full-blown music career.
5.Josh Richards
According to Forbes, Josh is worth $1.5 million – and it’s not just because of sponsorship deals with major brands. He earns income from his merch line and his own drink business too. Also, he has co-founded his own talent management company.
Conclusion
Doing what you are passionate about is one thing; making money from it is another. That is what the TikTok creator fund does for video content creators. So, if you trust your creativity, joining the creator fund program might be a lifetime opportunity for you. Maintain a robust content strategy and start earning money through your own content on TikTok!
Shanoon Cox
Shanoon Cox is a writer and a lover of all things video.
Follow @Shanoon Cox
Shanoon Cox
Mar 27, 2024• Proven solutions
TikTok – a platform entrenched in creativity – has become one of the most popular social media sites in the world in a short period. With more than 800 million monthly users worldwide, this short-form video app is now an unstoppable growth. Over the recent years, it has become the central hub for the young and ambitious creators of the world.
You know how to make TikTok videos, and you even post them regularly to build your brand – but did you know as a content creator you could also get paid for posting TikToks?
Building on its efforts to support content creators monetize their content, the popular video-sharing platform has launched TikTok Creator Fund to allow creators to earn money from their videos. The introduction of the fund program is in alliance with TikTok’s commitment to encouraging those who dream of making careers using their creative talent. The platform wants to push its users to take their ambition, creativity, and imagination to the next level.
Source: newsroom.tiktok.com
Interested in joining this program but have no idea of who can apply, where to apply, and how to join the TikTok creator fund? Fret not! You’ve come to the right place.
Check out below to find out the answer and be ready to kick-start your TikTok career!
- Part 1: What is TikTok Creator Fund?
- Part 2: Who is Eligible to Apply to the Creator Fund?
- Part 3: Is the TikTok Creator Fund Worth Joining?
- Part 4: How to Join the TikTok Creator Fund?
- Part 5: Top 5 Highest Paid TikTokers
Part 1: What is TikTok Creator Fund?
TikTok’s Creator Fund program is a $200 million cash fund, growing to $1billion over the next 3 years, to reward TikTokers for creating authentic, entertaining, and engaging video content. Launched in 2020, the TikTok creator fund is the opportunity of a lifetime for determined video creators to earn per view on their original content.
From artists to educators, singers to dancers, comedians to bodybuilders, the TikTok creator fund allows the brightest TikTokers to earn money through their creative content. It is a type of incentive for the creators and a way for TikTok to express their gratitude to the creator community for their creativity and ingenuity. The goal of the fund is to support the brightest and best TikTok creators who draw audiences to the platform.
Part 2: Who is Eligible to Apply to the Creator Fund?
TikTokers can apply for funding through the creator fund and generate income from their videos. Although there’s no limit on the number of creators who can join, there are certain TikTok creator fund requirements that creators have to meet to be able to access the program.
The initial criteria for applying to the TikTok creator fund are:
- Must be at least 18 years of age
- Should have at least 10, 000 followers
- Must be based in the US, UK, France, Spain, Germany, or Italy
- Should have at least 100,000 views in the last 30 days
- Only post “original content” in line with the TikTok Community Guidelines
Source: newsroom.tiktok.com
In other words, the creator fund is for content creators who have already proven their ability to make popular content. If you do not meet the above requirements, you won’t be able to access the creator fund or the income it provides. So, unless you have a moderate level of popularity on TikTok, you won’t be able to qualify to receive money from the creator fund. However, you can set your focus on the creator fund program and grow your account to match the TikTok Creator Fund requirements!
Part 3: Is the TikTok Creator Fund Worth Joining?
TikTok’s creator fund offers the opportunity to ambitious creators to make additional earning with their content. So, if you are a TikToker who enjoys making video content and want to and turn your creativity into a career, joining the creator fund program might be worth it.
Some of the many reasons why you should fill the TikTok creator fund application and join this program are:
- The creator fund program was created to help new TikTokers gain followers and keep them entertained while they grow their audience.
- It is an excellent opportunity and way to build an income and earn money through the videos that you post. Since the fund is open to all types of content, you can earn money doing what you enjoy.
Part 4: How to Join the TikTok Creator Fund?
Once you meet the eligibility requirements for the creator fund, you can easily apply to join and be accepted into this program. Joining the program will enable you to earn income through TikTok and make money by doing what you enjoy – creating videos.
Here’s a simple tutorial on how to join the TikTok creator fund:
Step-1: Log in to your profile
Step-2: Click on the three dots in the top right corner of the screen
Step-3: Click on Manage Account and scroll down to choose Switch to Pro Account.
Step-4: Then, choose Creator.
Step-5: Once you are done switching to Pro, go to your profile once again.
Step-6: Click on the three dots in your screen’s top-right corner.
Step-7: Scroll down and select Creator.
Step-8: You’ll see Insights and the TikTok Creator Fund. Ensure you choose the latter.
Next, you will be taken to the application process where you have to confirm you are at least 18-years-old. You may have to upload your ID for this. Also, you have to verify your location. Make sure you do not forget to read and accept the Terms and Conditions.
Alternatively, there is another way for you to apply. You can follow the below steps:
Step-1: Go to your inbox, click on the All Activity section on the top of your screen,
Step-2: Tap From TikTok where you will see notifications from TikTok.
Step-3: Find a notification saying: “Turn your creativity into opportunity! Apply to the TikTok Creator Fund.”
Step-4: The message will redirect to a new screen, thus letting you know your eligibility
Step-5: Fill the TikTok Creator Fund application form
Step-6: When you are taken to the Creator Fund Dashboard, it denotes your application is approved.
Source: saleslovesmarketing.co
Part 5: Top 5 Highest Paid TikTokers
Before we delve into the richest TikTokers, it is recommended to know what TikTok creator Fund pays to users. So far, TikTok hasn’t officially announced what or how much it pays its creators. The creator fund isn’t a grant or an ad revenue-sharing program. However, influencers who are enrolled in the Creator Fund have reported that TikTok pays them between 2 and 4 cents per 1000 views.
TikTok Creator Fund payout depends on a range of factors in relation to your profile and the content you create. These factors include views count and their authenticity, number of engagement, the region where the views come from, and total followers compared to likes. Performance on this social media platform is dynamic as it changes naturally. Besides, the daily funding amount can differ depending on the number of videos released on that day. So, the specific amount differs from one person to another.
Now that you have an idea of the creator fund payout, you might be wondering about top TikTok creators who have monetized their content. Here’s a list of TikTok’s 5 highest paid TikTokers based on Forbes’ list of the highest-earning stars in 2020:
1.Addison Rae Easterling
Louisiana-native Addison Rae is TikTok’s top-earning star who earns $5 million in just a year. With sponsored posts, collaborations with the Hype House and many business opportunities, Addison has reached household name status.
2.Charli D’Amelio
According to Forbes’ 2020 breakdown, 16-year-old Charli D’Amelio has earned $4 million. She does sponsored content on TikTok and has also managed to leverage those efforts into large endorsement deals with reputed brands.
3.Dixie D’Amelio
Dixie’s fame goes in sync with her sister Charli’s as they appear in many of each other’s videos. With earnings of $2.9 million, she is among the top three on the list. The D’Amelios signed joint deals with many companies and Dixie is striking out on her own with her music career.
4.Loren Gray
Thanks to her immense popularity on TikTok, Loren Gray made a casual $2.4 million. In addition to the usual sponsored content and endorsement deals, she has turned her online success into a full-blown music career.
5.Josh Richards
According to Forbes, Josh is worth $1.5 million – and it’s not just because of sponsorship deals with major brands. He earns income from his merch line and his own drink business too. Also, he has co-founded his own talent management company.
Conclusion
Doing what you are passionate about is one thing; making money from it is another. That is what the TikTok creator fund does for video content creators. So, if you trust your creativity, joining the creator fund program might be a lifetime opportunity for you. Maintain a robust content strategy and start earning money through your own content on TikTok!
Shanoon Cox
Shanoon Cox is a writer and a lover of all things video.
Follow @Shanoon Cox
Tailoring Audio Quality: Audacity’s Path to Noiselessness
The most frequent request you’ll get from video makers is to eliminate irritating noises like rumbling or humming from an original clip. Almost all of the time, capturing high-quality audio during filming is challenging since the conversation is often hard to hear or is made unclear due to surrounding noises, such as the dreadful air conditioners or fans.
To get rid of all these awful noises, this Audacity Noise Reduction feature will serve you a significant purpose in removing unwanted background noise for your future videos. Without further ado, let’s get started!
In this article
01 Things You Need to Prepare for Background Noise Reduction
02 How to Remove Background Noise in Audacity?
03 Why is Audacity Noise Reduction Not Working?
04 How to Prevent Background Noise in Audio Recording?
05 How to Remove Background Noise in Filmora?
Part 1: Things You Need to Prepare for Background Noise Reduction
Here are few things that you need to consider before you apply the noise reduction to your clips:
1. Noise Sample
A decent sample of the noise you wish to eliminate is perhaps the most crucial aspect of the Audacity remove noise procedure.
This will be used by Audacity to understand the noise and build a noise profile. The noise recording should last for a fair amount of time and be devoid of any other noises.
2. Avoid Copy Pasting Tiny Noise Section in Your Spoken Phrases
When you have a tiny part of noise between your stated words on your audio, please don’t copy/paste it to make a more significant piece of sound for Audacity to examine.
You would not be supplying Audacity with any more information that will help it generate a decent noise profile. The noise profile is what enables Audacity to tell the difference between speech and noise.
3. Minimum 2048 Data Samples Required
To build a noise profile, the Noise Reduction function requires a minimum of 2048 sample data. An audio file with a sampling frequency of 44.1kHz is roughly five hundredths of a second.
Note that this is the minor sound level that Audacity needs to generate a noise profile; however, should you supply a larger sample of the noise, Audacity can typically perform a great job of producing a suitable noise profile. As a result, attempt to capture a few seconds of background noises wherever possible.
4. Establish Recording Level and Record “Silence”
Setting your audio volume and capturing some “quiet” prior to speaking is the best way to achieve this. Instead, when you’ve finished talking, keep your camera/recorder going for a few moments.
Don’t move or create any sounds while capturing the background noises, and keep an ear open for any other noises. You only need to capture the ambient noise for a few moments; two to five seconds will suffice.
Part 2: How to Remove Background Noise in Audacity on Windows and Mac?
Whether you are using Windows or macOS, we will show you a step-by-step process to achieve your results using both software in this part of Audacity remove background music guide.
Remove background noise in Audacity on Windows
Step 1: On your recording, select a few moments of sound. Any segment of noise that incorporates other noises should be avoided.

Step 2: From the Effect menu, select Noise Reduction.

Step 3: Select the Get Noise Profile option whenever the Noise Reduction effect screen appears.

Note: Choose whether to implement the noise removal to the entire waveforms or only a portion of it.
Step 4: To access the Noise Reduction effects window, go to Effects > Noise Reduction. Raise the level of noise reduction progressively while previewing the result.

Step 5: Head over to the File section to Export and Save the result. Audacity does not save sound clips when you select Save Project; instead, you must choose Export. Select the file type you want to store and the place wherever you can save it. Select Save after giving the File Name.

Remove background noise in Audacity on Mac
Step 1: Create a room tone-containing audio file. When you don’t have a separate track for room tone, use a recording with a few moments of quiet in it. Click-and-drag to select a segment with a few minutes of silence using the Selection Tool.

Step 2: Select Noise Reduction from the Effects tab. Select the Get Noise Profile tab in the new tab under Step 1. The screen will shut, and Audacity will take noise profile samples of the indicated area.

Step 3: Click-and-drag to select the whole file, which requires noise reduction with the Selection Tool. To re-open the function, go to the Effect tab and pick Noise Reduction. Make modifications to the following parameters under Step 2:
- Reduce and Residue
- Frequency Smoothing (bands)
- Sensitivity
- Noise Reduction

Step 4: To listen to how the chosen file will look with the selected parameters, select Preview. Re-adjust until you have a sound noise reduction with no interference. When you’re finished, select Reduce and click OK.
Part 3: Why is Audacity Noise Reduction Not Working?
It’s possible that the Noise Reduction function isn’t letting you mop up your recording since your audio isn’t appropriate for it. The disturbance must be continuous, not random or fluctuating, to work for Audacity’s Noise Reduction function.
For example, the Noise Reduction function will not assist if your audio was made in a busy environment with unique noises such as background chatter, random traffic noises, or in an exhibition space or museum. The Noise Reduction feature in Audacity isn’t meant to cope with that kind of distortion. You’ll need to alter your recording approach if you’re capturing voice in either of those situations.
Under the following situations, the Audacity Noise Reduction function might underperform.
- Particular noise in the background, including traffic or people.
- When the harmonics of the sound and voice are comparable.
- There is sound variance where there is fluctuation in the noise.
- The volume of the voice is comparable to or lower than that of the background noise.
- When the noise is irregular or changeable rather than continuous.
- The loudness is deafening.
- The sound is a single click or pop.
Part 4: How to Prevent Background Noise in Audio Recording?
Although Audacity allows eliminating noise very simply, it is still an additional level that takes time to refine your podcast production. These pointers can help you avoid the necessity for noise reduction and cut down on the amount of time you spend processing.
1. Reduce the Computer Fan Noise
Whenever computers become too heated, they can produce a lot of noise. You may limit the amount of software that runs and position your mic away from the keyboard to help lessen this impact and avoid the fan from coming on.
However, even if you observe all of these guidelines, undesired recording sounds may still appear in your program. Fortunately, contemporary software makes this problem quite simple to resolve.
2. Reduce the Gain and Get Close to the Mic
Reduce the gain (sensitivity of the microphone) and go nearer to it. Talking straight into the microphone won’t distort your audio if you reduce the gain, and that would assist your microphone in concentrating on scooping up your voice’s tone.
Bonus Tip: Set your recorder’s (or DAW’s) sensitivity such that your speech peaks between -12 and -10db.
3. Utilize a Versatile Microphone
Condenser and dynamic microphones are the two most common types of podcast microphones. Condenser microphones are significantly more sensitive instruments meant to take up average atmospheric noise, whereas dynamic microphones have a narrower frequency range, picking up fewer ambient noises.
4. Optimize Your Recording Environment
The most significant and most crucial aspect of your podcasts’ sound quality is where you capture it. To optimize your personal podcasting space, we recommend choosing a peaceful, compact area away from HVAC systems, vehicles, external hard drives, background sound, motors, and other distractions. You may also increase the tone of your room by using natural sound absorbents such as curtains, rugs, carpets, and sofas.
Part 5: How to Remove Background Noise in Filmora?
Although there is a lot of software available to eliminate ambient noise, we highly suggest Wondershare Filmora Video Editor to edit audio and video in one place.
In addition to the standard audio editing capabilities, the recently redesigned Filmora currently includes enhanced waveforms, volume Keyframing , peak metering, and audio transitions, giving you a better audio editing interface.
For Win 7 or later (64-bit)
For macOS 10.12 or later
Filmora Video Editor will quickly remove ambient sound from both sound/video. You may also remove the sound from the video with this simple video editor, use the Audio Equalizer or Audio Mixer functions to modify the audio further, and then Export and save the audio in an Mp3 file. Here are the detailed steps:
Step 1: In the Wondershare Filmora Timeline menu, Import your footage. Trim the footage after previewing it and deleting the sections you don’t want to retain.

Step 2: To eliminate the ambient noise immediately, double-click on the video file, and go to the Audio panel to select the Remove Background Noise option. You will find that the background noise is removed automatically.

Step 3: After checking the results, select Export to download the noise-reduced clip to your desktop or upload it immediately to YouTube or Vimeo.

Conclusion
Well, there you have it. In this Audacity Remove Background Noise guide, we have reviewed every possible method you can adopt to get rid of the unnecessary background noise in the Audacity. And if the desired results are still not achieved, we highly recommend using the Wondershare Filmora editing software. Not only will it help you remove the unwanted ambient noise, but it will also allow you to customize your audio or video file further.
02 How to Remove Background Noise in Audacity?
03 Why is Audacity Noise Reduction Not Working?
04 How to Prevent Background Noise in Audio Recording?
05 How to Remove Background Noise in Filmora?
Part 1: Things You Need to Prepare for Background Noise Reduction
Here are few things that you need to consider before you apply the noise reduction to your clips:
1. Noise Sample
A decent sample of the noise you wish to eliminate is perhaps the most crucial aspect of the Audacity remove noise procedure.
This will be used by Audacity to understand the noise and build a noise profile. The noise recording should last for a fair amount of time and be devoid of any other noises.
2. Avoid Copy Pasting Tiny Noise Section in Your Spoken Phrases
When you have a tiny part of noise between your stated words on your audio, please don’t copy/paste it to make a more significant piece of sound for Audacity to examine.
You would not be supplying Audacity with any more information that will help it generate a decent noise profile. The noise profile is what enables Audacity to tell the difference between speech and noise.
3. Minimum 2048 Data Samples Required
To build a noise profile, the Noise Reduction function requires a minimum of 2048 sample data. An audio file with a sampling frequency of 44.1kHz is roughly five hundredths of a second.
Note that this is the minor sound level that Audacity needs to generate a noise profile; however, should you supply a larger sample of the noise, Audacity can typically perform a great job of producing a suitable noise profile. As a result, attempt to capture a few seconds of background noises wherever possible.
4. Establish Recording Level and Record “Silence”
Setting your audio volume and capturing some “quiet” prior to speaking is the best way to achieve this. Instead, when you’ve finished talking, keep your camera/recorder going for a few moments.
Don’t move or create any sounds while capturing the background noises, and keep an ear open for any other noises. You only need to capture the ambient noise for a few moments; two to five seconds will suffice.
Part 2: How to Remove Background Noise in Audacity on Windows and Mac?
Whether you are using Windows or macOS, we will show you a step-by-step process to achieve your results using both software in this part of Audacity remove background music guide.
Remove background noise in Audacity on Windows
Step 1: On your recording, select a few moments of sound. Any segment of noise that incorporates other noises should be avoided.
Step 2: From the Effect menu, select Noise Reduction.
Step 3: Select the Get Noise Profile option whenever the Noise Reduction effect screen appears.
Note: Choose whether to implement the noise removal to the entire waveforms or only a portion of it.
Step 4: To access the Noise Reduction effects window, go to Effects > Noise Reduction. Raise the level of noise reduction progressively while previewing the result.
Step 5: Head over to the File section to Export and Save the result. Audacity does not save sound clips when you select Save Project; instead, you must choose Export. Select the file type you want to store and the place wherever you can save it. Select Save after giving the File Name.
Remove background noise in Audacity on Mac
Step 1: Create a room tone-containing audio file. When you don’t have a separate track for room tone, use a recording with a few moments of quiet in it. Click-and-drag to select a segment with a few minutes of silence using the Selection Tool.
Step 2: Select Noise Reduction from the Effects tab. Select the Get Noise Profile tab in the new tab under Step 1. The screen will shut, and Audacity will take noise profile samples of the indicated area.
Step 3: Click-and-drag to select the whole file, which requires noise reduction with the Selection Tool. To re-open the function, go to the Effect tab and pick Noise Reduction. Make modifications to the following parameters under Step 2:
- Reduce and Residue
- Frequency Smoothing (bands)
- Sensitivity
- Noise Reduction
Step 4: To listen to how the chosen file will look with the selected parameters, select Preview. Re-adjust until you have a sound noise reduction with no interference. When you’re finished, select Reduce and click OK.
Part 3: Why is Audacity Noise Reduction Not Working?
It’s possible that the Noise Reduction function isn’t letting you mop up your recording since your audio isn’t appropriate for it. The disturbance must be continuous, not random or fluctuating, to work for Audacity’s Noise Reduction function.
For example, the Noise Reduction function will not assist if your audio was made in a busy environment with unique noises such as background chatter, random traffic noises, or in an exhibition space or museum. The Noise Reduction feature in Audacity isn’t meant to cope with that kind of distortion. You’ll need to alter your recording approach if you’re capturing voice in either of those situations.
Under the following situations, the Audacity Noise Reduction function might underperform.
- Particular noise in the background, including traffic or people.
- When the harmonics of the sound and voice are comparable.
- There is sound variance where there is fluctuation in the noise.
- The volume of the voice is comparable to or lower than that of the background noise.
- When the noise is irregular or changeable rather than continuous.
- The loudness is deafening.
- The sound is a single click or pop.
Part 4: How to Prevent Background Noise in Audio Recording?
Although Audacity allows eliminating noise very simply, it is still an additional level that takes time to refine your podcast production. These pointers can help you avoid the necessity for noise reduction and cut down on the amount of time you spend processing.
1. Reduce the Computer Fan Noise
Whenever computers become too heated, they can produce a lot of noise. You may limit the amount of software that runs and position your mic away from the keyboard to help lessen this impact and avoid the fan from coming on.
However, even if you observe all of these guidelines, undesired recording sounds may still appear in your program. Fortunately, contemporary software makes this problem quite simple to resolve.
2. Reduce the Gain and Get Close to the Mic
Reduce the gain (sensitivity of the microphone) and go nearer to it. Talking straight into the microphone won’t distort your audio if you reduce the gain, and that would assist your microphone in concentrating on scooping up your voice’s tone.
Bonus Tip: Set your recorder’s (or DAW’s) sensitivity such that your speech peaks between -12 and -10db.
3. Utilize a Versatile Microphone
Condenser and dynamic microphones are the two most common types of podcast microphones. Condenser microphones are significantly more sensitive instruments meant to take up average atmospheric noise, whereas dynamic microphones have a narrower frequency range, picking up fewer ambient noises.
4. Optimize Your Recording Environment
The most significant and most crucial aspect of your podcasts’ sound quality is where you capture it. To optimize your personal podcasting space, we recommend choosing a peaceful, compact area away from HVAC systems, vehicles, external hard drives, background sound, motors, and other distractions. You may also increase the tone of your room by using natural sound absorbents such as curtains, rugs, carpets, and sofas.
Part 5: How to Remove Background Noise in Filmora?
Although there is a lot of software available to eliminate ambient noise, we highly suggest Wondershare Filmora Video Editor to edit audio and video in one place.
In addition to the standard audio editing capabilities, the recently redesigned Filmora currently includes enhanced waveforms, volume Keyframing , peak metering, and audio transitions, giving you a better audio editing interface.
For Win 7 or later (64-bit)
For macOS 10.12 or later
Filmora Video Editor will quickly remove ambient sound from both sound/video. You may also remove the sound from the video with this simple video editor, use the Audio Equalizer or Audio Mixer functions to modify the audio further, and then Export and save the audio in an Mp3 file. Here are the detailed steps:
Step 1: In the Wondershare Filmora Timeline menu, Import your footage. Trim the footage after previewing it and deleting the sections you don’t want to retain.
Step 2: To eliminate the ambient noise immediately, double-click on the video file, and go to the Audio panel to select the Remove Background Noise option. You will find that the background noise is removed automatically.
Step 3: After checking the results, select Export to download the noise-reduced clip to your desktop or upload it immediately to YouTube or Vimeo.
Conclusion
Well, there you have it. In this Audacity Remove Background Noise guide, we have reviewed every possible method you can adopt to get rid of the unnecessary background noise in the Audacity. And if the desired results are still not achieved, we highly recommend using the Wondershare Filmora editing software. Not only will it help you remove the unwanted ambient noise, but it will also allow you to customize your audio or video file further.
Also read:
- [Updated] Coolest TikTok Viral Rap Songs of the Year for 2024
- [Updated] TikTok Creator Fund How to Join It and Make Money for 2024
- [Updated] 2024 Approved Cutting-Edge Anime Ideas Dominating Social Media Screens
- [Updated] In 2024, Mirthful Mayhem A Top 20 List of Hilarious TikTok Jokes & Riddles
- [Updated] Mastering TikTok Videos Mac Editing Techniques for 2024
- Effortless Excellence in TikTok React Videos Through Filmora for 2024
- In 2024, Boosting Video Playback Rate on TikTok
- [New] How to Get More Views and Likes on Tik Tok for 2024
- [Updated] In 2024, The Ultimate Explanimation What PFP Means on TikTok?
- Innovative Profile Flair Top TikTok PFP Concepts for 2024
- [Updated] Become a TikTok Pro in No Time Essential Recording and Post-Processing Techniques
- [Updated] Peculiar Playground A Curated List of TikTok Games for 2024
- Delightful Dishes on TikTok for 2024
- [Updated] Skyrocketing Views on TikTok with Unique and Impactful Names
- [Updated] Unlock Your Drive with Top TikTokers for 2024
- In 2024, Eliminate Watermarks IPhone TikTok Videos Download Guide
- [New] 2024 Approved Trending Treats on TikTok Top 10 Culinary Craze
- Essential Tips for Navigating Discord Spoilers
- Crafting Engaging TikTok Content on Computers
- [Updated] How To Achieve Impactful Big Head Aesthetics in Your TikToks (3 Ways)
- [New] 2024 Approved The Best 7 TikTok Instruments to Increase Your View Count
- [New] In 2024, Flavorful TikTok Kitchen Sensations
- 2024 Approved The Ultimate Guide 5 Preferred TikTok GIF Creation Tools
- Boosting Connections on Snapchat Master the Art of Sharing GIFs
- [Updated] In 2024, Absurd Adventures A Compilation of Extraordinary TikTok Games
- [New] Step-by-Step Guide to Adding Descriptive Text in TikTok Videos
- Triller Vs. TikTok - Similarities & Differences - a Complete Guide for 2024
- [Updated] 2024 Approved Harnessing TikTok Voice Control with Apple's Siri
- In 2024, Recommended Best Applications for Mirroring Your Poco F5 Pro 5G Screen | Dr.fone
- Updated In 2024, Filmora Coupon Hunters Guide 7 Essential Tips
- Fix Unfortunately Settings Has Stopped on Xiaomi 13T Quickly | Dr.fone
- [New] 2024 Approved Royale Champions The Defining Battle Royale Titles
- How to Bypass Google FRP Lock on Samsung Devices
- In 2024, A Guide Google Pixel 8 Pro Wireless and Wired Screen Mirroring | Dr.fone
- In 2024, Top FCPX Learning Resources Top Channels and Sites
- How to Come up With the Best Pokemon Team On Lava Storm 5G? | Dr.fone
- In 2024, Cinema of Sounds Discover the Leading 5 Music Video Animations
- How to Use Google Assistant on Your Lock Screen Of Realme 11 Pro Phone
- In 2024, Elevate Your WhatsApp Status Top Creative Apps Revealed
- [Updated] In 2024, The Artist' Writes An iPad Guide to Time-Lapse Photography
- [Updated] In 2024, Instagram Success Starts with These Strategies
- [New] Sundae Surveillance Insightful Review of Frozen Film Software for 2024
- Possible solutions to restore deleted contacts from Nokia C12.
- How To Change Your SIM PIN Code on Your Nokia Phone
- Can I use iTools gpx file to catch the rare Pokemon On Apple iPhone 14 Plus | Dr.fone
- How to Unlock Motorola G24 Power Pattern Lock if Forgotten? 6 Ways
- New Mastering the Art of Selecting Purpose-Driven Instrumental Music in Videos
- [New] Explore 5 Pro Game Record Methods in Windows 11
- New 2024 Approved Best of the Best 10 WebM to MP4 Converters for Easy Conversion
- How to Exit Android Factory Mode On Samsung Galaxy S24 Ultra? | Dr.fone
- The Best Ways to Record and Preserve Internet Radio
- Title: "[Updated] 2024 Approved Mastering TikTok's Financial Landscape - A Creator's Manual"
- Author: Kenneth
- Created at : 2024-05-23 01:51:43
- Updated at : 2024-05-24 01:51:43
- Link: https://tiktok-video-files.techidaily.com/updated-2024-approved-mastering-tiktoks-financial-landscape-a-creators-manual/
- License: This work is licensed under CC BY-NC-SA 4.0.
