
!["[Updated] 2024 Approved Audacity Masterclass Techniques for Flawless Sound De-Noising"](https://www.lifewire.com/thmb/B_1diziBQUEroVybSTOOXTd9cxc=/400x300/filters:no_upscale():max_bytes(150000):strip_icc()/GettyImages-643997505-3dcb1b226e104d1da13825b0d9117173.jpg)
"[Updated] 2024 Approved Audacity Masterclass Techniques for Flawless Sound De-Noising"
Audacity Masterclass: Techniques for Flawless Sound De-Noising
The most frequent request you’ll get from video makers is to eliminate irritating noises like rumbling or humming from an original clip. Almost all of the time, capturing high-quality audio during filming is challenging since the conversation is often hard to hear or is made unclear due to surrounding noises, such as the dreadful air conditioners or fans.
To get rid of all these awful noises, this Audacity Noise Reduction feature will serve you a significant purpose in removing unwanted background noise for your future videos. Without further ado, let’s get started!
In this article
01 Things You Need to Prepare for Background Noise Reduction
02 How to Remove Background Noise in Audacity?
03 Why is Audacity Noise Reduction Not Working?
04 How to Prevent Background Noise in Audio Recording?
05 How to Remove Background Noise in Filmora?
Part 1: Things You Need to Prepare for Background Noise Reduction
Here are few things that you need to consider before you apply the noise reduction to your clips:
1. Noise Sample
A decent sample of the noise you wish to eliminate is perhaps the most crucial aspect of the Audacity remove noise procedure.
This will be used by Audacity to understand the noise and build a noise profile. The noise recording should last for a fair amount of time and be devoid of any other noises.
2. Avoid Copy Pasting Tiny Noise Section in Your Spoken Phrases
When you have a tiny part of noise between your stated words on your audio, please don’t copy/paste it to make a more significant piece of sound for Audacity to examine.
You would not be supplying Audacity with any more information that will help it generate a decent noise profile. The noise profile is what enables Audacity to tell the difference between speech and noise.
3. Minimum 2048 Data Samples Required
To build a noise profile, the Noise Reduction function requires a minimum of 2048 sample data. An audio file with a sampling frequency of 44.1kHz is roughly five hundredths of a second.
Note that this is the minor sound level that Audacity needs to generate a noise profile; however, should you supply a larger sample of the noise, Audacity can typically perform a great job of producing a suitable noise profile. As a result, attempt to capture a few seconds of background noises wherever possible.
4. Establish Recording Level and Record “Silence”
Setting your audio volume and capturing some “quiet” prior to speaking is the best way to achieve this. Instead, when you’ve finished talking, keep your camera/recorder going for a few moments.
Don’t move or create any sounds while capturing the background noises, and keep an ear open for any other noises. You only need to capture the ambient noise for a few moments; two to five seconds will suffice.
Part 2: How to Remove Background Noise in Audacity on Windows and Mac?
Whether you are using Windows or macOS, we will show you a step-by-step process to achieve your results using both software in this part of Audacity remove background music guide.
Remove background noise in Audacity on Windows
Step 1: On your recording, select a few moments of sound. Any segment of noise that incorporates other noises should be avoided.

Step 2: From the Effect menu, select Noise Reduction.

Step 3: Select the Get Noise Profile option whenever the Noise Reduction effect screen appears.

Note: Choose whether to implement the noise removal to the entire waveforms or only a portion of it.
Step 4: To access the Noise Reduction effects window, go to Effects > Noise Reduction. Raise the level of noise reduction progressively while previewing the result.

Step 5: Head over to the File section to Export and Save the result. Audacity does not save sound clips when you select Save Project; instead, you must choose Export. Select the file type you want to store and the place wherever you can save it. Select Save after giving the File Name.

Remove background noise in Audacity on Mac
Step 1: Create a room tone-containing audio file. When you don’t have a separate track for room tone, use a recording with a few moments of quiet in it. Click-and-drag to select a segment with a few minutes of silence using the Selection Tool.

Step 2: Select Noise Reduction from the Effects tab. Select the Get Noise Profile tab in the new tab under Step 1. The screen will shut, and Audacity will take noise profile samples of the indicated area.

Step 3: Click-and-drag to select the whole file, which requires noise reduction with the Selection Tool. To re-open the function, go to the Effect tab and pick Noise Reduction. Make modifications to the following parameters under Step 2:
- Reduce and Residue
- Frequency Smoothing (bands)
- Sensitivity
- Noise Reduction

Step 4: To listen to how the chosen file will look with the selected parameters, select Preview. Re-adjust until you have a sound noise reduction with no interference. When you’re finished, select Reduce and click OK.
Part 3: Why is Audacity Noise Reduction Not Working?
It’s possible that the Noise Reduction function isn’t letting you mop up your recording since your audio isn’t appropriate for it. The disturbance must be continuous, not random or fluctuating, to work for Audacity’s Noise Reduction function.
For example, the Noise Reduction function will not assist if your audio was made in a busy environment with unique noises such as background chatter, random traffic noises, or in an exhibition space or museum. The Noise Reduction feature in Audacity isn’t meant to cope with that kind of distortion. You’ll need to alter your recording approach if you’re capturing voice in either of those situations.
Under the following situations, the Audacity Noise Reduction function might underperform.
- Particular noise in the background, including traffic or people.
- When the harmonics of the sound and voice are comparable.
- There is sound variance where there is fluctuation in the noise.
- The volume of the voice is comparable to or lower than that of the background noise.
- When the noise is irregular or changeable rather than continuous.
- The loudness is deafening.
- The sound is a single click or pop.
Part 4: How to Prevent Background Noise in Audio Recording?
Although Audacity allows eliminating noise very simply, it is still an additional level that takes time to refine your podcast production. These pointers can help you avoid the necessity for noise reduction and cut down on the amount of time you spend processing.
1. Reduce the Computer Fan Noise
Whenever computers become too heated, they can produce a lot of noise. You may limit the amount of software that runs and position your mic away from the keyboard to help lessen this impact and avoid the fan from coming on.
However, even if you observe all of these guidelines, undesired recording sounds may still appear in your program. Fortunately, contemporary software makes this problem quite simple to resolve.
2. Reduce the Gain and Get Close to the Mic
Reduce the gain (sensitivity of the microphone) and go nearer to it. Talking straight into the microphone won’t distort your audio if you reduce the gain, and that would assist your microphone in concentrating on scooping up your voice’s tone.
Bonus Tip: Set your recorder’s (or DAW’s) sensitivity such that your speech peaks between -12 and -10db.
3. Utilize a Versatile Microphone
Condenser and dynamic microphones are the two most common types of podcast microphones. Condenser microphones are significantly more sensitive instruments meant to take up average atmospheric noise, whereas dynamic microphones have a narrower frequency range, picking up fewer ambient noises.
4. Optimize Your Recording Environment
The most significant and most crucial aspect of your podcasts’ sound quality is where you capture it. To optimize your personal podcasting space, we recommend choosing a peaceful, compact area away from HVAC systems, vehicles, external hard drives, background sound, motors, and other distractions. You may also increase the tone of your room by using natural sound absorbents such as curtains, rugs, carpets, and sofas.
Part 5: How to Remove Background Noise in Filmora?
Although there is a lot of software available to eliminate ambient noise, we highly suggest Wondershare Filmora Video Editor to edit audio and video in one place.
In addition to the standard audio editing capabilities, the recently redesigned Filmora currently includes enhanced waveforms, volume Keyframing , peak metering, and audio transitions, giving you a better audio editing interface.
For Win 7 or later (64-bit)
For macOS 10.12 or later
Filmora Video Editor will quickly remove ambient sound from both sound/video. You may also remove the sound from the video with this simple video editor, use the Audio Equalizer or Audio Mixer functions to modify the audio further, and then Export and save the audio in an Mp3 file. Here are the detailed steps:
Step 1: In the Wondershare Filmora Timeline menu, Import your footage. Trim the footage after previewing it and deleting the sections you don’t want to retain.

Step 2: To eliminate the ambient noise immediately, double-click on the video file, and go to the Audio panel to select the Remove Background Noise option. You will find that the background noise is removed automatically.

Step 3: After checking the results, select Export to download the noise-reduced clip to your desktop or upload it immediately to YouTube or Vimeo.

Conclusion
Well, there you have it. In this Audacity Remove Background Noise guide, we have reviewed every possible method you can adopt to get rid of the unnecessary background noise in the Audacity. And if the desired results are still not achieved, we highly recommend using the Wondershare Filmora editing software. Not only will it help you remove the unwanted ambient noise, but it will also allow you to customize your audio or video file further.
02 How to Remove Background Noise in Audacity?
03 Why is Audacity Noise Reduction Not Working?
04 How to Prevent Background Noise in Audio Recording?
05 How to Remove Background Noise in Filmora?
Part 1: Things You Need to Prepare for Background Noise Reduction
Here are few things that you need to consider before you apply the noise reduction to your clips:
1. Noise Sample
A decent sample of the noise you wish to eliminate is perhaps the most crucial aspect of the Audacity remove noise procedure.
This will be used by Audacity to understand the noise and build a noise profile. The noise recording should last for a fair amount of time and be devoid of any other noises.
2. Avoid Copy Pasting Tiny Noise Section in Your Spoken Phrases
When you have a tiny part of noise between your stated words on your audio, please don’t copy/paste it to make a more significant piece of sound for Audacity to examine.
You would not be supplying Audacity with any more information that will help it generate a decent noise profile. The noise profile is what enables Audacity to tell the difference between speech and noise.
3. Minimum 2048 Data Samples Required
To build a noise profile, the Noise Reduction function requires a minimum of 2048 sample data. An audio file with a sampling frequency of 44.1kHz is roughly five hundredths of a second.
Note that this is the minor sound level that Audacity needs to generate a noise profile; however, should you supply a larger sample of the noise, Audacity can typically perform a great job of producing a suitable noise profile. As a result, attempt to capture a few seconds of background noises wherever possible.
4. Establish Recording Level and Record “Silence”
Setting your audio volume and capturing some “quiet” prior to speaking is the best way to achieve this. Instead, when you’ve finished talking, keep your camera/recorder going for a few moments.
Don’t move or create any sounds while capturing the background noises, and keep an ear open for any other noises. You only need to capture the ambient noise for a few moments; two to five seconds will suffice.
Part 2: How to Remove Background Noise in Audacity on Windows and Mac?
Whether you are using Windows or macOS, we will show you a step-by-step process to achieve your results using both software in this part of Audacity remove background music guide.
Remove background noise in Audacity on Windows
Step 1: On your recording, select a few moments of sound. Any segment of noise that incorporates other noises should be avoided.
Step 2: From the Effect menu, select Noise Reduction.
Step 3: Select the Get Noise Profile option whenever the Noise Reduction effect screen appears.
Note: Choose whether to implement the noise removal to the entire waveforms or only a portion of it.
Step 4: To access the Noise Reduction effects window, go to Effects > Noise Reduction. Raise the level of noise reduction progressively while previewing the result.
Step 5: Head over to the File section to Export and Save the result. Audacity does not save sound clips when you select Save Project; instead, you must choose Export. Select the file type you want to store and the place wherever you can save it. Select Save after giving the File Name.
Remove background noise in Audacity on Mac
Step 1: Create a room tone-containing audio file. When you don’t have a separate track for room tone, use a recording with a few moments of quiet in it. Click-and-drag to select a segment with a few minutes of silence using the Selection Tool.
Step 2: Select Noise Reduction from the Effects tab. Select the Get Noise Profile tab in the new tab under Step 1. The screen will shut, and Audacity will take noise profile samples of the indicated area.
Step 3: Click-and-drag to select the whole file, which requires noise reduction with the Selection Tool. To re-open the function, go to the Effect tab and pick Noise Reduction. Make modifications to the following parameters under Step 2:
- Reduce and Residue
- Frequency Smoothing (bands)
- Sensitivity
- Noise Reduction
Step 4: To listen to how the chosen file will look with the selected parameters, select Preview. Re-adjust until you have a sound noise reduction with no interference. When you’re finished, select Reduce and click OK.
Part 3: Why is Audacity Noise Reduction Not Working?
It’s possible that the Noise Reduction function isn’t letting you mop up your recording since your audio isn’t appropriate for it. The disturbance must be continuous, not random or fluctuating, to work for Audacity’s Noise Reduction function.
For example, the Noise Reduction function will not assist if your audio was made in a busy environment with unique noises such as background chatter, random traffic noises, or in an exhibition space or museum. The Noise Reduction feature in Audacity isn’t meant to cope with that kind of distortion. You’ll need to alter your recording approach if you’re capturing voice in either of those situations.
Under the following situations, the Audacity Noise Reduction function might underperform.
- Particular noise in the background, including traffic or people.
- When the harmonics of the sound and voice are comparable.
- There is sound variance where there is fluctuation in the noise.
- The volume of the voice is comparable to or lower than that of the background noise.
- When the noise is irregular or changeable rather than continuous.
- The loudness is deafening.
- The sound is a single click or pop.
Part 4: How to Prevent Background Noise in Audio Recording?
Although Audacity allows eliminating noise very simply, it is still an additional level that takes time to refine your podcast production. These pointers can help you avoid the necessity for noise reduction and cut down on the amount of time you spend processing.
1. Reduce the Computer Fan Noise
Whenever computers become too heated, they can produce a lot of noise. You may limit the amount of software that runs and position your mic away from the keyboard to help lessen this impact and avoid the fan from coming on.
However, even if you observe all of these guidelines, undesired recording sounds may still appear in your program. Fortunately, contemporary software makes this problem quite simple to resolve.
2. Reduce the Gain and Get Close to the Mic
Reduce the gain (sensitivity of the microphone) and go nearer to it. Talking straight into the microphone won’t distort your audio if you reduce the gain, and that would assist your microphone in concentrating on scooping up your voice’s tone.
Bonus Tip: Set your recorder’s (or DAW’s) sensitivity such that your speech peaks between -12 and -10db.
3. Utilize a Versatile Microphone
Condenser and dynamic microphones are the two most common types of podcast microphones. Condenser microphones are significantly more sensitive instruments meant to take up average atmospheric noise, whereas dynamic microphones have a narrower frequency range, picking up fewer ambient noises.
4. Optimize Your Recording Environment
The most significant and most crucial aspect of your podcasts’ sound quality is where you capture it. To optimize your personal podcasting space, we recommend choosing a peaceful, compact area away from HVAC systems, vehicles, external hard drives, background sound, motors, and other distractions. You may also increase the tone of your room by using natural sound absorbents such as curtains, rugs, carpets, and sofas.
Part 5: How to Remove Background Noise in Filmora?
Although there is a lot of software available to eliminate ambient noise, we highly suggest Wondershare Filmora Video Editor to edit audio and video in one place.
In addition to the standard audio editing capabilities, the recently redesigned Filmora currently includes enhanced waveforms, volume Keyframing , peak metering, and audio transitions, giving you a better audio editing interface.
For Win 7 or later (64-bit)
For macOS 10.12 or later
Filmora Video Editor will quickly remove ambient sound from both sound/video. You may also remove the sound from the video with this simple video editor, use the Audio Equalizer or Audio Mixer functions to modify the audio further, and then Export and save the audio in an Mp3 file. Here are the detailed steps:
Step 1: In the Wondershare Filmora Timeline menu, Import your footage. Trim the footage after previewing it and deleting the sections you don’t want to retain.
Step 2: To eliminate the ambient noise immediately, double-click on the video file, and go to the Audio panel to select the Remove Background Noise option. You will find that the background noise is removed automatically.
Step 3: After checking the results, select Export to download the noise-reduced clip to your desktop or upload it immediately to YouTube or Vimeo.
Conclusion
Well, there you have it. In this Audacity Remove Background Noise guide, we have reviewed every possible method you can adopt to get rid of the unnecessary background noise in the Audacity. And if the desired results are still not achieved, we highly recommend using the Wondershare Filmora editing software. Not only will it help you remove the unwanted ambient noise, but it will also allow you to customize your audio or video file further.
Taste the Viral Trend: 15 Top TikTok Recipe Videos That Are Capturing Hearts Worldwide
Versatile Video Editor - Wondershare Filmora
An easy yet powerful editor
Numerous effects to choose from
Detailed tutorials provided by official channel
TikTok is a platform with a pool of content. But apart from the dance videos, you will also find some cooking and food videos on this platform. When opening the app, you are sure to find some TikTok recipes waiting to greet you on the ‘For You Page’. There is a whole list of creative and easy TikTok food recipes to try out that deserves a try. This is what you are going to find in the next section.
In this article
01 Can You Get Recipes from TikTok?
02 What Food is Trending on TikTok?
03 15 Viral TikTok Recipes in 2022
04 How to Create a Stunning Cooking Video?
Part 1: Can You Get Recipes from TikTok?
Well, the best part about TikTok is you don’t know what you are going to get. Many think it is just about dancing. But there is more to it than meets the eye. TikTok users will also come across some viral TikTok recipes. However, these viral recipes aren’t perfectly curated videos that you will come across on other social media platforms, though. These are all tried and true recipes created by regular people who want to get delectable food on the table. At times, the recipes might seem questionable but they turn out amazing.
Part 2: What Food is Trending on TikTok?
When it comes to food trends, people just turn to TikTok. As soon as any easy TikTok recipes go viral, it tends to get the internet excited. So, here are some of the foods that are trending on TikTok.
- Baked Feta
- Baked Oats
- Nature’s Cereal
- Pasta Chips
- Pesto Eggs
- Smashed Vegetables
- Corn Ribs
- At-Home Quesadilla
- Vegetable Burger Buns
- Salmon Rice Bowl
Part 3: 15 Viral TikTok Recipes in 2022
The most viral TikTok recipes touch every corner of the food world. You will find TikTok dinner recipes, as well as drink recipes. Here is a list of 15 top viral TikTok recipes that you can choose from.
1. Creamy Ramen
Creamy Ramen has changed the game for lovers of instant noodles. With this recipe, you can just upgrade a simple packet of ramen. What’s more, it is one of the easiest TikTok ramen noodle recipes to prepare. There are different variations of the recipe floating on TikTok. However, a maximum video suggests the use of sesame oil, Japanese mayo, spicy ramen, and an egg.
2. Baked Oatmeal with Peanut Butter and Chocolate
Many people don’t like having oatmeal as it is tasteless and appears like a lumpy goop. But the baked oatmeal recipes have taken the internet by storm. This tastes as good as it looks. One of the recipes is baked oatmeal with peanut butter. It went viral as a dessert or snack option. When prepared it looks like a chocolate chip cake. Blend oats with peanut butter, maple syrup, and banana with vanilla, egg, and choco chip.
3. Pickled Garlic
Garlic has a bad reputation due to the unpleasant effects it leaves on your breath. However, it is a small price to pay for this taste. In a container with a lid, place some drained and pickled garlic, a little thyme, a generous amount of sriracha, and chili powder. Shake it up and you have your delicious snack.
4. Pasta Chips
Pasta Chips is one of the viral pasta recipes. The air fryer advocates have been really excited about this. In this, you are baking cooked pasta until they become crispy chips. You can make any shape of pasta you want.

5. Oreo Cake in a Mug
Who doesn’t like a dessert that you can prepare in just two minutes! All you need is 4-5 Oreo biscuits and 2 tablespoons of milk. Mash the biscuits and add the milk to prepare a batter in the microwave for one minute. Take it out and enjoy with a dollop of ice cream.
6. Whipped Coffee
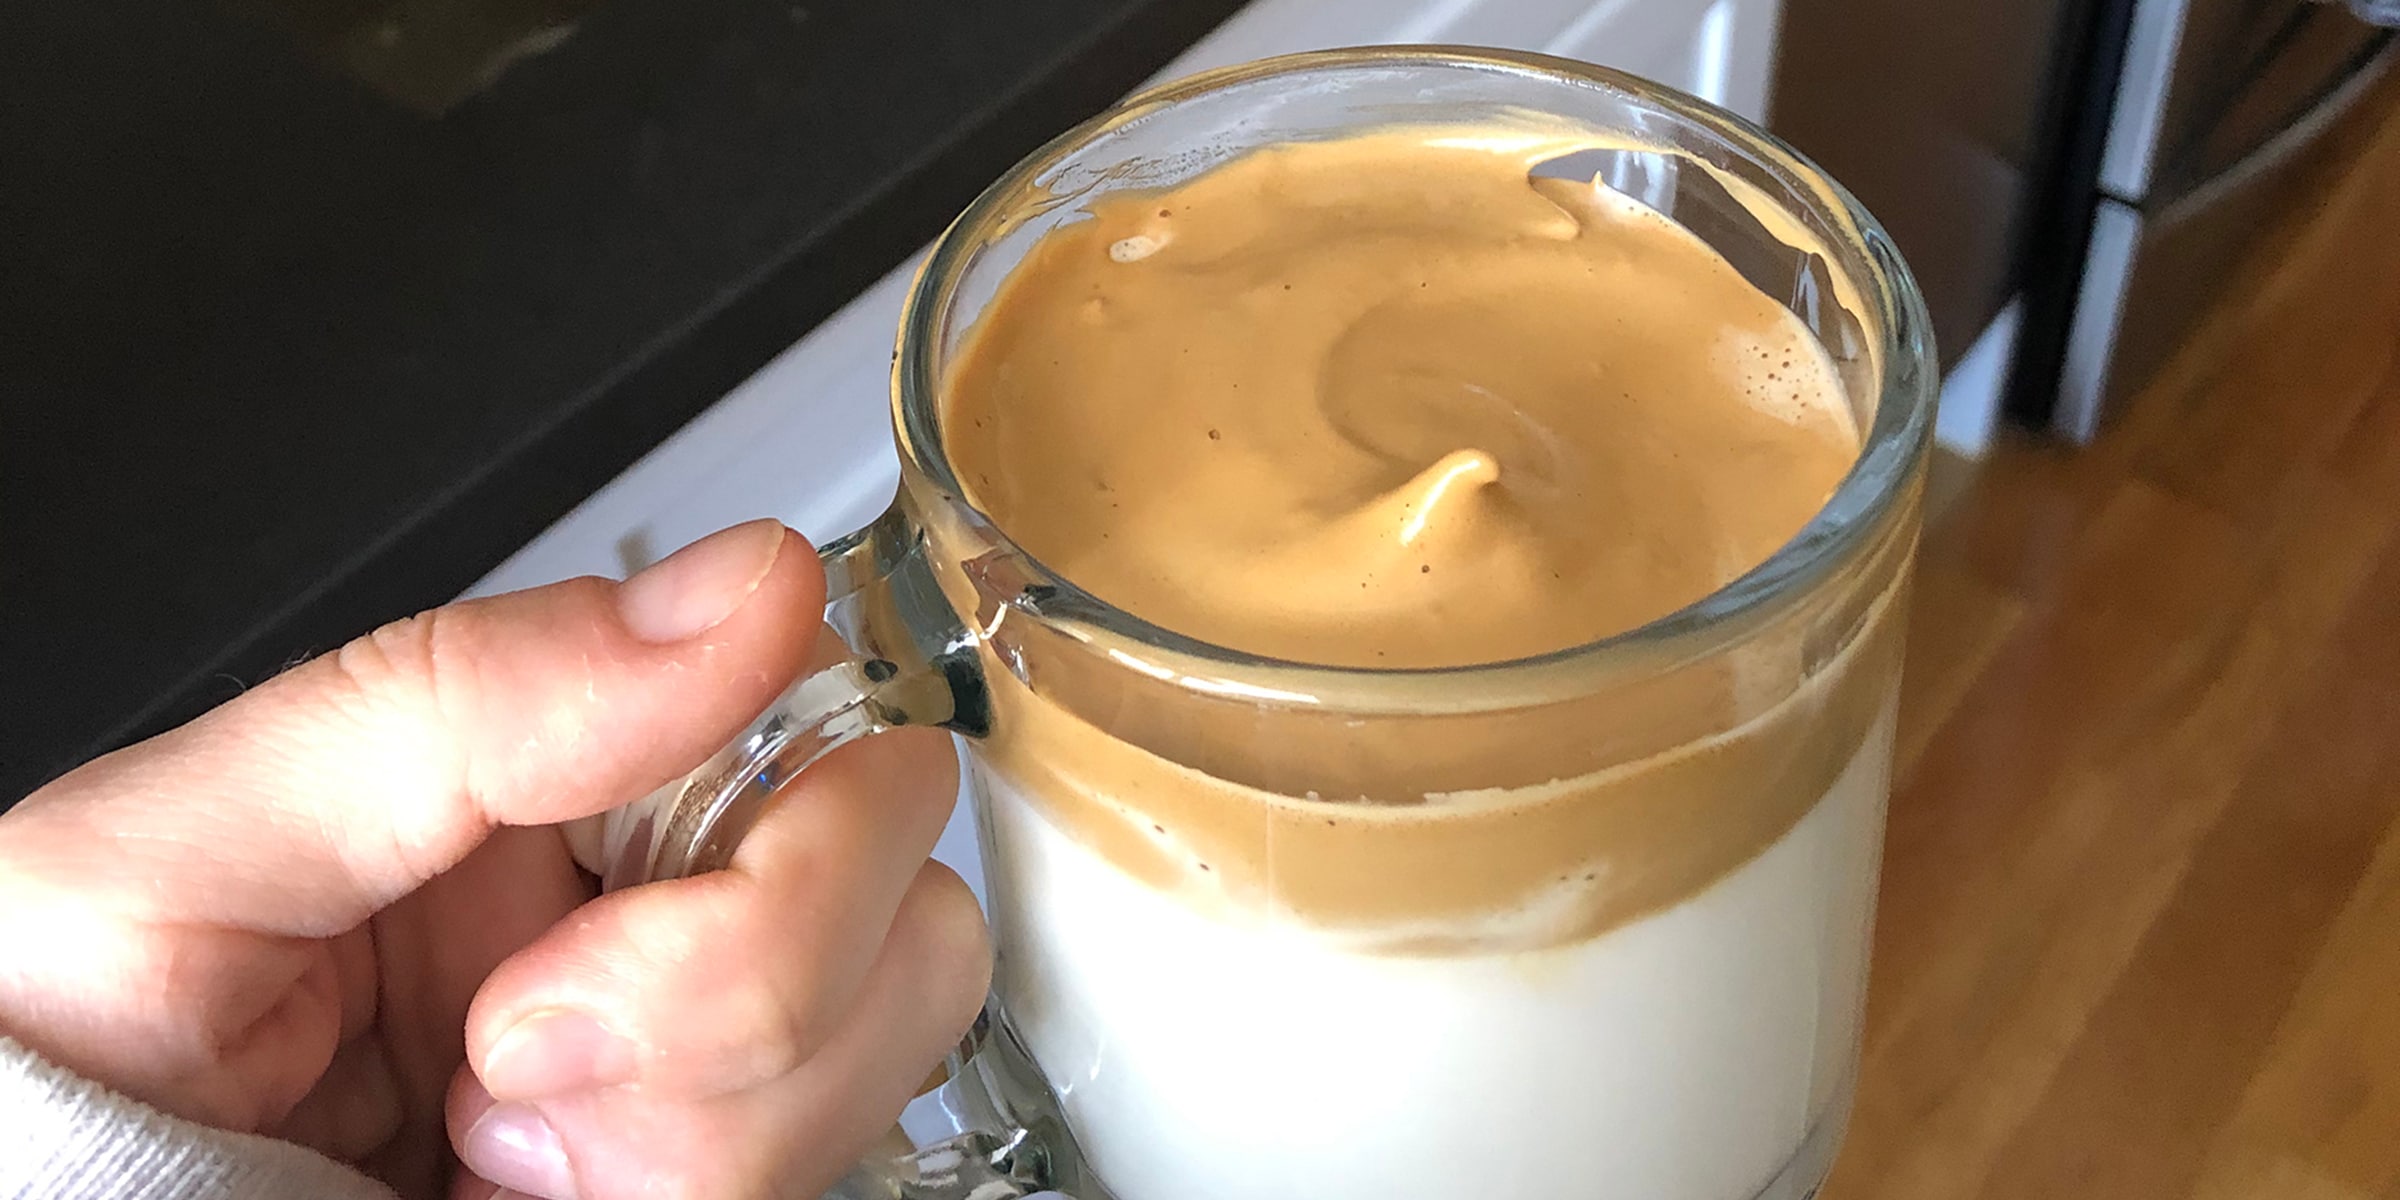
While everybody was getting frustrated at home during the lockdown, they turned to TikTok drink recipes to get rid of their boredom. This is when Whipped Coffee or Dalgona Coffee became popular. It became an overnight sensation. You need a few simple ingredients: instant coffee powder, white sugar, hot water, and milk. Combine the first three ingredients until it’s fluffy and light and pour them on a cup of coffee.
7. Baked Feta
With this trend, you can prepare some delicious pasta and it also works as a great dip. The baked dishes use just six ingredients, excluding the basics that everybody has in the kitchen. You need cherry tomatoes, garlic, feta cheese, pasta, basil, and chilis. You can prepare the pasta in just 25 minutes. The best thing about the recipe is it can be prepared in one pan. Hence, there is little to clean up.

8. Chili Oil Eggs
If you love eggs, this is one recipe that you can try out. It makes for a tasty breakfast and is simple to prepare. Also, the idea is quite straightforward. The chili added to the oil gives an added flavor to the eggs. It goes well with a bowl of rice but they can also go with some noodles.
9. Pesto Eggs
This is another egg recipe that you can prepare. It makes for a tasty breakfast. The idea is to use oil or butter and fry the eggs in pesto. The garlic-infused olive oil and basil from the sauce add a lot of flavors to the eggs. There are various ways to enjoy it but they go great over tost.
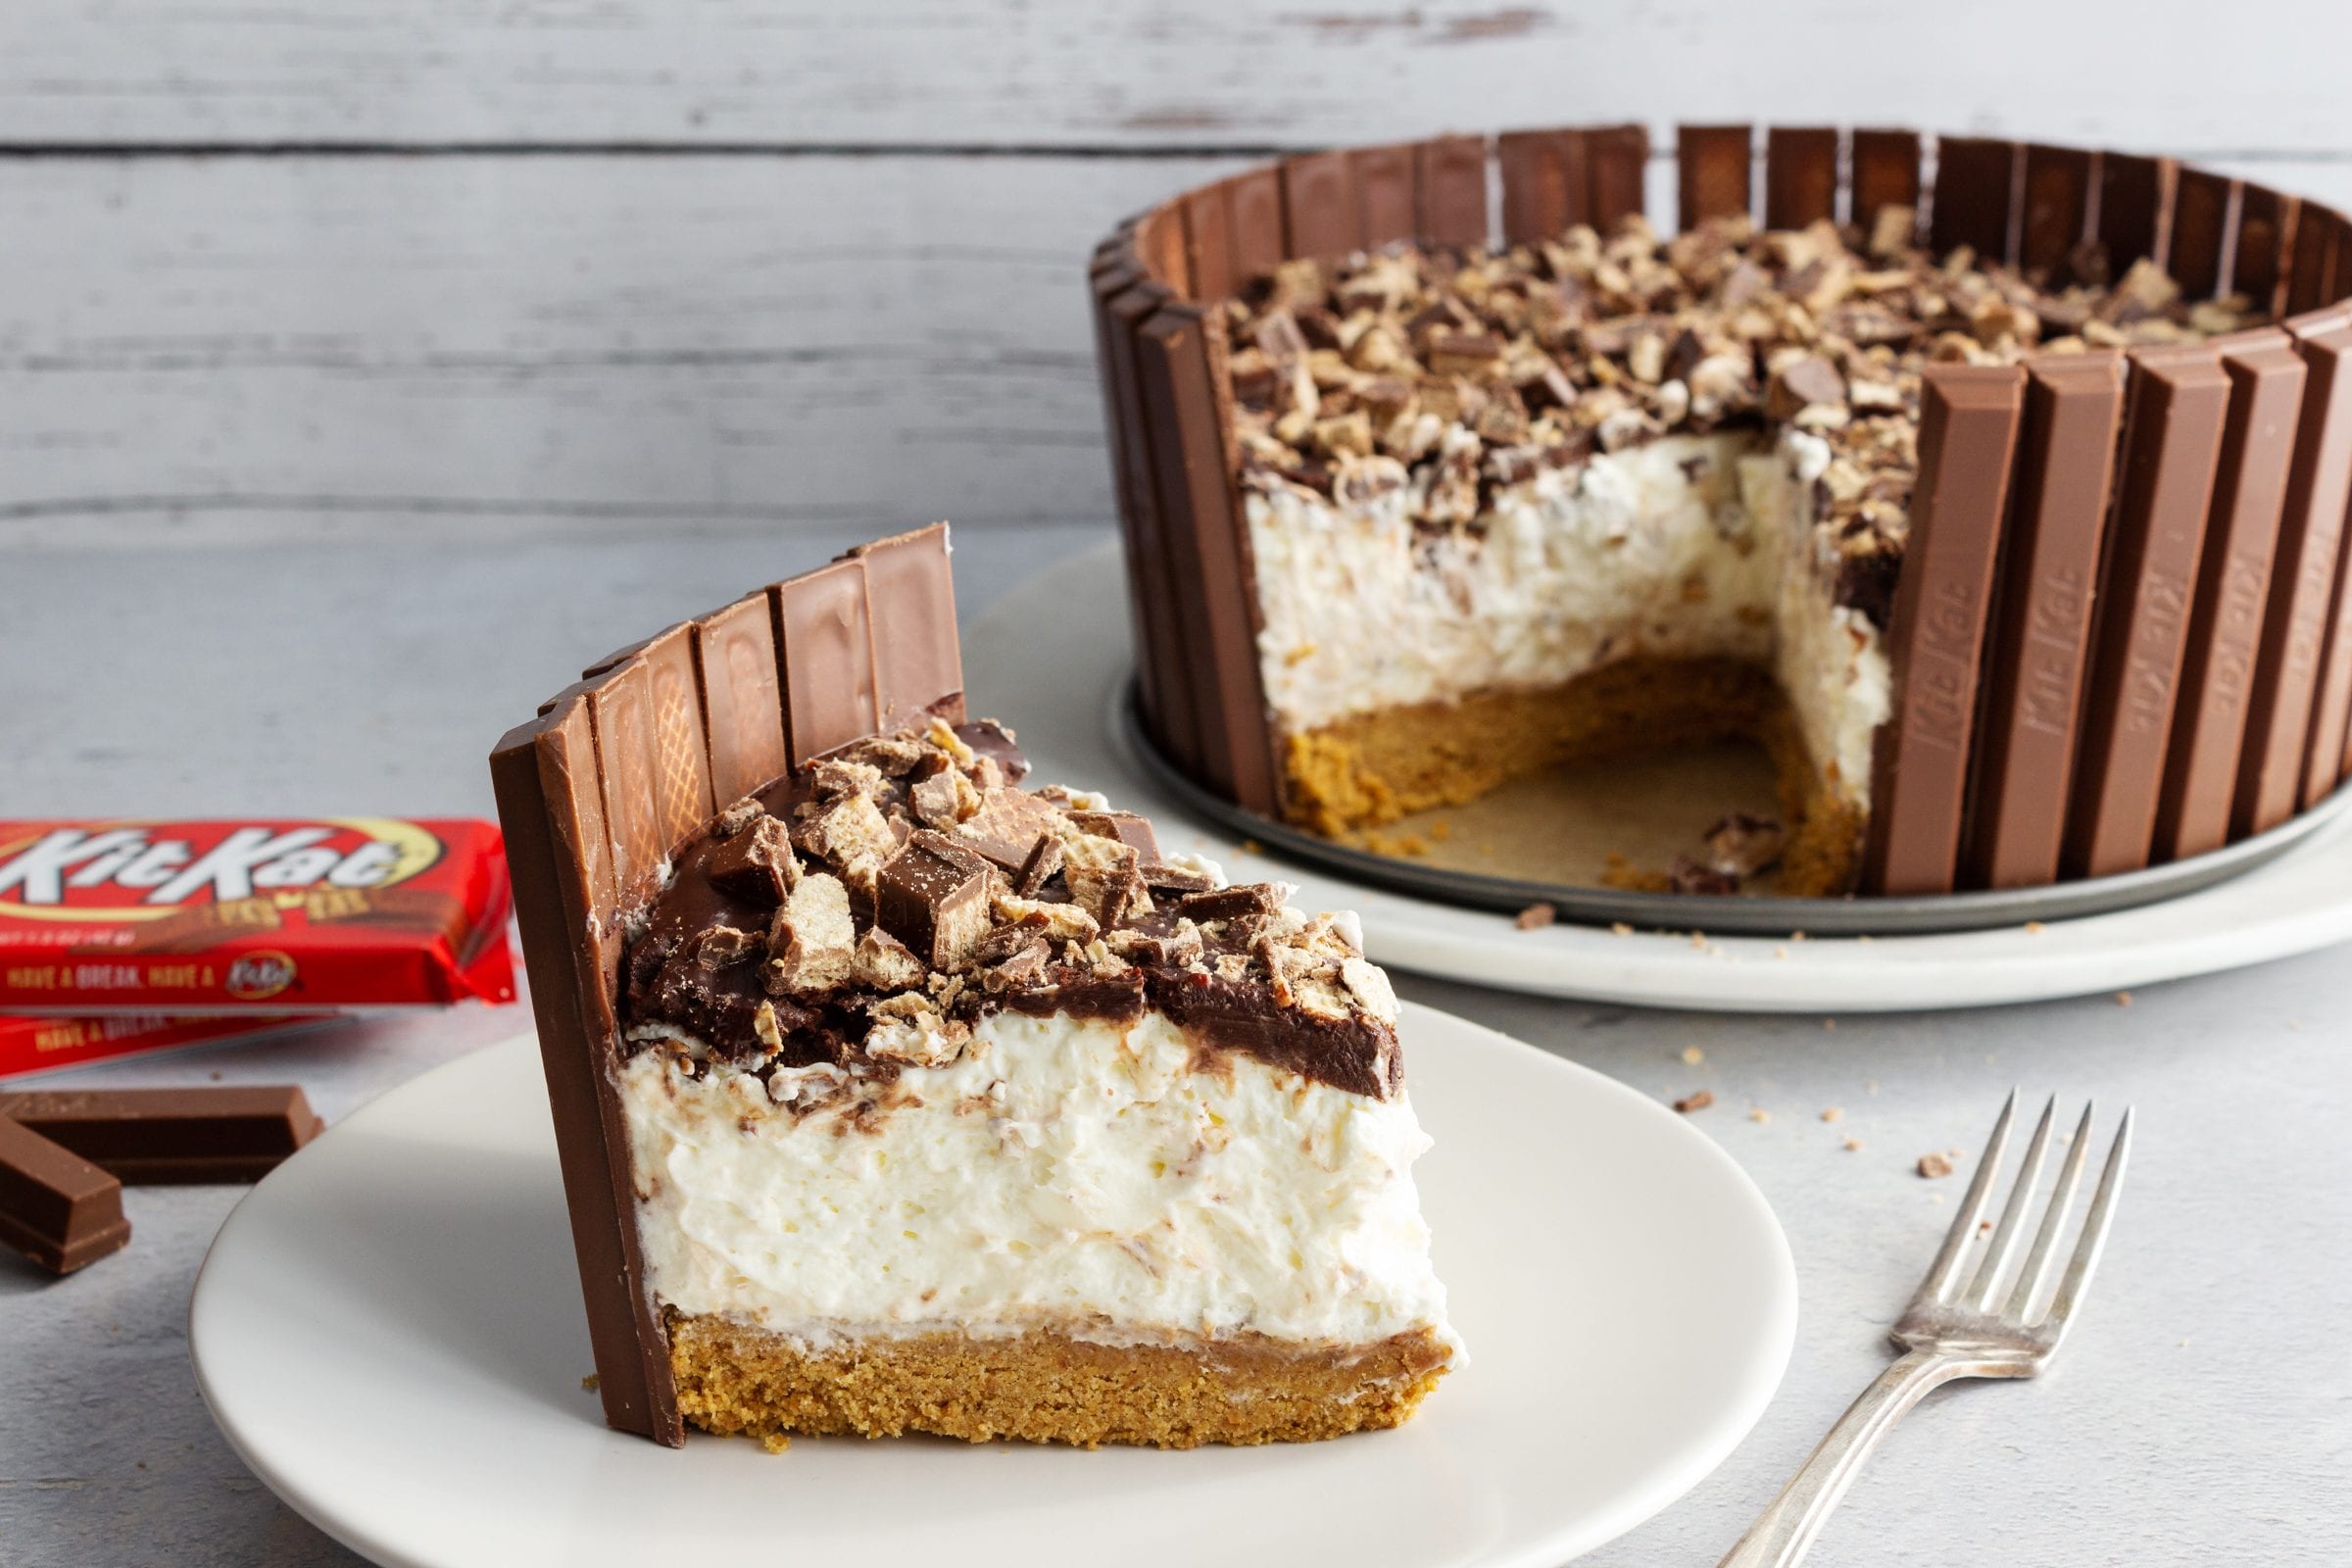
10. KitKat Cheesecake
Once you take a bite of this KitKat Cheesecake you will know what the hype is about. The cheesecake is surrounded by a crust of KitKat and is topped with crumbled candies. If you love KitKat, you are going to love the chocolatey and decadent goodness of the sweet items.
11. Crispy Potatoes
This can be an excellent dish for dinner. The viral TikTok recipe requires a little bit of food science. For this, you need a couple of Yukon Gold potatoes and salt to get their ultra-crispy texture. You can season it with paprika, old bay, Maldon, black pepper, and some sprigs of rosemary to perfect the potato dish.
12. Oreo Sushi
Oreo lovers are sure to love this Sushi. The sweet dish mimics rolled ice cream. You just need two ingredients to prepare it: ice cream and oreo biscuits.
13. Twisted Bacon
This is the crispiest bacon recipe you will come across. There are many ways to prepare bacon but the ultra-twisted one can be everyone’s favorite.

14. Creamy Lemonade
Pour a glass of creamy lemonade prepared out of whipped lemonade recipe this summer. It can level up what is available at the lemonade stand. Use whipped cream and condensed milk to make it frothy and delectable.
15. Tortilla Wrap
Portion out 4 toppings and place them on your tortilla. Then fold it clockwise to cook. When you are ready to serve, just slice it in half.
Part 4: How to Create a Stunning Cooking Video?
Here are some tricks to create stunning cooking videos-
- Make sure that you plan ahead. If it is your first time, don’t do it on camera. Practice first before recording.
- It can be tricky to use one camera to record the video from a different camera. Using two cameras will give you a better video.
- You shouldn’t distract the viewers from the cooking video. So, don’t wear something loud or white. Go for solid and bright colors.
- Use Filmora’s cooking video template to make your video stand out.
Wondershare Filmora
Get started easily with Filmora’s powerful performance, intuitive interface, and countless effects!
Try It Free Try It Free Try It Free Learn More >

Conclusion
There are numerous viral TikTok cooking videos. But some of the best TikTok recipes have been listed above. In case you have a recipe in mind and want to create a video using the Filmora video editing tool.
TikTok is a platform with a pool of content. But apart from the dance videos, you will also find some cooking and food videos on this platform. When opening the app, you are sure to find some TikTok recipes waiting to greet you on the ‘For You Page’. There is a whole list of creative and easy TikTok food recipes to try out that deserves a try. This is what you are going to find in the next section.
In this article
01 Can You Get Recipes from TikTok?
02 What Food is Trending on TikTok?
03 15 Viral TikTok Recipes in 2022
04 How to Create a Stunning Cooking Video?
Part 1: Can You Get Recipes from TikTok?
Well, the best part about TikTok is you don’t know what you are going to get. Many think it is just about dancing. But there is more to it than meets the eye. TikTok users will also come across some viral TikTok recipes. However, these viral recipes aren’t perfectly curated videos that you will come across on other social media platforms, though. These are all tried and true recipes created by regular people who want to get delectable food on the table. At times, the recipes might seem questionable but they turn out amazing.
Part 2: What Food is Trending on TikTok?
When it comes to food trends, people just turn to TikTok. As soon as any easy TikTok recipes go viral, it tends to get the internet excited. So, here are some of the foods that are trending on TikTok.
- Baked Feta
- Baked Oats
- Nature’s Cereal
- Pasta Chips
- Pesto Eggs
- Smashed Vegetables
- Corn Ribs
- At-Home Quesadilla
- Vegetable Burger Buns
- Salmon Rice Bowl
Part 3: 15 Viral TikTok Recipes in 2022
The most viral TikTok recipes touch every corner of the food world. You will find TikTok dinner recipes, as well as drink recipes. Here is a list of 15 top viral TikTok recipes that you can choose from.
1. Creamy Ramen
Creamy Ramen has changed the game for lovers of instant noodles. With this recipe, you can just upgrade a simple packet of ramen. What’s more, it is one of the easiest TikTok ramen noodle recipes to prepare. There are different variations of the recipe floating on TikTok. However, a maximum video suggests the use of sesame oil, Japanese mayo, spicy ramen, and an egg.
2. Baked Oatmeal with Peanut Butter and Chocolate
Many people don’t like having oatmeal as it is tasteless and appears like a lumpy goop. But the baked oatmeal recipes have taken the internet by storm. This tastes as good as it looks. One of the recipes is baked oatmeal with peanut butter. It went viral as a dessert or snack option. When prepared it looks like a chocolate chip cake. Blend oats with peanut butter, maple syrup, and banana with vanilla, egg, and choco chip.
3. Pickled Garlic
Garlic has a bad reputation due to the unpleasant effects it leaves on your breath. However, it is a small price to pay for this taste. In a container with a lid, place some drained and pickled garlic, a little thyme, a generous amount of sriracha, and chili powder. Shake it up and you have your delicious snack.
4. Pasta Chips
Pasta Chips is one of the viral pasta recipes. The air fryer advocates have been really excited about this. In this, you are baking cooked pasta until they become crispy chips. You can make any shape of pasta you want.
5. Oreo Cake in a Mug
Who doesn’t like a dessert that you can prepare in just two minutes! All you need is 4-5 Oreo biscuits and 2 tablespoons of milk. Mash the biscuits and add the milk to prepare a batter in the microwave for one minute. Take it out and enjoy with a dollop of ice cream.
6. Whipped Coffee
While everybody was getting frustrated at home during the lockdown, they turned to TikTok drink recipes to get rid of their boredom. This is when Whipped Coffee or Dalgona Coffee became popular. It became an overnight sensation. You need a few simple ingredients: instant coffee powder, white sugar, hot water, and milk. Combine the first three ingredients until it’s fluffy and light and pour them on a cup of coffee.
7. Baked Feta
With this trend, you can prepare some delicious pasta and it also works as a great dip. The baked dishes use just six ingredients, excluding the basics that everybody has in the kitchen. You need cherry tomatoes, garlic, feta cheese, pasta, basil, and chilis. You can prepare the pasta in just 25 minutes. The best thing about the recipe is it can be prepared in one pan. Hence, there is little to clean up.
8. Chili Oil Eggs
If you love eggs, this is one recipe that you can try out. It makes for a tasty breakfast and is simple to prepare. Also, the idea is quite straightforward. The chili added to the oil gives an added flavor to the eggs. It goes well with a bowl of rice but they can also go with some noodles.
9. Pesto Eggs
This is another egg recipe that you can prepare. It makes for a tasty breakfast. The idea is to use oil or butter and fry the eggs in pesto. The garlic-infused olive oil and basil from the sauce add a lot of flavors to the eggs. There are various ways to enjoy it but they go great over tost.
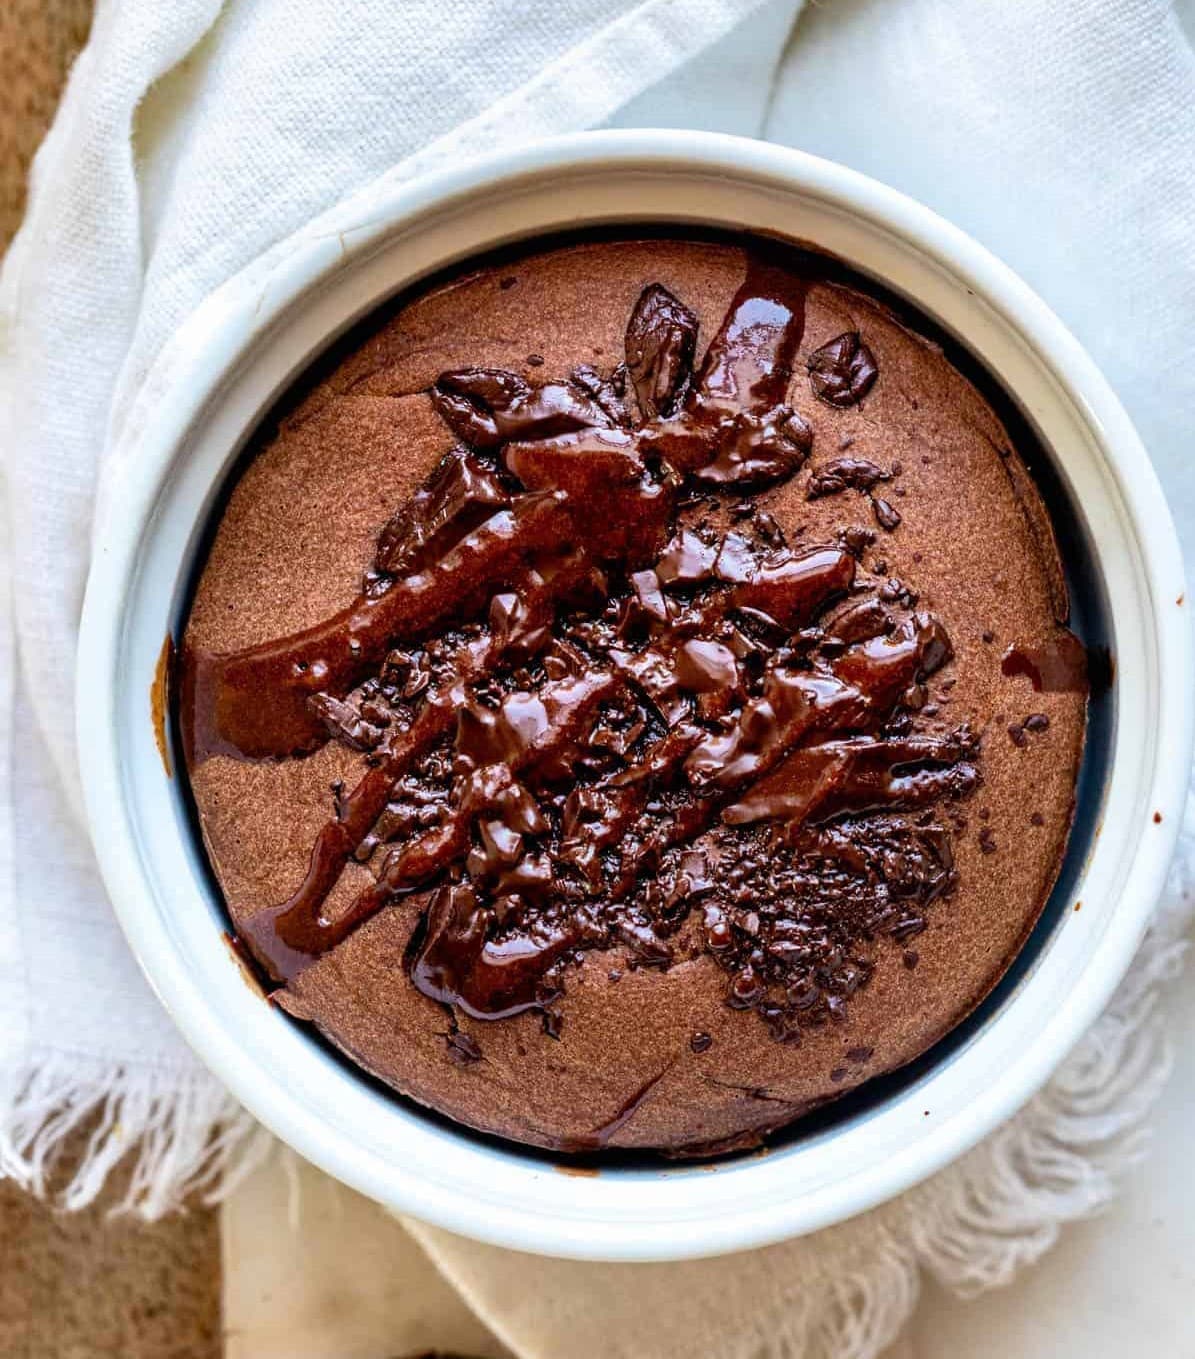
10. KitKat Cheesecake
Once you take a bite of this KitKat Cheesecake you will know what the hype is about. The cheesecake is surrounded by a crust of KitKat and is topped with crumbled candies. If you love KitKat, you are going to love the chocolatey and decadent goodness of the sweet items.
11. Crispy Potatoes
This can be an excellent dish for dinner. The viral TikTok recipe requires a little bit of food science. For this, you need a couple of Yukon Gold potatoes and salt to get their ultra-crispy texture. You can season it with paprika, old bay, Maldon, black pepper, and some sprigs of rosemary to perfect the potato dish.
12. Oreo Sushi
Oreo lovers are sure to love this Sushi. The sweet dish mimics rolled ice cream. You just need two ingredients to prepare it: ice cream and oreo biscuits.
13. Twisted Bacon
This is the crispiest bacon recipe you will come across. There are many ways to prepare bacon but the ultra-twisted one can be everyone’s favorite.
14. Creamy Lemonade
Pour a glass of creamy lemonade prepared out of whipped lemonade recipe this summer. It can level up what is available at the lemonade stand. Use whipped cream and condensed milk to make it frothy and delectable.
15. Tortilla Wrap
Portion out 4 toppings and place them on your tortilla. Then fold it clockwise to cook. When you are ready to serve, just slice it in half.
Part 4: How to Create a Stunning Cooking Video?
Here are some tricks to create stunning cooking videos-
- Make sure that you plan ahead. If it is your first time, don’t do it on camera. Practice first before recording.
- It can be tricky to use one camera to record the video from a different camera. Using two cameras will give you a better video.
- You shouldn’t distract the viewers from the cooking video. So, don’t wear something loud or white. Go for solid and bright colors.
- Use Filmora’s cooking video template to make your video stand out.
Wondershare Filmora
Get started easily with Filmora’s powerful performance, intuitive interface, and countless effects!
Try It Free Try It Free Try It Free Learn More >
Conclusion
There are numerous viral TikTok cooking videos. But some of the best TikTok recipes have been listed above. In case you have a recipe in mind and want to create a video using the Filmora video editing tool.
TikTok is a platform with a pool of content. But apart from the dance videos, you will also find some cooking and food videos on this platform. When opening the app, you are sure to find some TikTok recipes waiting to greet you on the ‘For You Page’. There is a whole list of creative and easy TikTok food recipes to try out that deserves a try. This is what you are going to find in the next section.
In this article
01 Can You Get Recipes from TikTok?
02 What Food is Trending on TikTok?
03 15 Viral TikTok Recipes in 2022
04 How to Create a Stunning Cooking Video?
Part 1: Can You Get Recipes from TikTok?
Well, the best part about TikTok is you don’t know what you are going to get. Many think it is just about dancing. But there is more to it than meets the eye. TikTok users will also come across some viral TikTok recipes. However, these viral recipes aren’t perfectly curated videos that you will come across on other social media platforms, though. These are all tried and true recipes created by regular people who want to get delectable food on the table. At times, the recipes might seem questionable but they turn out amazing.
Part 2: What Food is Trending on TikTok?
When it comes to food trends, people just turn to TikTok. As soon as any easy TikTok recipes go viral, it tends to get the internet excited. So, here are some of the foods that are trending on TikTok.
- Baked Feta
- Baked Oats
- Nature’s Cereal
- Pasta Chips
- Pesto Eggs
- Smashed Vegetables
- Corn Ribs
- At-Home Quesadilla
- Vegetable Burger Buns
- Salmon Rice Bowl
Part 3: 15 Viral TikTok Recipes in 2022
The most viral TikTok recipes touch every corner of the food world. You will find TikTok dinner recipes, as well as drink recipes. Here is a list of 15 top viral TikTok recipes that you can choose from.
1. Creamy Ramen
Creamy Ramen has changed the game for lovers of instant noodles. With this recipe, you can just upgrade a simple packet of ramen. What’s more, it is one of the easiest TikTok ramen noodle recipes to prepare. There are different variations of the recipe floating on TikTok. However, a maximum video suggests the use of sesame oil, Japanese mayo, spicy ramen, and an egg.
2. Baked Oatmeal with Peanut Butter and Chocolate
Many people don’t like having oatmeal as it is tasteless and appears like a lumpy goop. But the baked oatmeal recipes have taken the internet by storm. This tastes as good as it looks. One of the recipes is baked oatmeal with peanut butter. It went viral as a dessert or snack option. When prepared it looks like a chocolate chip cake. Blend oats with peanut butter, maple syrup, and banana with vanilla, egg, and choco chip.
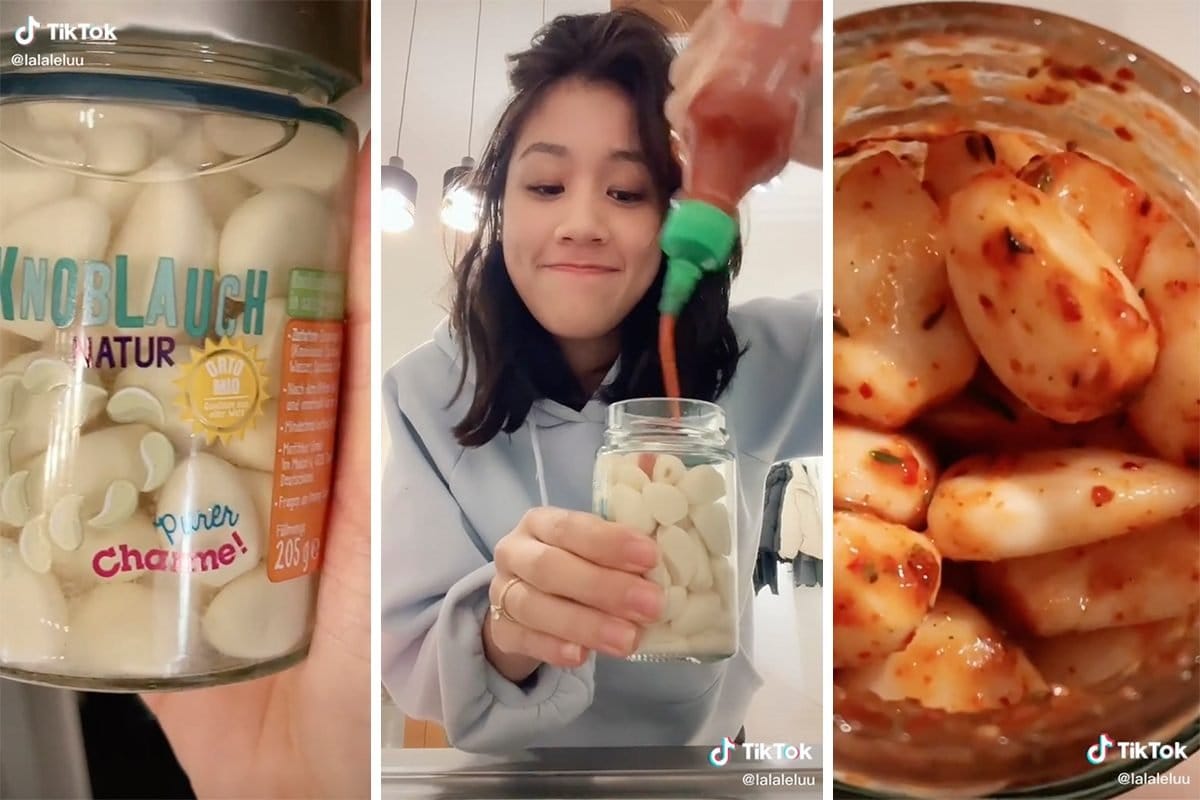
3. Pickled Garlic
Garlic has a bad reputation due to the unpleasant effects it leaves on your breath. However, it is a small price to pay for this taste. In a container with a lid, place some drained and pickled garlic, a little thyme, a generous amount of sriracha, and chili powder. Shake it up and you have your delicious snack.
4. Pasta Chips
Pasta Chips is one of the viral pasta recipes. The air fryer advocates have been really excited about this. In this, you are baking cooked pasta until they become crispy chips. You can make any shape of pasta you want.
5. Oreo Cake in a Mug
Who doesn’t like a dessert that you can prepare in just two minutes! All you need is 4-5 Oreo biscuits and 2 tablespoons of milk. Mash the biscuits and add the milk to prepare a batter in the microwave for one minute. Take it out and enjoy with a dollop of ice cream.
6. Whipped Coffee
While everybody was getting frustrated at home during the lockdown, they turned to TikTok drink recipes to get rid of their boredom. This is when Whipped Coffee or Dalgona Coffee became popular. It became an overnight sensation. You need a few simple ingredients: instant coffee powder, white sugar, hot water, and milk. Combine the first three ingredients until it’s fluffy and light and pour them on a cup of coffee.
7. Baked Feta
With this trend, you can prepare some delicious pasta and it also works as a great dip. The baked dishes use just six ingredients, excluding the basics that everybody has in the kitchen. You need cherry tomatoes, garlic, feta cheese, pasta, basil, and chilis. You can prepare the pasta in just 25 minutes. The best thing about the recipe is it can be prepared in one pan. Hence, there is little to clean up.
8. Chili Oil Eggs
If you love eggs, this is one recipe that you can try out. It makes for a tasty breakfast and is simple to prepare. Also, the idea is quite straightforward. The chili added to the oil gives an added flavor to the eggs. It goes well with a bowl of rice but they can also go with some noodles.
9. Pesto Eggs
This is another egg recipe that you can prepare. It makes for a tasty breakfast. The idea is to use oil or butter and fry the eggs in pesto. The garlic-infused olive oil and basil from the sauce add a lot of flavors to the eggs. There are various ways to enjoy it but they go great over tost.
10. KitKat Cheesecake
Once you take a bite of this KitKat Cheesecake you will know what the hype is about. The cheesecake is surrounded by a crust of KitKat and is topped with crumbled candies. If you love KitKat, you are going to love the chocolatey and decadent goodness of the sweet items.
11. Crispy Potatoes
This can be an excellent dish for dinner. The viral TikTok recipe requires a little bit of food science. For this, you need a couple of Yukon Gold potatoes and salt to get their ultra-crispy texture. You can season it with paprika, old bay, Maldon, black pepper, and some sprigs of rosemary to perfect the potato dish.
12. Oreo Sushi
Oreo lovers are sure to love this Sushi. The sweet dish mimics rolled ice cream. You just need two ingredients to prepare it: ice cream and oreo biscuits.
13. Twisted Bacon
This is the crispiest bacon recipe you will come across. There are many ways to prepare bacon but the ultra-twisted one can be everyone’s favorite.
14. Creamy Lemonade
Pour a glass of creamy lemonade prepared out of whipped lemonade recipe this summer. It can level up what is available at the lemonade stand. Use whipped cream and condensed milk to make it frothy and delectable.
15. Tortilla Wrap
Portion out 4 toppings and place them on your tortilla. Then fold it clockwise to cook. When you are ready to serve, just slice it in half.
Part 4: How to Create a Stunning Cooking Video?
Here are some tricks to create stunning cooking videos-
- Make sure that you plan ahead. If it is your first time, don’t do it on camera. Practice first before recording.
- It can be tricky to use one camera to record the video from a different camera. Using two cameras will give you a better video.
- You shouldn’t distract the viewers from the cooking video. So, don’t wear something loud or white. Go for solid and bright colors.
- Use Filmora’s cooking video template to make your video stand out.
Wondershare Filmora
Get started easily with Filmora’s powerful performance, intuitive interface, and countless effects!
Try It Free Try It Free Try It Free Learn More >
Conclusion
There are numerous viral TikTok cooking videos. But some of the best TikTok recipes have been listed above. In case you have a recipe in mind and want to create a video using the Filmora video editing tool.
TikTok is a platform with a pool of content. But apart from the dance videos, you will also find some cooking and food videos on this platform. When opening the app, you are sure to find some TikTok recipes waiting to greet you on the ‘For You Page’. There is a whole list of creative and easy TikTok food recipes to try out that deserves a try. This is what you are going to find in the next section.
In this article
01 Can You Get Recipes from TikTok?
02 What Food is Trending on TikTok?
03 15 Viral TikTok Recipes in 2022
04 How to Create a Stunning Cooking Video?
Part 1: Can You Get Recipes from TikTok?
Well, the best part about TikTok is you don’t know what you are going to get. Many think it is just about dancing. But there is more to it than meets the eye. TikTok users will also come across some viral TikTok recipes. However, these viral recipes aren’t perfectly curated videos that you will come across on other social media platforms, though. These are all tried and true recipes created by regular people who want to get delectable food on the table. At times, the recipes might seem questionable but they turn out amazing.
Part 2: What Food is Trending on TikTok?
When it comes to food trends, people just turn to TikTok. As soon as any easy TikTok recipes go viral, it tends to get the internet excited. So, here are some of the foods that are trending on TikTok.
- Baked Feta
- Baked Oats
- Nature’s Cereal
- Pasta Chips
- Pesto Eggs
- Smashed Vegetables
- Corn Ribs
- At-Home Quesadilla
- Vegetable Burger Buns
- Salmon Rice Bowl
Part 3: 15 Viral TikTok Recipes in 2022
The most viral TikTok recipes touch every corner of the food world. You will find TikTok dinner recipes, as well as drink recipes. Here is a list of 15 top viral TikTok recipes that you can choose from.
1. Creamy Ramen
Creamy Ramen has changed the game for lovers of instant noodles. With this recipe, you can just upgrade a simple packet of ramen. What’s more, it is one of the easiest TikTok ramen noodle recipes to prepare. There are different variations of the recipe floating on TikTok. However, a maximum video suggests the use of sesame oil, Japanese mayo, spicy ramen, and an egg.
2. Baked Oatmeal with Peanut Butter and Chocolate
Many people don’t like having oatmeal as it is tasteless and appears like a lumpy goop. But the baked oatmeal recipes have taken the internet by storm. This tastes as good as it looks. One of the recipes is baked oatmeal with peanut butter. It went viral as a dessert or snack option. When prepared it looks like a chocolate chip cake. Blend oats with peanut butter, maple syrup, and banana with vanilla, egg, and choco chip.
3. Pickled Garlic
Garlic has a bad reputation due to the unpleasant effects it leaves on your breath. However, it is a small price to pay for this taste. In a container with a lid, place some drained and pickled garlic, a little thyme, a generous amount of sriracha, and chili powder. Shake it up and you have your delicious snack.
4. Pasta Chips
Pasta Chips is one of the viral pasta recipes. The air fryer advocates have been really excited about this. In this, you are baking cooked pasta until they become crispy chips. You can make any shape of pasta you want.
5. Oreo Cake in a Mug
Who doesn’t like a dessert that you can prepare in just two minutes! All you need is 4-5 Oreo biscuits and 2 tablespoons of milk. Mash the biscuits and add the milk to prepare a batter in the microwave for one minute. Take it out and enjoy with a dollop of ice cream.
6. Whipped Coffee
While everybody was getting frustrated at home during the lockdown, they turned to TikTok drink recipes to get rid of their boredom. This is when Whipped Coffee or Dalgona Coffee became popular. It became an overnight sensation. You need a few simple ingredients: instant coffee powder, white sugar, hot water, and milk. Combine the first three ingredients until it’s fluffy and light and pour them on a cup of coffee.
7. Baked Feta
With this trend, you can prepare some delicious pasta and it also works as a great dip. The baked dishes use just six ingredients, excluding the basics that everybody has in the kitchen. You need cherry tomatoes, garlic, feta cheese, pasta, basil, and chilis. You can prepare the pasta in just 25 minutes. The best thing about the recipe is it can be prepared in one pan. Hence, there is little to clean up.
8. Chili Oil Eggs
If you love eggs, this is one recipe that you can try out. It makes for a tasty breakfast and is simple to prepare. Also, the idea is quite straightforward. The chili added to the oil gives an added flavor to the eggs. It goes well with a bowl of rice but they can also go with some noodles.
9. Pesto Eggs
This is another egg recipe that you can prepare. It makes for a tasty breakfast. The idea is to use oil or butter and fry the eggs in pesto. The garlic-infused olive oil and basil from the sauce add a lot of flavors to the eggs. There are various ways to enjoy it but they go great over tost.
10. KitKat Cheesecake
Once you take a bite of this KitKat Cheesecake you will know what the hype is about. The cheesecake is surrounded by a crust of KitKat and is topped with crumbled candies. If you love KitKat, you are going to love the chocolatey and decadent goodness of the sweet items.
11. Crispy Potatoes
This can be an excellent dish for dinner. The viral TikTok recipe requires a little bit of food science. For this, you need a couple of Yukon Gold potatoes and salt to get their ultra-crispy texture. You can season it with paprika, old bay, Maldon, black pepper, and some sprigs of rosemary to perfect the potato dish.
12. Oreo Sushi
Oreo lovers are sure to love this Sushi. The sweet dish mimics rolled ice cream. You just need two ingredients to prepare it: ice cream and oreo biscuits.
13. Twisted Bacon
This is the crispiest bacon recipe you will come across. There are many ways to prepare bacon but the ultra-twisted one can be everyone’s favorite.
14. Creamy Lemonade
Pour a glass of creamy lemonade prepared out of whipped lemonade recipe this summer. It can level up what is available at the lemonade stand. Use whipped cream and condensed milk to make it frothy and delectable.
15. Tortilla Wrap
Portion out 4 toppings and place them on your tortilla. Then fold it clockwise to cook. When you are ready to serve, just slice it in half.
Part 4: How to Create a Stunning Cooking Video?
Here are some tricks to create stunning cooking videos-
- Make sure that you plan ahead. If it is your first time, don’t do it on camera. Practice first before recording.
- It can be tricky to use one camera to record the video from a different camera. Using two cameras will give you a better video.
- You shouldn’t distract the viewers from the cooking video. So, don’t wear something loud or white. Go for solid and bright colors.
- Use Filmora’s cooking video template to make your video stand out.
Wondershare Filmora
Get started easily with Filmora’s powerful performance, intuitive interface, and countless effects!
Try It Free Try It Free Try It Free Learn More >
Conclusion
There are numerous viral TikTok cooking videos. But some of the best TikTok recipes have been listed above. In case you have a recipe in mind and want to create a video using the Filmora video editing tool.
Also read:
- 2024 Approved Viral Influencers on TikTok to Elevate Your Spirit
- Explore the Latest Trends with These Snapchat Ideas
- [New] What's Cooking? 10 Viral Food Scenes on TikTok
- [Updated] 2024 Approved Dispelling Myths About TikTok Bans
- [New] Replicating Your Best Self with Finesse on TikTok
- [New] Instantly and Indefinitely Remove Yourself From TikTok Landscape for 2024
- [Updated] 2024 Approved Beyond the Blue Feed Top 5 Platforms Excluding TikTok
- [New] In 2024, Elevate Your Vibe Most Chic TikTok Dances
- Expertly Selected 10 Windows Apps for TikTok Videography for 2024
- [Updated] Top 10 Tik Tok Songs of 2024 that Are Stuck in Your Head
- In 2024, Secure Your Content Top TikTok Marker Erasers for iPhones & Android
- [New] From Beginner to Expert The Complete Guide to Slow Mo in TikTok for 2024
- [New] Crafting the Perfect Anime Story Best Ideas for Viral Videos
- [Updated] 10 Free TikTok Video Editing Apps/Website on Mac for 2024
- In 2024, Syncopating Scenes & Beats The TikTok Video Guide
- [Updated] Sync the Beat Unleashing Your Inner Dancer with TikTok and Mac for 2024
- Comparing the Giants An In-Depth Guide to TikTok vs Snapchat's Functionality
- In 2024, Essential Steps for Perfect TikTok Clips
- Mouthwatering Marvels Leading TikTok Kitchen Stars for 2024
- [Updated] Structuring a Significant TikTok Close-Up for 2024
- [Updated] Relaxed Rhythms Essential 20 Country Tracks to Dance Away Stress (TikTok)
- Transform the Mundane Into Stunning Create with Our Video Templates
- [New] Leading the Charge Top 15 Influencers for Your Drive for 2024
- [Updated] 2024 Approved Explore the Power of Visuals Mastery over TikTok Video Backgrounds
- [Updated] Mastering the Art of Increasing TikTok Visibility with Hashes for 2024
- [New] Explore the Power of Text in Visuals Uncovering Top 5 Caption Strategies for TikTok for 2024
- [New] Binge-Worthy 20 Catchy TikTok Songs by Artists
- [Updated] In 2024, Lightning-Fast Method to Claim TikTok Treasures
- [Updated] The Road to Success Key Elements in TikTok Marketing for 2024
- Effortlessly Transform Your TikTok Identity with This Guide for 2024
- Fiery Friendship Keeping Your Snapstreak Hot and Steady
- [Updated] Elevate Your Content Game Best Practices for Mac-Based TikTok Intros
- [New] In 2024, Unlocking Growth Potential with Top 7 TikTok Tools
- [New] Discover Top Analytics for Tripling Your TikTok Reach
- [New] Crafting Winning Desktop TikToks A Step-by-Step Approach for 2024
- 2024 Approved Gastronomic Globe-Trotting Iconic Recipes Worldwide
- [New] Top 10 Tiktok Analytics Tools to Improve Account Performance
- [Updated] Unleash Creativity with Ease Streamlined Ways to Change TikTok Backgrounds
- [New] In 2024, The Comprehensible Guide to Mac-Based OOTD Videography
- [New] Step-by-Step Guide Incorporating Music in Your TikTok Videos
- [New] Designing Your Perfect TikTok End Screen
- 2024 Approved Becoming a Viral Star on TikTok Steps to Increase Views and Likes
- In 2024, Direct TikTok to MP4 Format Downloader
- In 2024, Mastery Guide Critical TikTok (macOS) Elements
- 2024 Approved Discovering the Most Influential TikTok Trends
- [Updated] 2024 Approved A Primer to Navigating the World of TikTok on Computers
- In 2024, Blending Techniques for Top-Tier TikTok Video Quality
- [Updated] Guesting Without Glitches Live TikTok Conversations
- [Updated] Elevate Your TikToks The Art of Video Patchwork for 2024
- [New] In 2024, Mellow Music Playlist 20 TikTok Country Tracks to Relax With
- [Updated] 2024 Approved Easy Steps to Deactivate IGTV
- [Updated] 2024 Approved Premium Screen Recording Selections
- Updated A Deep Dive Into Adobe Audition Understanding Its Impact on Audio Editing
- New Trim and Edit MKV Files with Ease Top Mac Tools 2023
- How to Remove Forgotten PIN Of Your Vivo Y78+
- 10 Best Fake GPS Location Spoofers for Lenovo ThinkPhone | Dr.fone
- In 2024, Fix Apple iPhone 6s Stuck on Data Transfer Verified Solution! | Dr.fone
- Updated MP4 to MP3 Conversion on Mobile The Best Apps and Tools
- Updated Free Sound Effects for Final Cut Pro Top Sources and Integration Tips for 2024
- [New] 2024 Approved Sweep Through Your Contacts with Speed and Skill
- [Updated] Constructing Cozy Cornerstones Easy MC House Plans
- Updated 2024 Approved Audience Cheers Reproducer
- In 2024, Turn Your Meet Webinar Into an Interactive Participant Showcase
- 5 Techniques to Transfer Data from Samsung Galaxy XCover 7 to iPhone 15/14/13/12 | Dr.fone
- Beyond the Lens The Complete Selfie Confirmation on IG for 2024
- Poco F5 5G Messages Recovery - Recover Deleted Messages from Poco F5 5G
- [New] In 2024, Top Voice Transformation Tools for Personal Use
- Motorola Bypass Tools to Bypass Lock Screen(Motorola )
- Planning to Use a Pokemon Go Joystick on Honor X8b? | Dr.fone
- In 2024, The Ultimate Guide to Get the Rare Candy on Pokemon Go Fire Red On Apple iPhone XS Max | Dr.fone
- [New] 2024 Approved From Strangers to Community Your Facebook Onboarding Journey
- An In-Depth Look at Embedding Audios Within Windows-Based Animated Gifs for 2024
- In 2024, How To Do Motorola Moto G13 Screen Sharing | Dr.fone
- Updated In 2024, Detailed Steps to Rotate Videos in Windows Media Player
- 6 Fixes to Unfortunately WhatsApp has stopped Error Popups On Vivo Y200 | Dr.fone
- In 2024, How to Fix when Apple Account Locked On iPhone 6 Plus?
- In 2024, The Most Effective Ways to Bypass iPhone X Activation Lock
- How to Recover Deleted Photos from Android Gallery App on Vivo V27 Pro
- In 2024, 5 Easy Ways to Copy Contacts from Motorola Moto E13 to iPhone 14 and 15 | Dr.fone
- [Updated] The Musician's Manual to Copyright Navigation on Instagram
- New In 2024, Unveiling Dynamic Volume Control Mastering Audio Ducking Techniques
- How to Transfer Contacts from ZTE Nubia Flip 5G to Outlook | Dr.fone
- 11 Best Location Changers for Vivo Y200 | Dr.fone
- [New] Navigating the Maze of Audio Capturing A Complete Minecraft Guide on Mac for 2024
- In 2024, Did Your Apple iPhone 15 Pro Max Passcode Change Itself? Unlock It Now | Dr.fone
- [New] 2024 Approved 16 Steps to Successfully Livestream and Save Money on Education Platforms
- Facebook's A+ Covers Ranking the Best Photo Making Websites
- Translate Video From Japanese to English Online for Free
- In 2024, The Ultimate Guide to Adding Background Music in iMovie Videos
- New 2024 Approved Beginners Guide to Separating Chorus Pieces with Advanced Tools
- [Updated] Share Tweets WhatsApp Video Broadcasting
- 2024 Approved Ranked Webcam Apps for Beginners and Pros
- The Smart Way to Choose an Aiff Converter Tips and Recommendations
- In 2024, How Can We Bypass OnePlus 11R FRP?
- In 2024, What You Want To Know About Two-Factor Authentication for iCloud On your iPhone SE
- 2024 Approved Maximizing Engagement with Optimal Social Media Aspect Ratios
- Updated Unlock Animation Magic Top 8 Photo Animation Tools
- Gmail Not Working on Infinix Note 30 VIP Racing Edition 7 Common Problems & Fixes | Dr.fone
- Title: "[Updated] 2024 Approved Audacity Masterclass Techniques for Flawless Sound De-Noising"
- Author: Kenneth
- Created at : 2024-05-23 01:38:43
- Updated at : 2024-05-24 01:38:43
- Link: https://tiktok-video-files.techidaily.com/updated-2024-approved-audacity-masterclass-techniques-for-flawless-sound-de-noising/
- License: This work is licensed under CC BY-NC-SA 4.0.
