
Saving Snaps From Snapchat on Camera Roll – A Guide
Saving Snaps From Snapchat on Camera Roll – A Guide
Snapchat is the most popular social media platform that is enjoyed by youngsters. The main reason lies in their unique filters that allow you to capture vibrant snaps. Moreover, the features of Snapchat, like emojis, drawings, and bitmojis, help you chat with your friends in an exciting manner. Hence, it’s an excellent app for taking interesting and vibrant snaps flawlessly.
If you are a regular user of Snapchat and want to learn how to save snaps to the camera roll, this article will help you. By applying the suggested methods, you can save your snaps to the smartphone.
Part 1: Save Snaps to Camera Roll or Gallery Instead of Memories
If you want to share your snaps on other social media platforms like Instagram and Facebook, you should save your snaps on your phone’s gallery. The saved snaps in your phone’s gallery can be located and shared on other platforms without hassle. Read the following instructions on how to save snaps to the camera roll or gallery quickly:
Step1 Navigate to your Snapchat and tap on your Bitmoji icon displayed in the top left corner. Afterward, select the “Settings” icon displayed at the top right corner.

Step2 On the Settings menu, head to the My Account section and tap “Memories.” In this new menu, tap on the “Save Button,” where you can choose to save your snaps on either Camera Roll and Memories or Only Camera Roll. Tap on your preferred choice to export your snaps to your phone’s gallery.

Part 2: Manually Export Snaps to Camera Roll
If you don’t want to alter the settings of Snapchat, you can still export snaps to the camera roll manually. In this solution, you can manually select a specific snap and export it directly to the camera roll. For this, the process is simple and quick, as described below:
Step1 Open your Snapchat and tap on the “Snaps” icon given below. This will open all the captured snaps on your phone.


Step2 Among all the snaps, select any snap that you want to send. Then, tap on the three-dot icon given at the top right.

Step3 After selecting the three-dot icon, tap on the “Export or Send Snap” option. Now under the heading of “Share Elsewhere,” tap on the “Download” icon, which will instantly export the snap to your camera roll.

Part 3: Save Multiple Snaps to Camera Roll at Once
Many people like to capture pictures of a particular event on their Snapchat. However, if your taken snaps are not saved in the camera roll, you may have difficulty sharing the images with others on other social media apps. You can save time by saving multiple snaps to the camera roll all at once. Through the following steps, you can learn how to save snaps to the camera roll all at once:
Step1 Open your Snapchat and swipe up from the bottom using your finger. This will open all the captured snaps on your screen.
Step2 Now tap and hold any specific snap that will allow you to select multiple snaps. You can see the “Tick” icon on the snaps that you have selected. Once you choose all the snaps you want to save to the camera roll, tap on the “Export” button displayed below.

Step3 Under the heading of “Share Elsewhere,” tap on the “Download” icon. This will quickly start exporting the snaps to your camera roll smoothly.

Part 4: How To Change Where Photos Are Saved in Snapchat
Some people like to save the phone’s storage by saving the snaps to memories. If you prefer saving the snaps in memories instead of the camera roll, you can save the phone’s storage space. Conversely, some people like to export their snaps to the camera roll if multiple people use their Snapchat.
For privacy matters, people like to save the snaps to the camera roll only. If you want to change the location where the photos are saved, you can check the below instructions:
Step1 Head to your Snapchat and tap on the Profile icon displayed in the top left corner. From there, select the “Settings” icon to proceed.

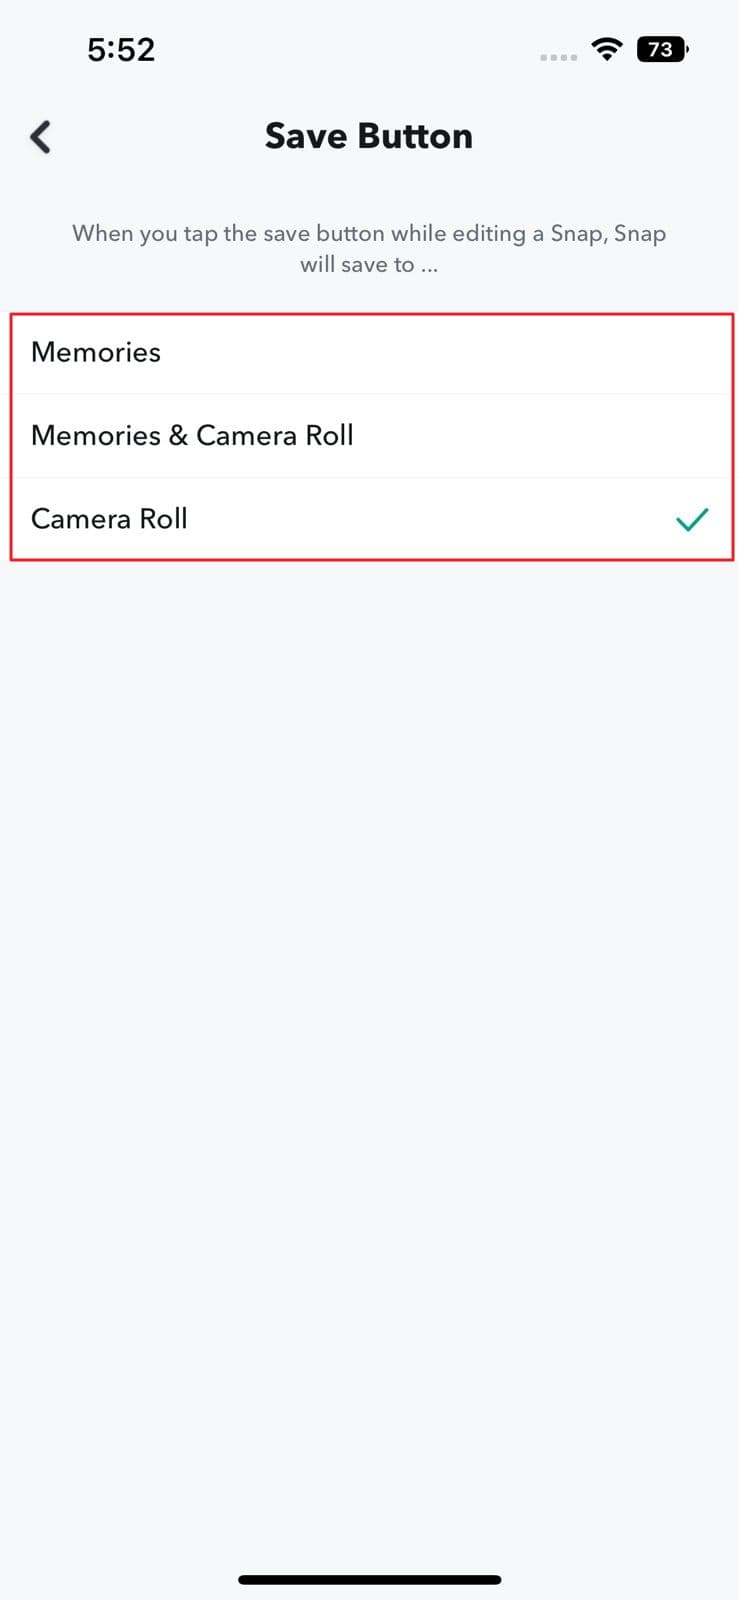
Step2 On the settings menu, locate the option called “Memories.” Now on the new menu, select the “Save Button” given under the section of “Save Destinations.”

Step3 In the Save Button menu, you can easily choose to save your photos to Camera Roll or Memories only. Or you can select the “Memories and Camera Roll” option to save the snaps on both memories and camera roll. Through these settings, you can change the location of saved snaps effortlessly.
Conclusion
Are you fond of using Snapchat regularly? If you take pictures from Snapchat frequently, this article will help you how to save snaps to the camera roll with multiple methods. Using the suggested methods, you can easily save your snaps to the camera roll without hassle.
Free Download For Win 7 or later(64-bit)
Free Download For macOS 10.14 or later
Free Download For macOS 10.14 or later
The Ultimate Guide to Integrating Snap Photos in Teams
The trend of using vibrant filters and lenses during the pandemic time was first introduced by Snap Camera. There are various popular filters in the Snap Camera app that indulges people in creating captivating avatars. Moreover, people also use this popular app to enhance their visual presence in virtual conferences. You can apply unique filters or lenses through the Snap Camera app to make funny virtual meetings with friends.
This article will address how to properly download and launch the Snap Camera app. Moreover, you can also learn to link the Snap Camera on Microsoft Teams easily.
Part 1: How To Download Snap Camera on Your PC or Mac?
Snap Camera is a popular app that can change your visual appearance on many platforms. For instance, you can use the Snap Camera app on Skype, Microsoft Teams, Google Meetings, etc. This app offers attractive lenses and filters that can make your facial appearance interesting. To conduct a casual meeting with your friends, you can use the webcam of Snap Camera. The Snap Camera’s webcam lets you greet your friends or colleagues in a unique manner.
In this section, we will provide you with the exact system requirements of the Snap Camera. Also, we will guide you on how to install and launch the Snap Camera tool on your Windows or Mac device easily.
System Requirements of Snap Camera
- Required Operating System: Windows 10 (64 bit) or latest; macOS 10.13 or latest
- Minimum Hardware Requirements: Minimum of Intel Core i3 2.5Ghz or AMD FX 4300 2.6Ghz with 4 GB RAM / Intel HD Graphics 4000 / Nvidia GeForce 710 / AMD Radeon HD 6450 / Screen Resolution of 1280 x 768 or higher
Steps to Install and Launch Snap Camera on Windows or Mac
Step1 Visit the official website of Snap Camera and tap on the “Download” button. This will open a new page on your computer’s screen.

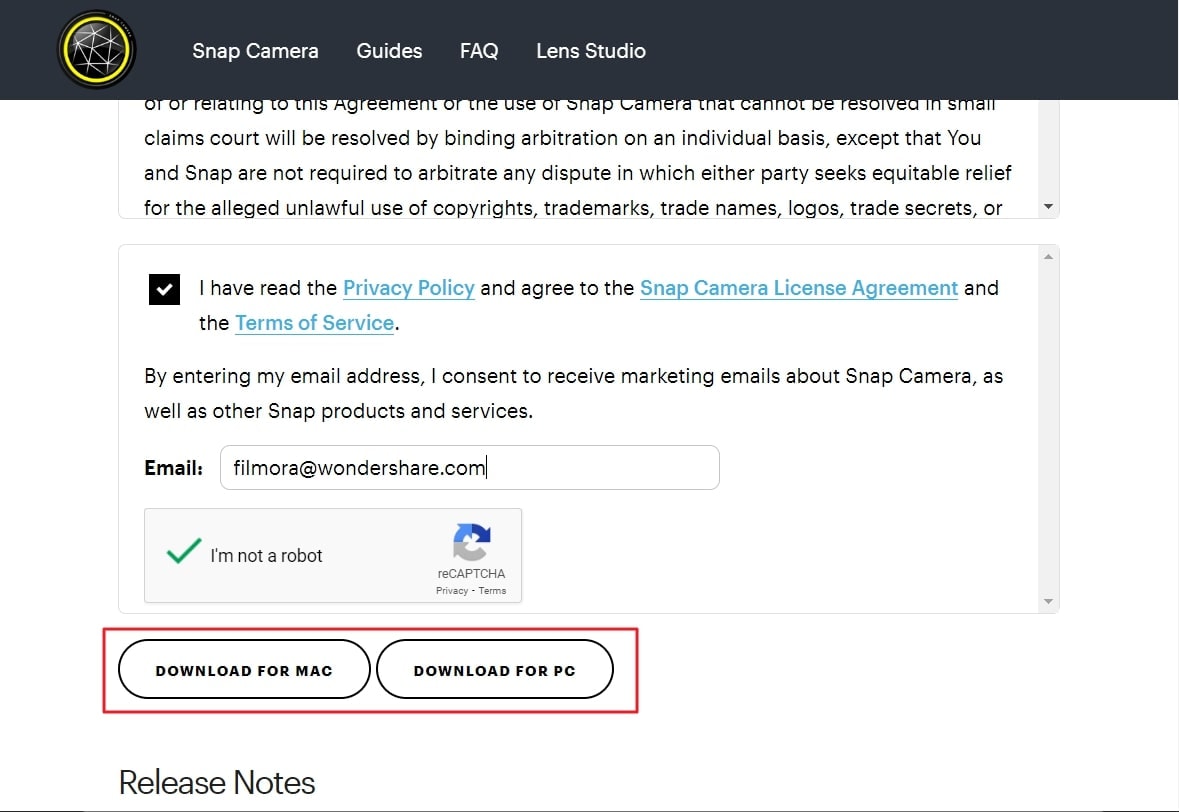
Step2 Click the “I agree” button and tap on the “I’m not a robot” option. Afterward, enter your email address in the given box.

Step3 Afterward, click either “Download for Mac” or “Download for PC,” depending on your need. Wait until the installer file gets downloaded on your computer completely. After that, double-click on the .exe file to install the Snap Camera for Microsoft Teams app.
Part 2: How To Set up Snap Camera on your PC
Do you want to set up the Snap Camera for Microsoft Teams on your computer? The setup process of the Snap Camera app is simple to follow. First, download the Snap Camera app on your computer successfully. Once done with launching the Snap Camera app, follow the below instructions:
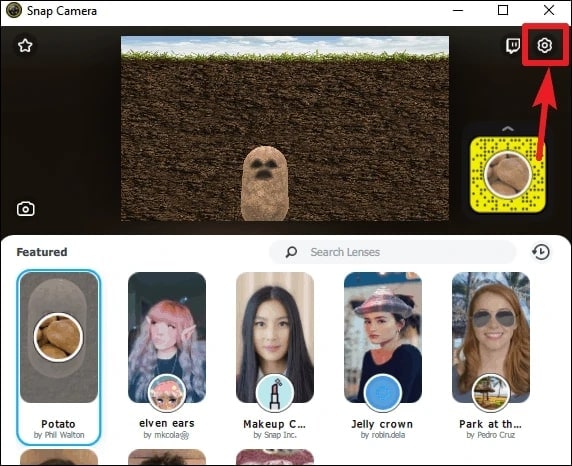
Step1 After opening the Snap Camera app, click on the “Gear” icon. This will open the Settings of the Snap Camera.
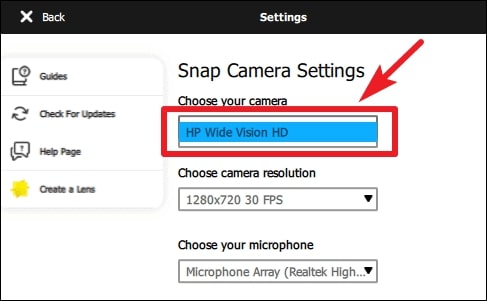
Step2 In Snap Camera Settings, head to the “Choose your Camera” option. Here, choose your desktop’s webcam to proceed. Afterward, select a filter on the app you want to apply during your virtual meeting.
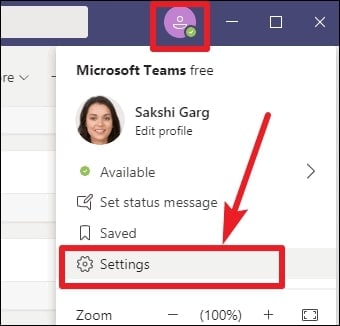
Step3 Now, you can utilize the Snap Camera app on Microsoft Teams. For this, open the Microsoft Teams app after setting up the Snap Camera on your PC.
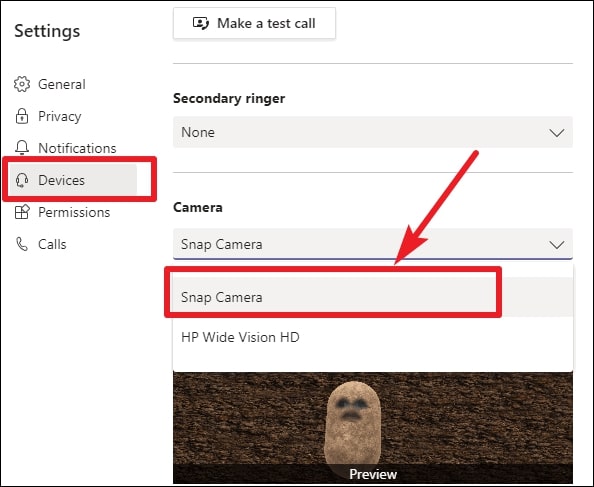
Step4 On your Microsoft Teams, tap on the “Profile” icon. Select “Settings” and tap on “Devices” from the left section. Afterward, scroll to the bottom until you can locate the “Camera” section.
Step5 Under the Camera section, choose “Snap Camera” from the list. Thus, you conduct a virtual meeting using the Snap Camera for Microsoft Teams webcam and applied filters.
Part 3: Recommending Popular Snap Camera Filters
Do you want to try the trending filters of Snap Camera for Microsoft Teams? Read this part to discover the exciting filters that are exclusively provided in the Snap Camera tool:
1. Potato
This unique filter can be used to describe a funny situation in the form of a potato cartoon.

2. Invisible Person
This filter is for you if you want to highlight your presence by getting invisible!

3. Baby
Do you want to take the sympathies of your colleagues? Try this filter to make a baby face to prevent yourself in vulnerable situations.

4. Snorkle
Are you the one who is always punctual in attending the virtual meetings? This filter can describe your dedication to the team’s goals.

5. Drift Visor
Drift Visor is a vibrant filter that can be used by IT experts. If you are a technical expert, use this filter during virtual meetings.

Conclusion
Snap Camera is an advanced app that functions in altering the visual look. Using this app, you can try a different look in virtual sessions flawlessly. You can eliminate your facial flaws by applying the offered lenses and filters from the Snap Camera. This article taught you how to set up the Snap Camera on Microsoft Teams easily. If you are willing to use the Snap Camera app during your Zoom and Google Meet meetings, you can read their respective guides.
Free Download For Win 7 or later(64-bit)
Free Download For macOS 10.14 or later
Free Download For macOS 10.14 or later
Also read:
- [New] 2024 Approved Avoid Breaches The Pre-Upload Guide to Copyright on TikTok
- [New] How to Step Into a TikTok Event Like a Pro for 2024
- [New] In 2024, Copyright Clearance for Creative Uploads on TikTok
- [New] The Blueprint for Crafting an Individual TikTok Marker for 2024
- [New] Top Tips for Pop Culture Meme Success for 2024
- [New] Zero-Cost Techniques for Video and Text Combination
- [Updated] 2024 Approved Engineering A Memorable TikTok Close Screen
- [Updated] How to Charm Your Way Into a Friend’s TikTok Show for 2024
- [Updated] In 2024, The Ultimate Guide to Streamline Your Podcast on Google
- [Updated] The Art of Rebranding Online Expert Tips for Transforming Your TikTok Username for 2024
- 2024 Approved The Ultimate List YouTube Alternatives for Video Creators
- 4 Methods to Turn off Life 360 On Realme C55 without Anyone Knowing | Dr.fone
- In 2024, Filmora Savings Hacks 4 Expert-Approved Methods to Get Discounts
- In 2024, The Top 5 Android Apps That Use Fingerprint Sensor to Lock Your Apps On Tecno Spark 10 5G
- Is your Xiaomi Redmi 13C working too slow? Heres how you can hard reset it | Dr.fone
- Quora Experts Live Snapchat Session
- Top 10 AirPlay Apps in Infinix GT 10 Pro for Streaming | Dr.fone
- Understanding Instagram's Max Video Length Guide
- Voiceover Techniques for TikTok Video Amplification
- Title: Saving Snaps From Snapchat on Camera Roll – A Guide
- Author: Kenneth
- Created at : 2024-10-07 18:29:19
- Updated at : 2024-10-11 23:30:48
- Link: https://tiktok-video-files.techidaily.com/saving-snaps-from-snapchat-on-camera-roll-a-guide/
- License: This work is licensed under CC BY-NC-SA 4.0.