
![[New] Your Complete TikTok Camera Operation Manual for 2024](https://www.lifewire.com/thmb/HpkGkovLwPPowOg2old7mg3NxW4=/400x300/filters:no_upscale():max_bytes(150000):strip_icc()/Switch_Splatoon2_hardwarebundle_JoyCons_artwork_01-5c3cbefdc9e77c0001043208.jpg)
[New] Your Complete TikTok Camera Operation Manual for 2024
Your Complete TikTok Camera Operation Manual
Whether sardonic, informative, or both, voiceovers can improve a TikTok video for humor and clarity.
What do sewing how-to videos, cooking tutorials, and daily vlogs have in common? They all probably are dependent on TikTok’s voiceover feature, which can be helpful in the inbuilt editing suite of the TikTok app.
Ever wished to record a TikTok and save it for later without letting the publisher know? Then, it is always the best idea to learn how to screen record on TikTok. This article will help you learn multiple ways of screen recording on TikTok without you having to worry about the other person knowing.
And, we’ll also look at how to do a voiceover on TikTok using the step-by-step guide mentioned below.
In this article
01 How to Screen Record on TikTok?
02 How to Add Voiceover to the TikTok Video?
03 Add Voiceover to TikTok Video with Extra Fusion: Wondershare Filmora
Part 1: How to Screen Record on TikTok?
Have you ever accidentally taken a screenshot of someone’s Instagram story or screen recorded it for future reference and got scared that the person may have got notified?
While Instagram had the feature of notifying users if their story or picture has been screen recorded, it has recently changed to restrict this notification to images and videos sent via private DMs.
However, TikTokers can rest assured as TikTok has never had a similar notification feature, and you can safely screen record TikTok without mentioning the publisher.
How to Record Computer Screens on Windows
PCs allow software products useful for various purposes. For example, if you would like to record your PC screen while using Windows-based software, you’ll be required a powerful screen recorder that lets you set up a new screencasting session in just a few simple steps.
Here are some of the steps you need to consider!
Step 1: Download Wondershare Filmora
Download Wondershare Filmora onto your computer and then launch the software.
Wondershare Filmora
Get started easily with Filmora’s powerful performance, intuitive interface, and countless effects!
Try It Free Try It Free Try It Free Learn More >

Just visit the browser and type the URL ‘tiktok.com’ in the search bar. Then, look for the TikTok video you would like to record.
Besides providing functions that activate you to control the screen recording procedure entirely, Wondershare Filmora is also a video editor program that lets you manipulate your videos in any way you want.
You must double-click on its desktop icon and open the Full Feature mode right after launching the software. Now, hit the Record tab and choose the Record PC screen option.
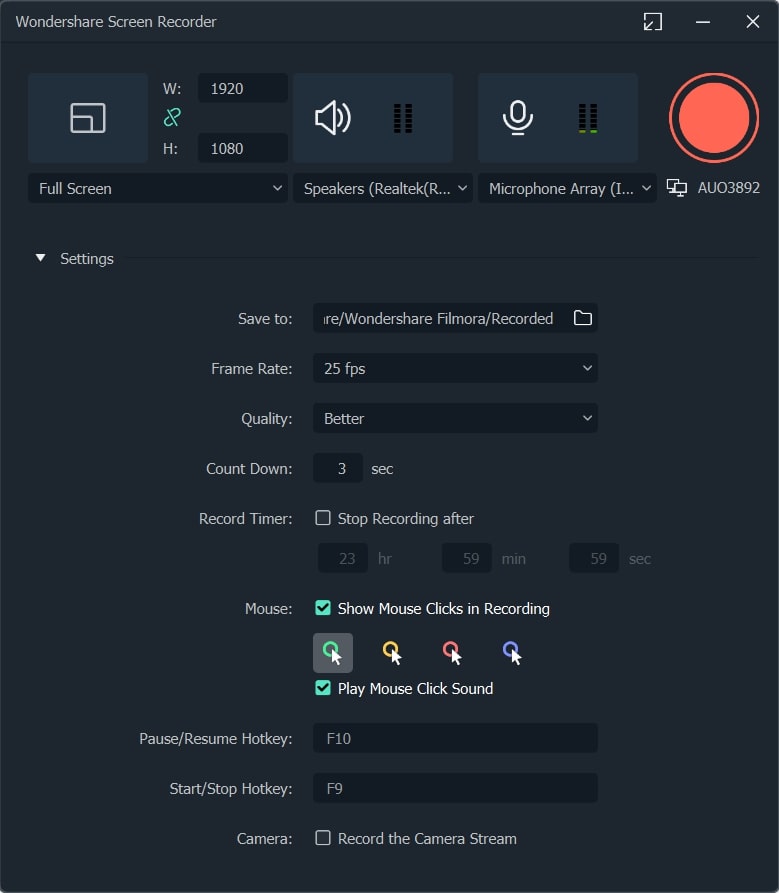
The Wondershare Screen Recorder window will appear on the screen so you can modify the settings for your upcoming screencasting session.

You’ll see the Settings icon in the window’s lower right corner and then click it. For example, you can select the computer’s hard drive destination where the recording will be saved, modify the frame rate or set the quality of the recording from the Quality drop-down menu.

Hit the Microphone icon to choose the mic you’ll be using to record narration, and you can select the Speakers icon if you want to disable or enable the computer’s speakers during the session of screen recording.
You’ll see the Settings icon in the window’s lower right corner and then click it. For example, you can select the computer’s hard drive destination where the recording will be saved, modify the frame rate or set the quality of the recording from the Quality drop-down menu.

Mark the Mouse checkbox if you wish the mouse clicks to display in the recording, and you can easily place the maximum duration of a recording session. It is done by inserting the preferred default screen recording duration into the Record Timer box.

Hit the Rec button to begin a new screencasting session, and the software will start recording after a three-second countdown.
Tap the F9 button on the keyboard to stop recording. It will automatically open the file in Filmora’s video editor so you can edit it before publishing online.
Part 2: How to Add Voiceover to the TikTok Video?
Steps to add a voiceover to your TikTok video.
Upload or record a new video by hitting the + at the menu’s center at the screen’s bottom area.
Hit the microphone icon on the screen’s upper right corner once you’re over with the recording and trimming clips to your desired edit. Beneath, the microphone icon must mention “Voiceover.”

Source: mashable.com
Now, you can record a voiceover timed to Video’s every frame here.
Hit the “Save“ button once you’re satisfied with the voiceover

Hitting the “Save“ button will offer you back to the video’s preview, where you can add filters, text, stickers, and various sounds.
It is needed to add effects to your voiceover by hitting the “voice effects”. Here, you can control the narrator’s volume as well.
Also, make sure to enable automatic captions to make sure your video is more accessible!
Tap the Next button once you’re over with your Video. Then, you can edit the Video’s privacy settings, add a caption, and select a cover.
Part 3: Add Voiceover to TikTok Video with Extra Fusion: Wondershare Filmora
Do you want to include your voice in a video, create a voiceover demo for sharing and uploading on social networking platforms, or frame a documentary for important content?
All you need is an ideal video editing program similar to the Wondershare Filmora Video Editor.
The Filmora’s voiceover feature allows you to record your voice or add voice-over files to Video easily. In addition, you can customize the pitch, speed, and volume of the recorded voiceover and apply fade-in and fade-out effects. I’ll share how to register and add voiceover to a video with Filmora on your computer in this post.
Firstly, you can edit your Video in Filmora and then record the voiceover afterward. Or, you can first record the voiceover and then edit the Video around.
Check the steps below on how to make TikTok videos with voiceover via Wondershare Filmora.
Wondershare Filmora
Get started easily with Filmora’s powerful performance, intuitive interface, and countless effects!
Try It Free Try It Free Try It Free Learn More >
Record Voiceover and Add it to Video
We suggest you record the voiceover first in most cases so the sound will become pretty natural.
Step 1: Connect Microphone to PC or laptop
Connect the microphone to your laptop/PC when you’re ready to begin. It’s advisable to use some professional external microphones to capture high-quality sound.
Step 2: Record voiceover
Tap the Wondershare Filmora icon to launch this software. Then, select the New Project option in the beginning interface to create a new one.
Enter the Record tab and choose the “Record a Voiceover” option to arouse the Record Audio windows.
Or hit the microphone icon, and you only need 3 seconds of countdown to begin speaking.
Click the microphone icon again after you finish the above. Then, a new Record file option will be automatically present on the audio track.
Step 3: Edit Recorded Voiceover to Video
To edit the recorded voiceover, you can adjust audio settings, such as changing the Speed, Pitch, Volume, etc.

You can cut and trim out unnecessary sound sections from the recorded voiceover or apply the fade effects to the voiceover for a smoother transition.
Step 4: Sync Voiceover to Video
Now, it’s time to synchronize the recorded voiceover to video to create a compelling video.
The Wondershare Filmora allows up to 100 audio tracks; you can also add some background music to the voiceover.
Then import and drag-n-drop the video content to the video track, drag and drop the soundtrack to the video’s right-side position. Keep the voice and video track in the exact video duration if required.
Here’s how to sync voiceover to video!
Now, sync the recorded voiceover to Video to create a video. Since Filmora is compatible with 100 plus audio tracks, you can add different background music to the voiceover.
Then import and drag-n-drop the video content to the video track, drag and drop the soundtrack to the Video’s right side position. You can keep the Video and audio track in the same video duration.

Note: If you’ve recorded the iPhone voiceover or other device already, you can import it in the Project Library if you wish to add it to the Video and then sync it to Video.
Here is the ultimate step-by-step guide about adding titles to videos after knowing how to do a voiceover on TikTok.
Step 5: Export and save the new file
Click the “Export“ tab to export your new video file after you complete the project. You can either save the Video to different formats or directly share it on other social media platforms.
Additionally, you can even burn a DVD in minutes to watch it on TV.
How to Record and Add Voice over File during Filmora’s Video Editing Process
If you’ve recorded the voice over on your iPhone or another device already, even via the Wondershare Filmora, and wish to add it to the Video, visit the steps mentioned below:
1. Upload the video to Filmora
After logging in to Filmora’s main editing interface, click “Import” or drag-drop your video and voiceover file to the project library.
Filmora video editing software is compatible with a vast range of formats, so there will be no need to convert the files before import.
Drag and drop the files or video content to the Video Timeline when all the files get imported.
2. Record Voiceover in Video Editing
3. Edit voiceover and Export
You can then edit the recorded voiceover for TikTok to perfectly fit the Video and export it to your laptop/PC or directly upload it to YouTube.
For improving the sound, Filmora features more audio editing tools.
Conclusion
This article offered you a step-by-step guide on how to record a TikTok. It also displays four different screen recording methods, along with how to do a voiceover on TikTok.
Now, don’t ever worry about losing out on your favorite TikTok without the original publisher knowing via screen record TikTok via Wondershare Filmora.
02 How to Add Voiceover to the TikTok Video?
03 Add Voiceover to TikTok Video with Extra Fusion: Wondershare Filmora
Part 1: How to Screen Record on TikTok?
Have you ever accidentally taken a screenshot of someone’s Instagram story or screen recorded it for future reference and got scared that the person may have got notified?
While Instagram had the feature of notifying users if their story or picture has been screen recorded, it has recently changed to restrict this notification to images and videos sent via private DMs.
However, TikTokers can rest assured as TikTok has never had a similar notification feature, and you can safely screen record TikTok without mentioning the publisher.
How to Record Computer Screens on Windows
PCs allow software products useful for various purposes. For example, if you would like to record your PC screen while using Windows-based software, you’ll be required a powerful screen recorder that lets you set up a new screencasting session in just a few simple steps.
Here are some of the steps you need to consider!
Step 1: Download Wondershare Filmora
Download Wondershare Filmora onto your computer and then launch the software.
Wondershare Filmora
Get started easily with Filmora’s powerful performance, intuitive interface, and countless effects!
Try It Free Try It Free Try It Free Learn More >
Just visit the browser and type the URL ‘tiktok.com’ in the search bar. Then, look for the TikTok video you would like to record.
Besides providing functions that activate you to control the screen recording procedure entirely, Wondershare Filmora is also a video editor program that lets you manipulate your videos in any way you want.
You must double-click on its desktop icon and open the Full Feature mode right after launching the software. Now, hit the Record tab and choose the Record PC screen option.
The Wondershare Screen Recorder window will appear on the screen so you can modify the settings for your upcoming screencasting session.
You’ll see the Settings icon in the window’s lower right corner and then click it. For example, you can select the computer’s hard drive destination where the recording will be saved, modify the frame rate or set the quality of the recording from the Quality drop-down menu.
Hit the Microphone icon to choose the mic you’ll be using to record narration, and you can select the Speakers icon if you want to disable or enable the computer’s speakers during the session of screen recording.
You’ll see the Settings icon in the window’s lower right corner and then click it. For example, you can select the computer’s hard drive destination where the recording will be saved, modify the frame rate or set the quality of the recording from the Quality drop-down menu.
Mark the Mouse checkbox if you wish the mouse clicks to display in the recording, and you can easily place the maximum duration of a recording session. It is done by inserting the preferred default screen recording duration into the Record Timer box.
Hit the Rec button to begin a new screencasting session, and the software will start recording after a three-second countdown.
Tap the F9 button on the keyboard to stop recording. It will automatically open the file in Filmora’s video editor so you can edit it before publishing online.
Part 2: How to Add Voiceover to the TikTok Video?
Steps to add a voiceover to your TikTok video.
Upload or record a new video by hitting the + at the menu’s center at the screen’s bottom area.
Hit the microphone icon on the screen’s upper right corner once you’re over with the recording and trimming clips to your desired edit. Beneath, the microphone icon must mention “Voiceover.”
Source: mashable.com
Now, you can record a voiceover timed to Video’s every frame here.
Hit the “Save“ button once you’re satisfied with the voiceover
Hitting the “Save“ button will offer you back to the video’s preview, where you can add filters, text, stickers, and various sounds.
It is needed to add effects to your voiceover by hitting the “voice effects”. Here, you can control the narrator’s volume as well.
Also, make sure to enable automatic captions to make sure your video is more accessible!
Tap the Next button once you’re over with your Video. Then, you can edit the Video’s privacy settings, add a caption, and select a cover.
Part 3: Add Voiceover to TikTok Video with Extra Fusion: Wondershare Filmora
Do you want to include your voice in a video, create a voiceover demo for sharing and uploading on social networking platforms, or frame a documentary for important content?
All you need is an ideal video editing program similar to the Wondershare Filmora Video Editor.
The Filmora’s voiceover feature allows you to record your voice or add voice-over files to Video easily. In addition, you can customize the pitch, speed, and volume of the recorded voiceover and apply fade-in and fade-out effects. I’ll share how to register and add voiceover to a video with Filmora on your computer in this post.
Firstly, you can edit your Video in Filmora and then record the voiceover afterward. Or, you can first record the voiceover and then edit the Video around.
Check the steps below on how to make TikTok videos with voiceover via Wondershare Filmora.
Wondershare Filmora
Get started easily with Filmora’s powerful performance, intuitive interface, and countless effects!
Try It Free Try It Free Try It Free Learn More >
Record Voiceover and Add it to Video
We suggest you record the voiceover first in most cases so the sound will become pretty natural.
Step 1: Connect Microphone to PC or laptop
Connect the microphone to your laptop/PC when you’re ready to begin. It’s advisable to use some professional external microphones to capture high-quality sound.
Step 2: Record voiceover
Tap the Wondershare Filmora icon to launch this software. Then, select the New Project option in the beginning interface to create a new one.
Enter the Record tab and choose the “Record a Voiceover” option to arouse the Record Audio windows.
Or hit the microphone icon, and you only need 3 seconds of countdown to begin speaking.
Click the microphone icon again after you finish the above. Then, a new Record file option will be automatically present on the audio track.
Step 3: Edit Recorded Voiceover to Video
To edit the recorded voiceover, you can adjust audio settings, such as changing the Speed, Pitch, Volume, etc.
You can cut and trim out unnecessary sound sections from the recorded voiceover or apply the fade effects to the voiceover for a smoother transition.
Step 4: Sync Voiceover to Video
Now, it’s time to synchronize the recorded voiceover to video to create a compelling video.
The Wondershare Filmora allows up to 100 audio tracks; you can also add some background music to the voiceover.
Then import and drag-n-drop the video content to the video track, drag and drop the soundtrack to the video’s right-side position. Keep the voice and video track in the exact video duration if required.
Here’s how to sync voiceover to video!
Now, sync the recorded voiceover to Video to create a video. Since Filmora is compatible with 100 plus audio tracks, you can add different background music to the voiceover.
Then import and drag-n-drop the video content to the video track, drag and drop the soundtrack to the Video’s right side position. You can keep the Video and audio track in the same video duration.
Note: If you’ve recorded the iPhone voiceover or other device already, you can import it in the Project Library if you wish to add it to the Video and then sync it to Video.
Here is the ultimate step-by-step guide about adding titles to videos after knowing how to do a voiceover on TikTok.
Step 5: Export and save the new file
Click the “Export“ tab to export your new video file after you complete the project. You can either save the Video to different formats or directly share it on other social media platforms.
Additionally, you can even burn a DVD in minutes to watch it on TV.
How to Record and Add Voice over File during Filmora’s Video Editing Process
If you’ve recorded the voice over on your iPhone or another device already, even via the Wondershare Filmora, and wish to add it to the Video, visit the steps mentioned below:
1. Upload the video to Filmora
After logging in to Filmora’s main editing interface, click “Import” or drag-drop your video and voiceover file to the project library.
Filmora video editing software is compatible with a vast range of formats, so there will be no need to convert the files before import.
Drag and drop the files or video content to the Video Timeline when all the files get imported.
2. Record Voiceover in Video Editing
3. Edit voiceover and Export
You can then edit the recorded voiceover for TikTok to perfectly fit the Video and export it to your laptop/PC or directly upload it to YouTube.
For improving the sound, Filmora features more audio editing tools.
Conclusion
This article offered you a step-by-step guide on how to record a TikTok. It also displays four different screen recording methods, along with how to do a voiceover on TikTok.
Now, don’t ever worry about losing out on your favorite TikTok without the original publisher knowing via screen record TikTok via Wondershare Filmora.
Finding the Key: Personalized Tag for Your TikTok Stream
TikTok is one of the most famous social media platforms that many people use on a daily basis. Due to high traffic on TikTok, you can reach a larger audience instantly. Through TikTok, you can efficiently market and promote your e-commerce products with live streaming. Moreover, if you are holding an event or conference, you can connect with multiple people through TikTok live streaming.
If you are willing to live stream on TikTok through your PC, you would need a TikTok stream key. To know how to get the TikTok stream key, this article will help you.
Part 1: What is Stream Key?
A stream key is a combination of random letters and numbers which stores the information of your account. It allows different streaming software to live stream your video on your preferred platform. To use streaming software such as OBS Studio for live streaming, the stream key will help you connect with your preferred platform.
If you are using the YouTube platform, its stream key will consist of all the related information, such as login details and permissions. That’s why you should keep the streaming key of your platform confidential. Thus, the stream key can prevent you from hassle as you don’t have to sign in with your YouTube account on OBS Studio for live streaming.
Part 2: How to Get your Own TikTok Stream Key?
Before jumping on how to get the TikTok stream key, there are some basic requirements. To check the prerequisites, read the below points:
- To use the live stream feature on TikTok, you need to have 1,000 followers.
- There is an age restriction to use this feature. You should be 16 years old or older.
- To send and receive virtual gifts during your live stream, the age restriction is 18 years old.
Easy Steps to Get TikTok Stream Key Instantly
Do you want to know how to find TikTok stream key? A streaming key can significantly help you to connect with your platform to ensure high-quality live streaming. Check the following instructions to get your TikTok streaming key quickly.
Step1 Go to Live Option
Launch the TikTok app on your iPhone or Android device and tap on the “Plus” icon given below. Now tap on the “Live” option by scrolling right on your screen.
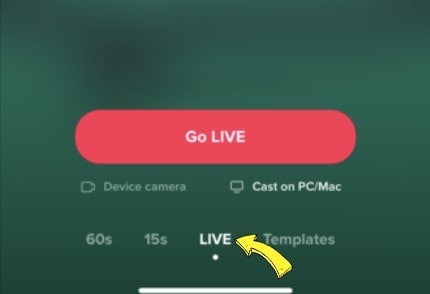
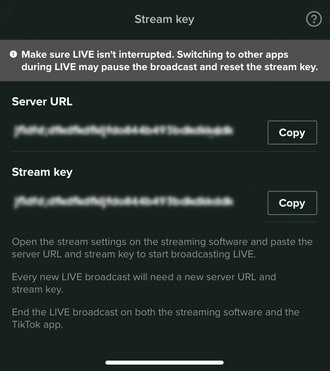
Step2 Copy the Streaming Key
Afterward, tap “Cast/Connect to PC/Mac” and select the “Go Live” button. Now you will be able to see the TikTok Stream Key and Server URL. You can tap on the “Copy” button given adjacent to the stream key and server URL. Make sure to copy both things carefully because they will be used in a later process.
Part 3: How to Go Live on TikTok with your Streaming Key?
Once you have gotten your stream key and server URL, now you can go live on TikTok through different streaming platforms. Read this section to learn how to live stream TikTok using the best streaming software.
Way 1. With OBS
OBS Studio is a famous streaming software that is used by professionals and experts. It is used for high-quality streams with additional features. It has an integrated video encoder that functions with great versatility. Along with producing live content, OBS Studio also offers an efficient screen recorder. Using this software, you can effectively add text and graphics to your video content.
In its clean interface, you have complete freedom to set your hotkeys. Using the hotkeys, you can complete a specific action instantly. While broadcasting your live stream, you can choose your preferred resolution on this software. Hence, it’s a great tool to live stream your TikTok flawlessly.
Instructions to Go Live on TikTok Via OBS Studio
OBS Studio is an advanced broadcasting software offering high-end results. To use OBS for live streaming on TikTok, check the below instructions:
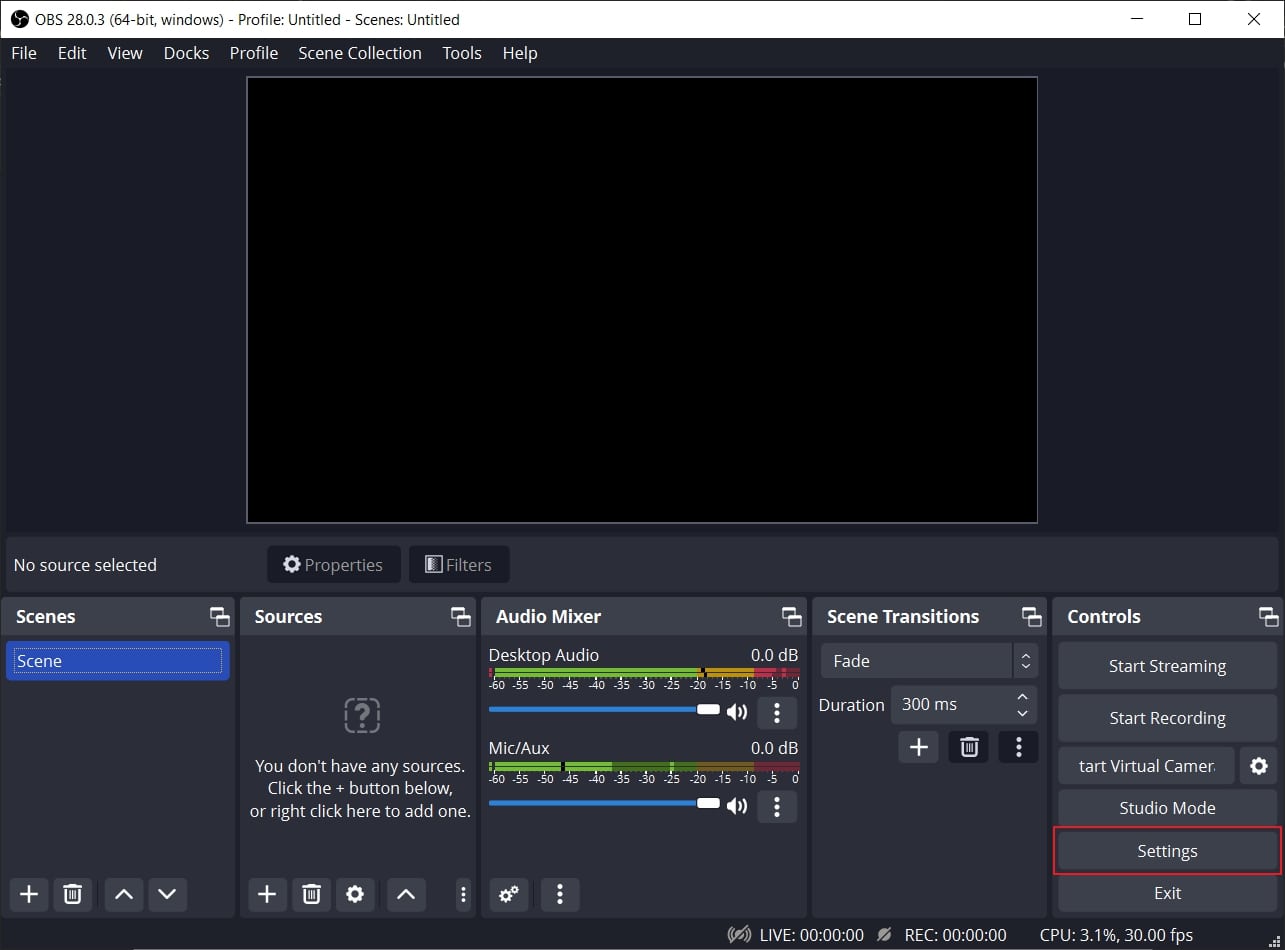
Step1 Navigate to Stream Section
Launch OBS Studio on your PC and click “Settings” under the “Controls” section. On the new window, select “Stream” from the left section.
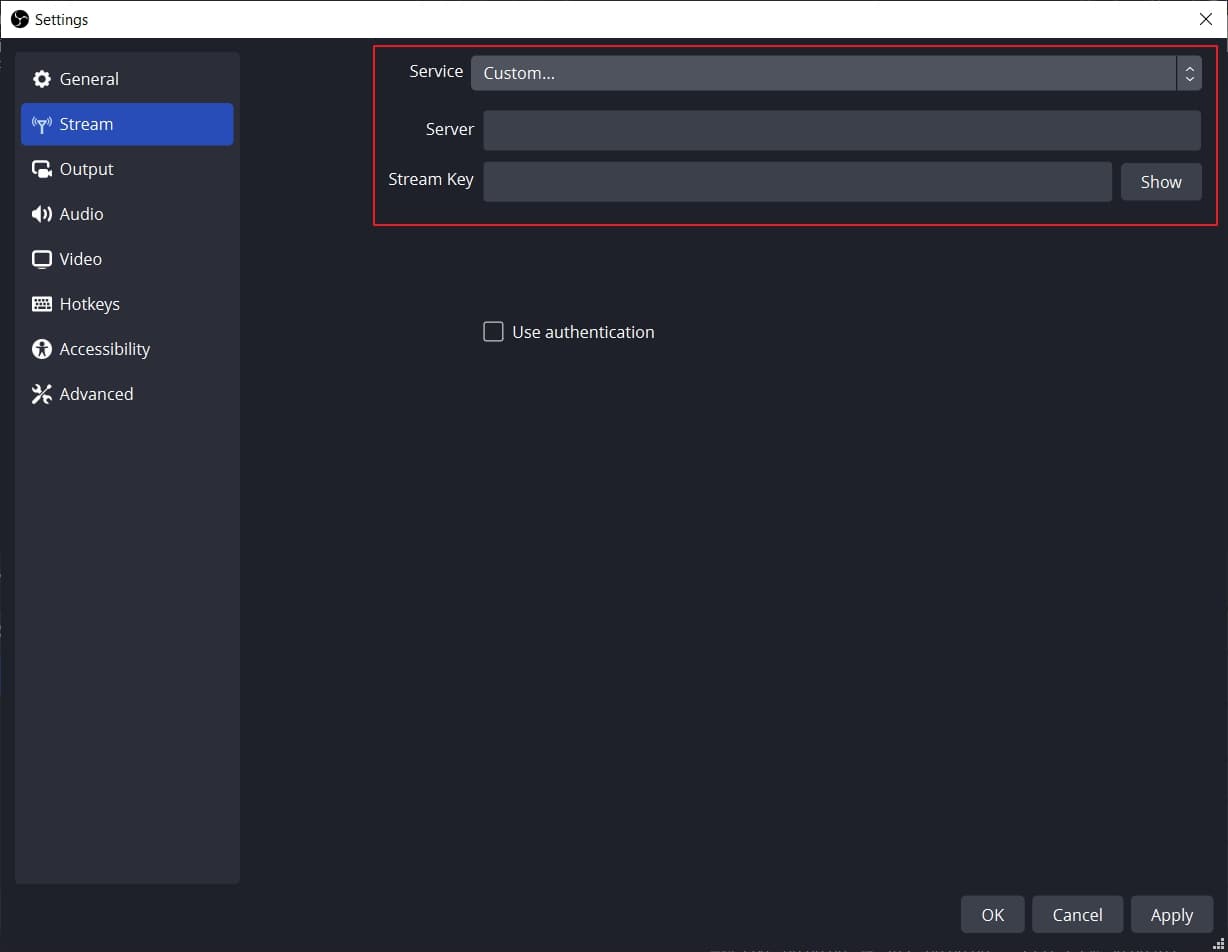
Step2 Enter Server URL and the Stream Key
On the Stream window, select “Custom” on the “Service” option. Once done, enter the Server and Stream Key on the given boxes. Now hit the “Apply” button to proceed with the process of getting live on TikTok with OBS.
Way 2. With Streamlabs
Streamlabs is an all-in-one streaming software that produces captivating results in a cost-effective manner. It shows compatibility with mainstream platforms like YouTube, Twitter, Discord, etc. This software consists of professional themes and overlays that you can utilize during live streaming. Furthermore, it supports multi-streaming, through which you can go live on various platforms simultaneously.
Using Streamlabs, you can get customizable alerts during your live stream. This will help you to check the feedback of your supporters quickly. Hence, Streamlabs is an excellent platform through which you can connect and engage with your audience effortlessly.
Instructions to Go Live on TikTok Using Streamlabs
Are you excited to use Streamlabs for conducting live streaming sessions on TikTok? To learn how to go live on TikTok using Streamlabs, here are the simple steps:
Step1 Open Streamlabs Desktop Settings
Download and install Streamlabs Desktop on your PC. Launch its interface and navigate to the “Gear” icon on the left side. It will open the settings of this tool. From the settings menu, choose “Stream” from the left side.
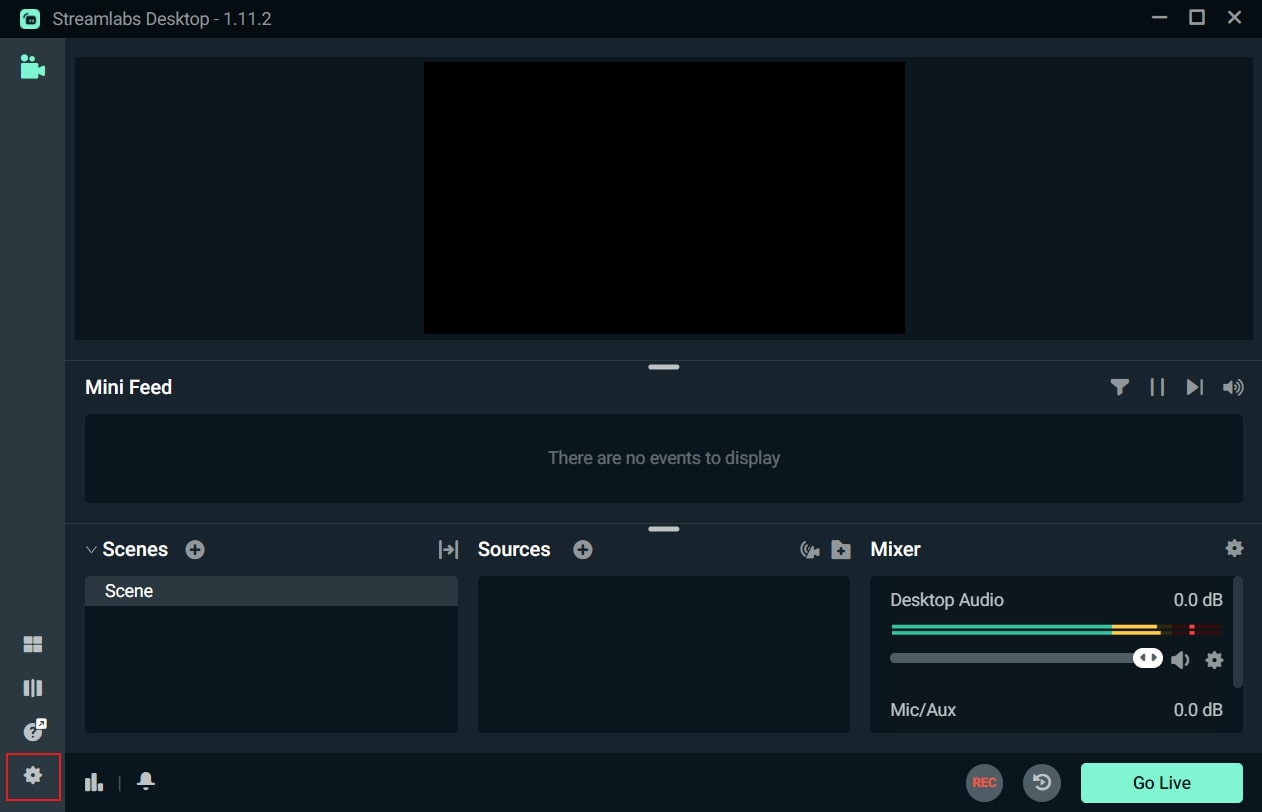
Step2 Add Streaming Key
On the Stream menu, select “Custom Streaming Service” as Stream Type. Afterward, add your Server URL and Stream Key on the given spaces. Once done, click on the “Done” button. Now you can easily go live through this streaming software on TikTok.

Bonus Tips: Easily Record and Edit Your Stream with Filmora
Are you interested in recording your live stream on TikTok? The best tool to capture your live streams efficiently on TikTok is Wondershare Filmora . This screen recorder has the ability to screen record your live streams in your desired resolution. Moreover, while recording your screen, you can simultaneously capture your webcam. It also gives you the option to select the recording area, preferably.
Besides screen recording, Filmora also offers a video editor. This editor offers more than 900 video effects that you can easily apply to your screen recording. Furthermore, you can also adjust the speed of your recorded video through this editor. You can also avail of other options to crop, split, resize, and trim the video. Hence, Filmora works efficiently to screen record and edit your live-stream sessions of TikTok. Watch the video below to learn more about Filmora’s new features.
Conclusion
Live streaming on TikTok is a new trend that many content creators and entrepreneurs are adopting. To go live on TikTok on your desktop, you would need a stream key. This article has provided clear instructions on how to get the TikTok stream key conveniently. Along with that, we have also highlighted a professional software known as Filmora to screen record and edit your TikTok live streaming.
Free Download For Win 7 or later(64-bit)
Free Download For macOS 10.14 or later
Part 1: What is Stream Key?
A stream key is a combination of random letters and numbers which stores the information of your account. It allows different streaming software to live stream your video on your preferred platform. To use streaming software such as OBS Studio for live streaming, the stream key will help you connect with your preferred platform.
If you are using the YouTube platform, its stream key will consist of all the related information, such as login details and permissions. That’s why you should keep the streaming key of your platform confidential. Thus, the stream key can prevent you from hassle as you don’t have to sign in with your YouTube account on OBS Studio for live streaming.
Part 2: How to Get your Own TikTok Stream Key?
Before jumping on how to get the TikTok stream key, there are some basic requirements. To check the prerequisites, read the below points:
- To use the live stream feature on TikTok, you need to have 1,000 followers.
- There is an age restriction to use this feature. You should be 16 years old or older.
- To send and receive virtual gifts during your live stream, the age restriction is 18 years old.
Easy Steps to Get TikTok Stream Key Instantly
Do you want to know how to find TikTok stream key? A streaming key can significantly help you to connect with your platform to ensure high-quality live streaming. Check the following instructions to get your TikTok streaming key quickly.
Step1 Go to Live Option
Launch the TikTok app on your iPhone or Android device and tap on the “Plus” icon given below. Now tap on the “Live” option by scrolling right on your screen.
Step2 Copy the Streaming Key
Afterward, tap “Cast/Connect to PC/Mac” and select the “Go Live” button. Now you will be able to see the TikTok Stream Key and Server URL. You can tap on the “Copy” button given adjacent to the stream key and server URL. Make sure to copy both things carefully because they will be used in a later process.
Part 3: How to Go Live on TikTok with your Streaming Key?
Once you have gotten your stream key and server URL, now you can go live on TikTok through different streaming platforms. Read this section to learn how to live stream TikTok using the best streaming software.
Way 1. With OBS
OBS Studio is a famous streaming software that is used by professionals and experts. It is used for high-quality streams with additional features. It has an integrated video encoder that functions with great versatility. Along with producing live content, OBS Studio also offers an efficient screen recorder. Using this software, you can effectively add text and graphics to your video content.
In its clean interface, you have complete freedom to set your hotkeys. Using the hotkeys, you can complete a specific action instantly. While broadcasting your live stream, you can choose your preferred resolution on this software. Hence, it’s a great tool to live stream your TikTok flawlessly.
Instructions to Go Live on TikTok Via OBS Studio
OBS Studio is an advanced broadcasting software offering high-end results. To use OBS for live streaming on TikTok, check the below instructions:
Step1 Navigate to Stream Section
Launch OBS Studio on your PC and click “Settings” under the “Controls” section. On the new window, select “Stream” from the left section.
Step2 Enter Server URL and the Stream Key
On the Stream window, select “Custom” on the “Service” option. Once done, enter the Server and Stream Key on the given boxes. Now hit the “Apply” button to proceed with the process of getting live on TikTok with OBS.
Way 2. With Streamlabs
Streamlabs is an all-in-one streaming software that produces captivating results in a cost-effective manner. It shows compatibility with mainstream platforms like YouTube, Twitter, Discord, etc. This software consists of professional themes and overlays that you can utilize during live streaming. Furthermore, it supports multi-streaming, through which you can go live on various platforms simultaneously.
Using Streamlabs, you can get customizable alerts during your live stream. This will help you to check the feedback of your supporters quickly. Hence, Streamlabs is an excellent platform through which you can connect and engage with your audience effortlessly.
Instructions to Go Live on TikTok Using Streamlabs
Are you excited to use Streamlabs for conducting live streaming sessions on TikTok? To learn how to go live on TikTok using Streamlabs, here are the simple steps:
Step1 Open Streamlabs Desktop Settings
Download and install Streamlabs Desktop on your PC. Launch its interface and navigate to the “Gear” icon on the left side. It will open the settings of this tool. From the settings menu, choose “Stream” from the left side.
Step2 Add Streaming Key
On the Stream menu, select “Custom Streaming Service” as Stream Type. Afterward, add your Server URL and Stream Key on the given spaces. Once done, click on the “Done” button. Now you can easily go live through this streaming software on TikTok.
Bonus Tips: Easily Record and Edit Your Stream with Filmora
Are you interested in recording your live stream on TikTok? The best tool to capture your live streams efficiently on TikTok is Wondershare Filmora . This screen recorder has the ability to screen record your live streams in your desired resolution. Moreover, while recording your screen, you can simultaneously capture your webcam. It also gives you the option to select the recording area, preferably.
Besides screen recording, Filmora also offers a video editor. This editor offers more than 900 video effects that you can easily apply to your screen recording. Furthermore, you can also adjust the speed of your recorded video through this editor. You can also avail of other options to crop, split, resize, and trim the video. Hence, Filmora works efficiently to screen record and edit your live-stream sessions of TikTok. Watch the video below to learn more about Filmora’s new features.
Conclusion
Live streaming on TikTok is a new trend that many content creators and entrepreneurs are adopting. To go live on TikTok on your desktop, you would need a stream key. This article has provided clear instructions on how to get the TikTok stream key conveniently. Along with that, we have also highlighted a professional software known as Filmora to screen record and edit your TikTok live streaming.
Free Download For Win 7 or later(64-bit)
Free Download For macOS 10.14 or later
Also read:
- [New] 2024 Approved How to Create Successful Tiktok Videos on Desktop/Android/iPhone?
- [New] 2024 Approved Direct Unwatermarked TikTok Content Download to iPhone
- In 2024, Exclusive Guide to Free, MacOS Compatible TikTok Edits
- [New] 2024 Approved Premium Assortment Unmarked, Superior TikTok Extractors
- In 2024, Food for the Followers Top TikTok Cuisine Craze
- [New] The Ultimate Blueprint for Assembling Engaging TikTok Videos
- [Updated] Complete Guide to Using Siri in TikTok Videos Easy and Effective Filming for 2024
- Boosting Connections on Snapchat Master the Art of Sharing GIFs
- [Updated] 2024 Approved Piecing Together an Epic TikTok Conclusion
- [Updated] 2024 Approved 10 Leading TikTok Metrics for Boosting Engagement
- Direct to the Bottom of the Feed, No Watermark on iPhone for 2024
- [New] In 2024, Accidental TikTok Refresh - Recover Your Content?
- OOTD Creation on a Mac Techniques for the Savvy TikToker
- [New] 2024 Approved How to Save TikTok Video in Gallery-3 Proven Ways [Android&iPhone]
- [New] 2024 Approved Elevate Your TikTok Experience Through Advanced Vocal Modification Techniques
- [New] Mastering Virality on TikTok Essential Hits
- 2024 Approved How to Produce Silent Soundtracks The Power of Audacity's De-Noising Tools
- 2024 Approved How to Change Your TikTok Username - an Ultimate Guide
- Efface Markings IOS/Android Apps for Clear Videos for 2024
- [Updated] Inside the Leaderboard 10 Prime TikTok Analytic Resources
- Elevating Your Mac's TikTok Opener Quality
- Chrome's Edge in TikTok Video Upload & Distribution for 2024
- In 2024, GastronomicGuide Leading Food Videos
- 2024 Approved Converting TikTok Videos to GIFs Top 5 Software Options
- [Updated] 2024 Approved Essential 10 Dynamic TikTok Filters For Fresh Looks
- [New] In 2024, Amp up Your TikTok Profile with Distinctive PFP Concepts
- Comprehensive Manual of Text Incorpression in TikTok Videos
- [New] Reach Optimal Timestamp in Fb Posting
- In 2024, Best Apple iPhone 8 & iPad Screen Mirroring App | Dr.fone
- How to Change your Vivo Y100 Location on Twitter | Dr.fone
- [New] 2024 Approved Essential Guide to Screen Capturing on HP Devices
- How to Remove Apple iPhone XR SIM Lock?
- Prime’s Trending Topics Highest Tweets & Watch Count Achievements for 2024
- In 2024, Does Lava Blaze 2 Pro Have Find My Friends? | Dr.fone
- In 2024, Fake Android Location without Rooting For Your Xiaomi Redmi Note 13 Pro 5G | Dr.fone
- In 2024, Top 11 Free Apps to Check IMEI on Oppo A2 Phones
- In 2024, How to Add Video to Audio
- AddROM Bypass An Android Tool to Unlock FRP Lock Screen For your Poco M6 5G
- Updated Exploring Advanced Android Audio Software The Best Non-Audacity Options
- How Do I Stop Someone From Tracking My Infinix Smart 8? | Dr.fone
- Updated The Best PowerDirector Substitutes for Mobile Video Editing for 2024
- How Can Realme GT 5 (240W)Mirror Share to PC? | Dr.fone
- In 2024, Best Pokemons for PVP Matches in Pokemon Go For Tecno Pova 5 | Dr.fone
- New In 2024, Quick and Simple Methods for Controlling Audio Playback Speed
- In 2024, Oppo Reno 10 Pro 5G ADB Format Tool for PC vs. Other Unlocking Tools Which One is the Best?
- How to Fix It Nubia Red Magic 9 Pro Wont Turn On | Dr.fone
- New Pioneering the Next Wave The Best 8 Android Applications for Sound Engineering for 2024
- Mastering Signal Processing Advanced Noise Reduction Techniques Using Artificial Intelligence
- Title: [New] Your Complete TikTok Camera Operation Manual for 2024
- Author: Kenneth
- Created at : 2024-05-23 02:04:23
- Updated at : 2024-05-24 02:04:23
- Link: https://tiktok-video-files.techidaily.com/new-your-complete-tiktok-camera-operation-manual-for-2024/
- License: This work is licensed under CC BY-NC-SA 4.0.
