![[New] In 2024, Proactive Copyright Verification for Your TikTok Videos](https://thmb.techidaily.com/fa14c75d8130ba0e60c04982be06f0a527e7ccaf343b8c78b71c24740e6fd540.jpg)
[New] In 2024, Proactive Copyright Verification for Your TikTok Videos
Proactive Copyright Verification for Your TikTok Videos
So, you have successfully created an awesome TikTok video with the perfect dance moves and accurate lip-sync. But what’s this? Your video gets muted or taken down! What a bummer!
The reason?
Copyright infringement, or in simple words, using music without the permission of the singer!
This includes external sounds that are not a part of the TikTok library.
So, what should we do to avoid this, you ask?
To avoid this, you need to learn how to check TikTok video copyright before uploading.
And, in this article, we will tell you exactly why you need to follow TikTok copyright, and how to check it before posting a video.
Why Do You Need to Follow Tiktok Copyright?
To avoid getting banned!
You see, TikTok has a vast library of sounds with proper legal authorization that is available for the users to use in their videos. However, sometimes people use their own music in the videos.
The external sound may or may not be copyrighted.
If it does not have any copyrights on it, all is good. But in case you accidentally use a copyrighted video, TikTok automatically detects it, and either mutes your video or takes it down entirely. If the copyright is detected while posting, the platform will prevent you from uploading it in the first place.
To be on the safe side, we recommend using sounds already present in the TikTok library.
But, what if you want to use an external sound? Is there a way to check TikTok video copyright before uploading?
Yes, there is! And in the next section, we will tell you all about it.
Wondershare Filmora
Get started easily with Filmora’s powerful performance, intuitive interface, and countless effects!
Try It Free Try It Free Try It Free

Check Tiktok Video Copyright Before Uploading
Whenever you’re posting a video to TikTok, you get the option of running a copyright check on it. But this option is only available on desktop browsers.
Therefore, if you’re posting a sound other than one from TikTok’s library, you can check if it’s copyrighted or not from your PC.
Here’s how:
Step 1
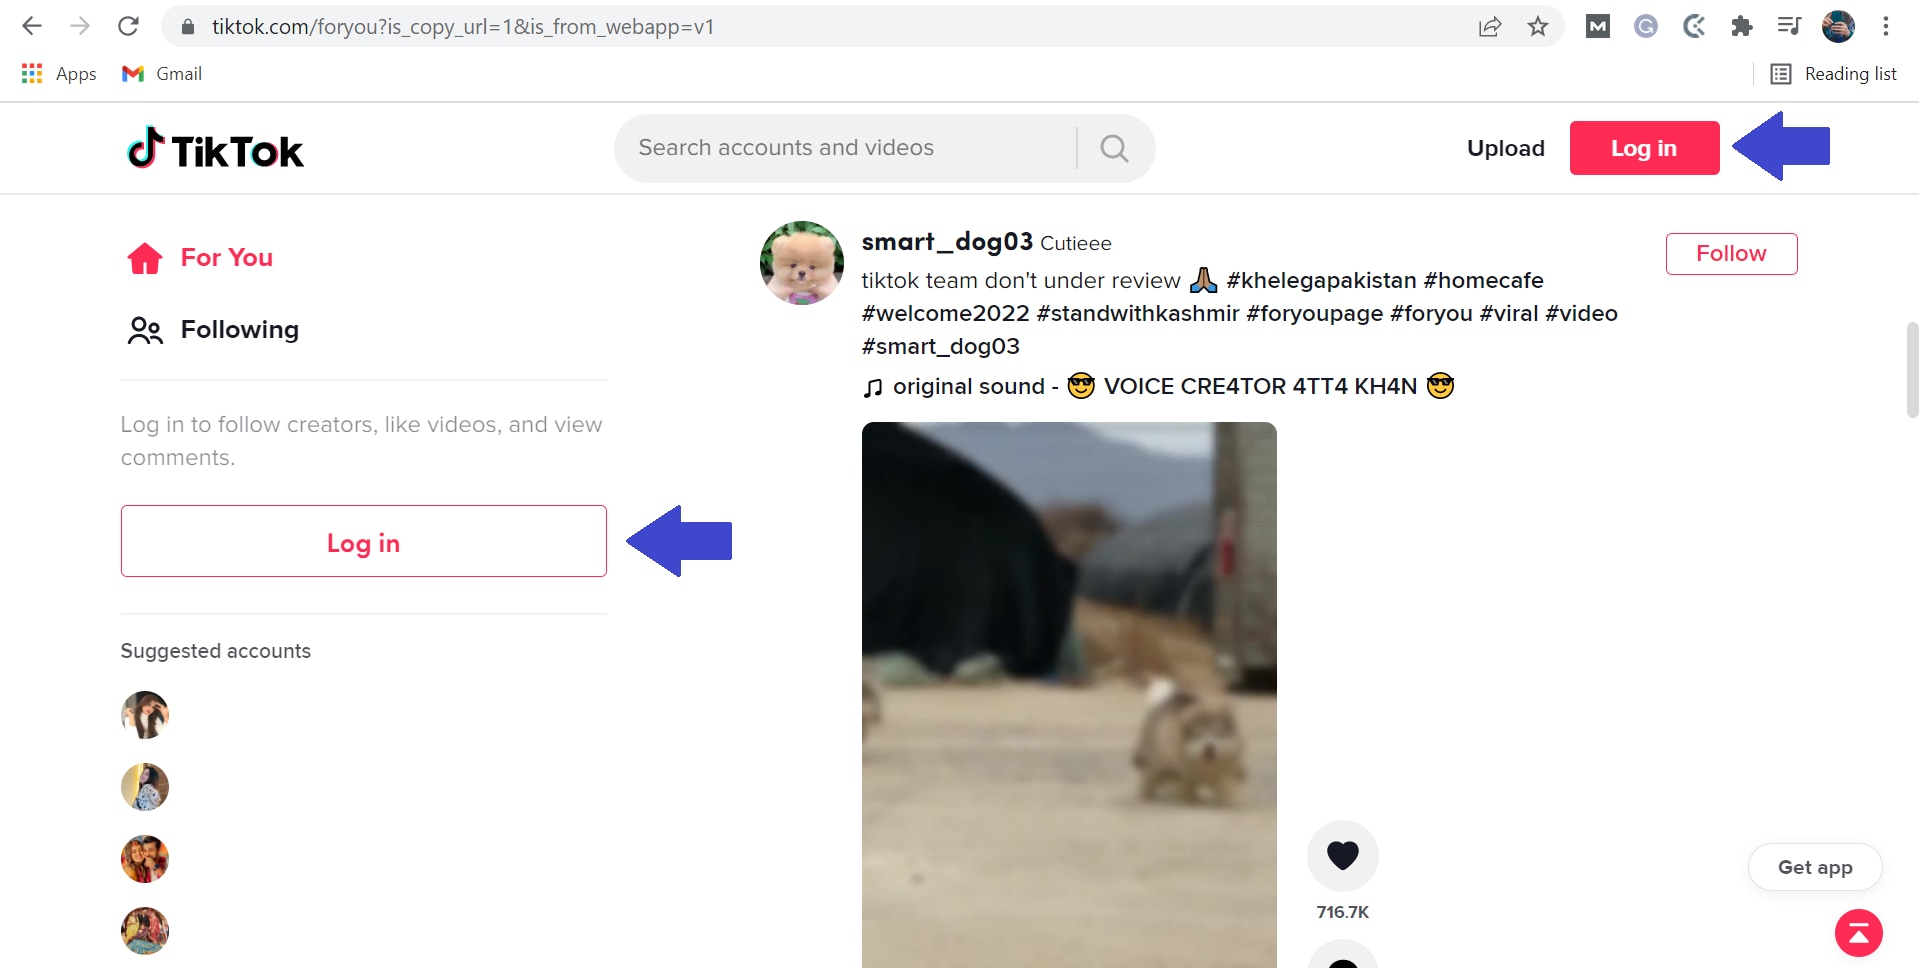
Go to the website version of Tiktok from Chrome, and click on “Log In” at the top-right corner of the page. You can also click on “Log In” under the “Following” option on the left.
Step 2
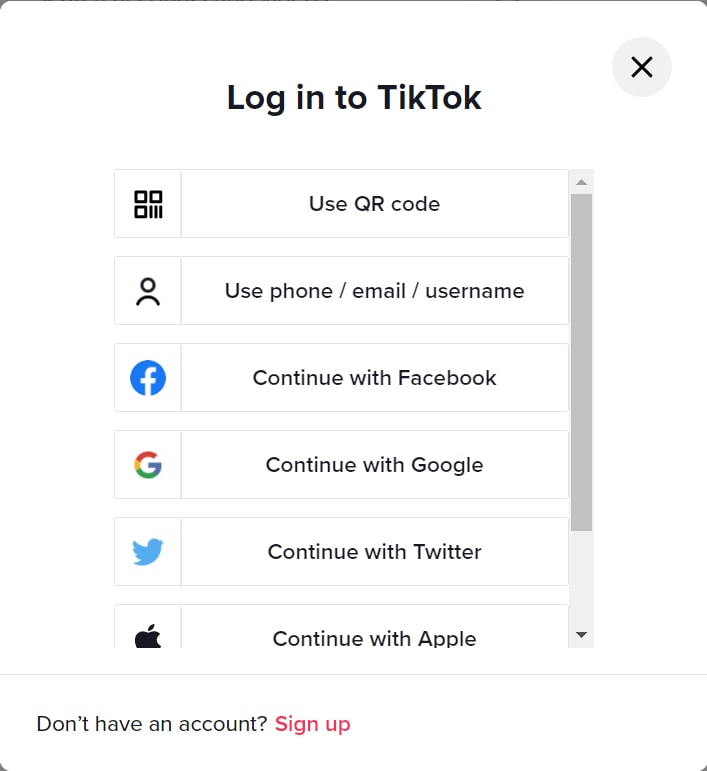
You will get a popup asking you to either sign up to Tiktok or log in using your email, Facebook, Twitter, Google, Apple, or Instagram. You can choose whichever option you find convenient.
Step 3
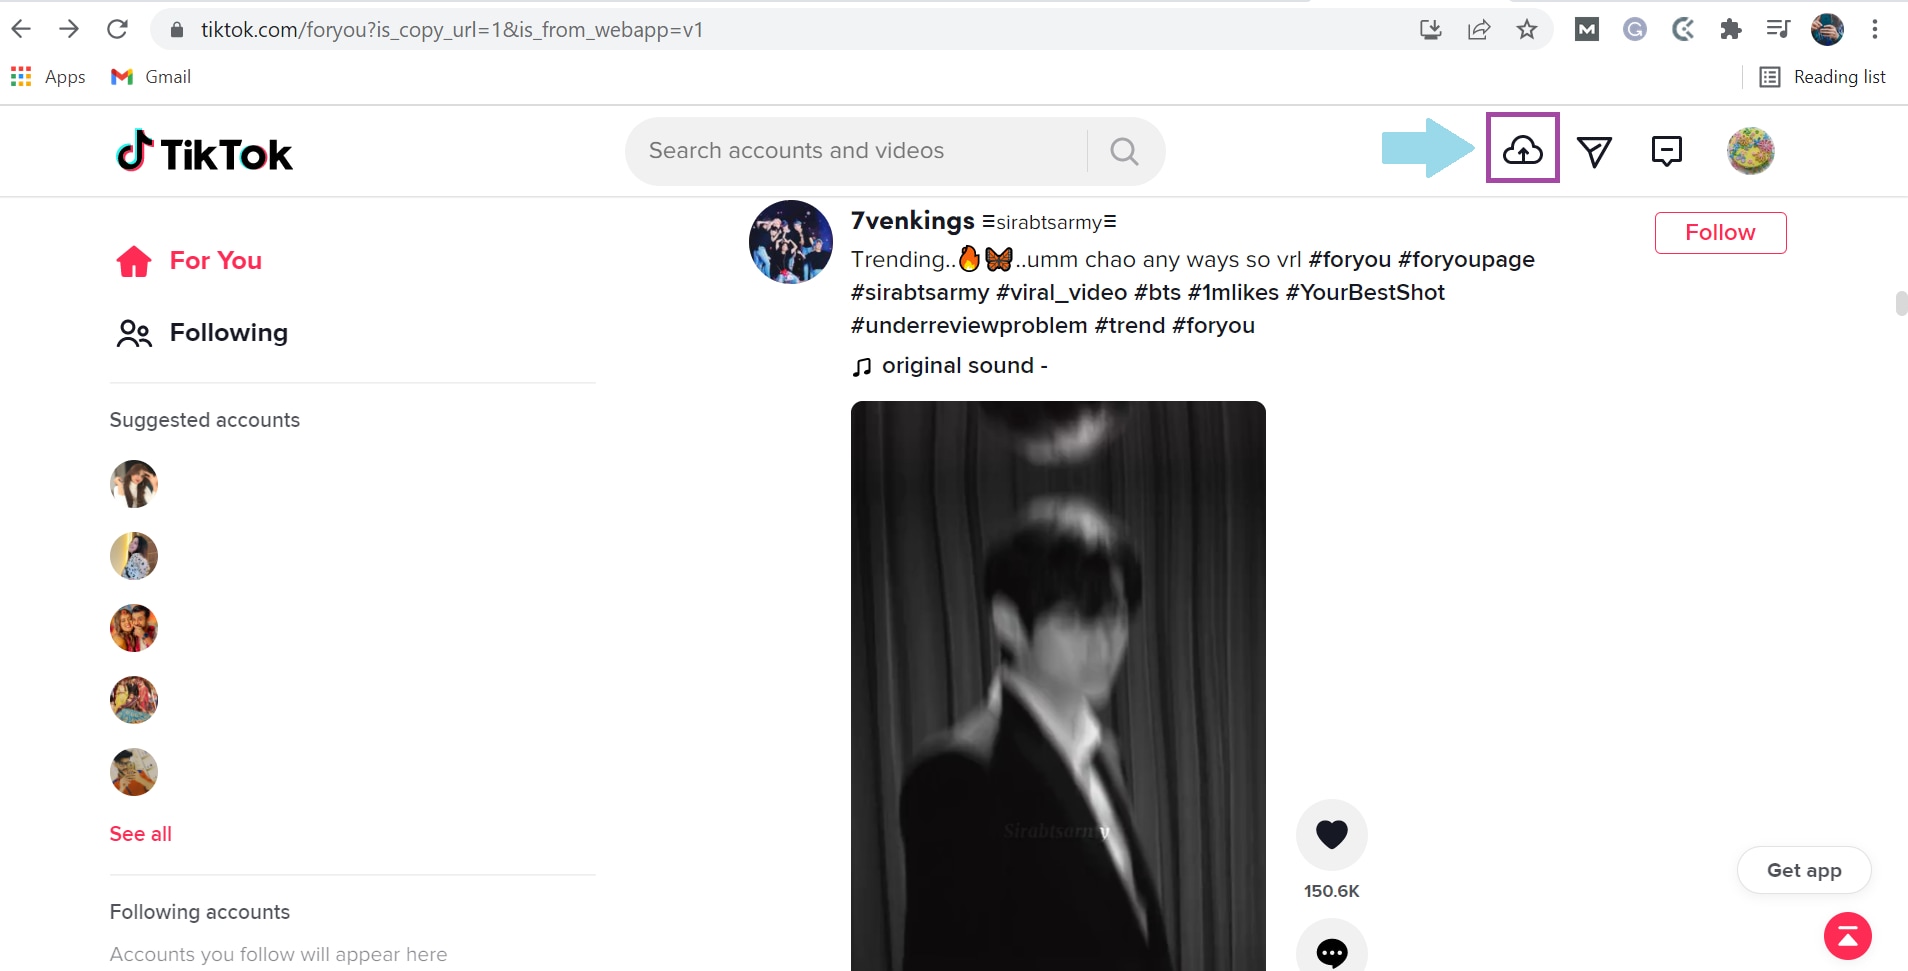
Click on the “Upload” option indicated by a cloud with an arrow.
Step 4
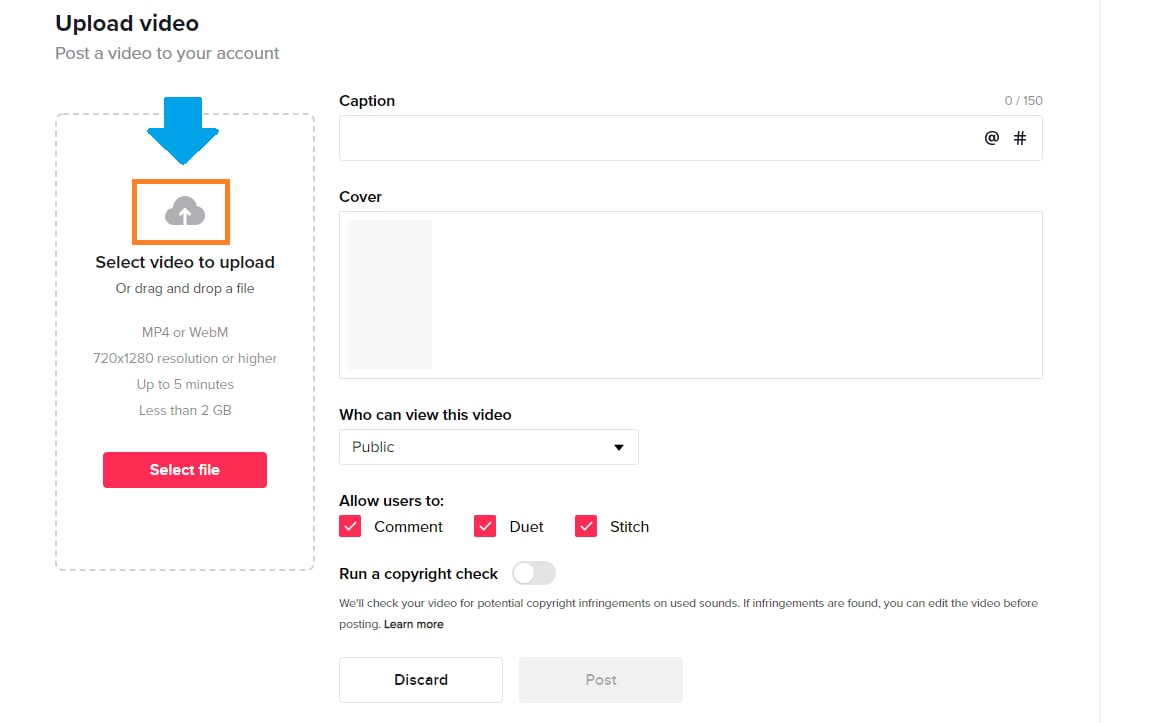
Click on “Select Video to Upload” and choose a video from your PC’s storage.
Step 5
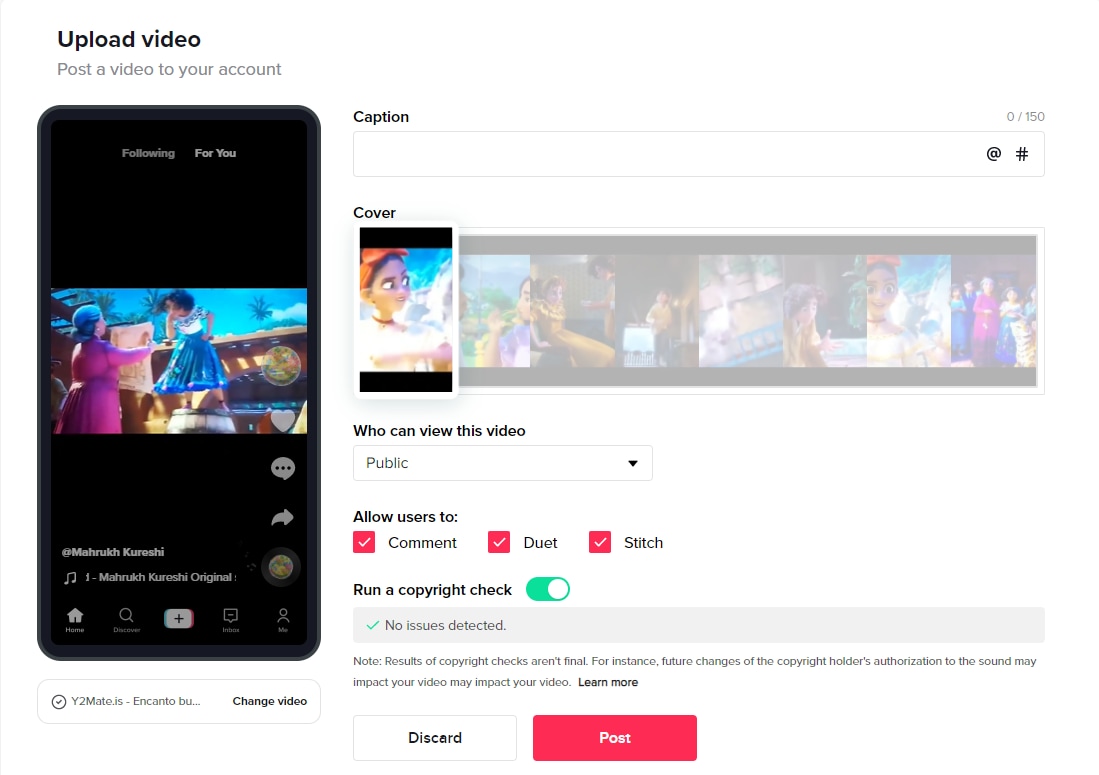
Once the video is uploaded, add a caption with hashtags and select the cover for your video.
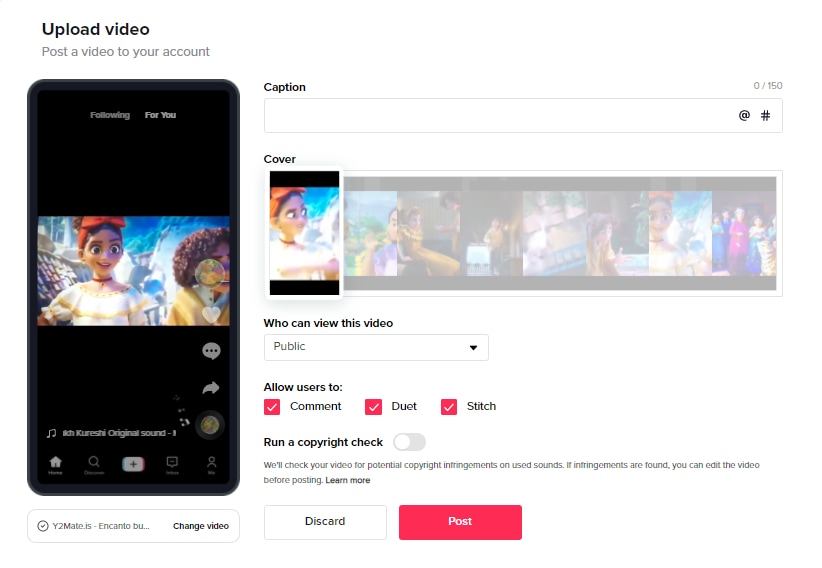
Step 6
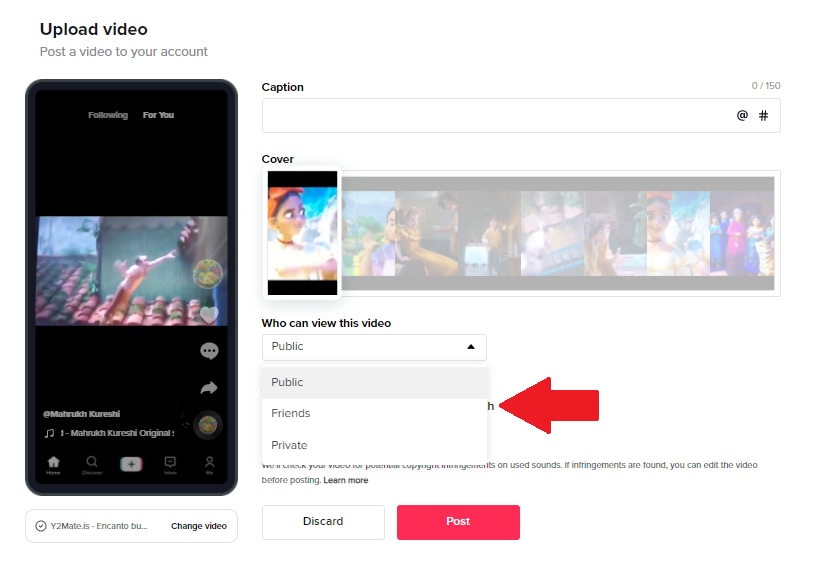
The next step is to choose whether your video can be viewed by the public or your friends or whether you want to keep it private from everyone.
Step 7
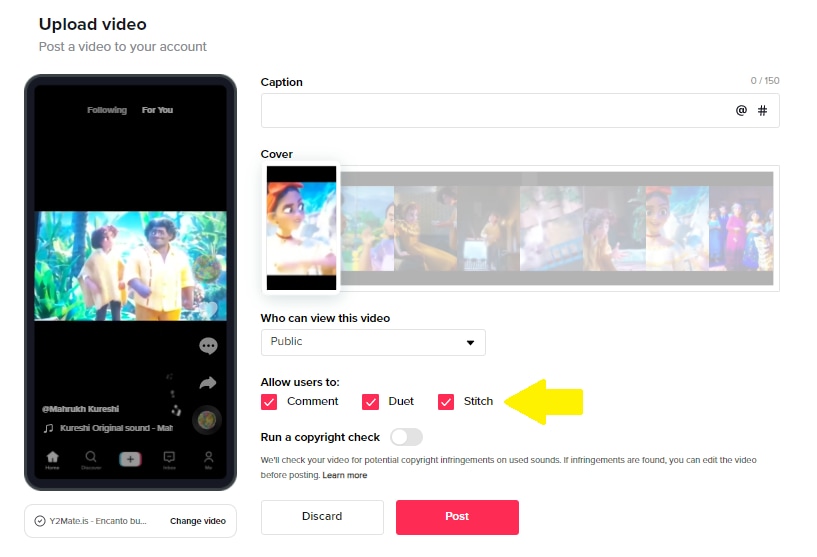
You can also allow or restrict users to comment on your video, make duets, or stitch your video.
Step 8
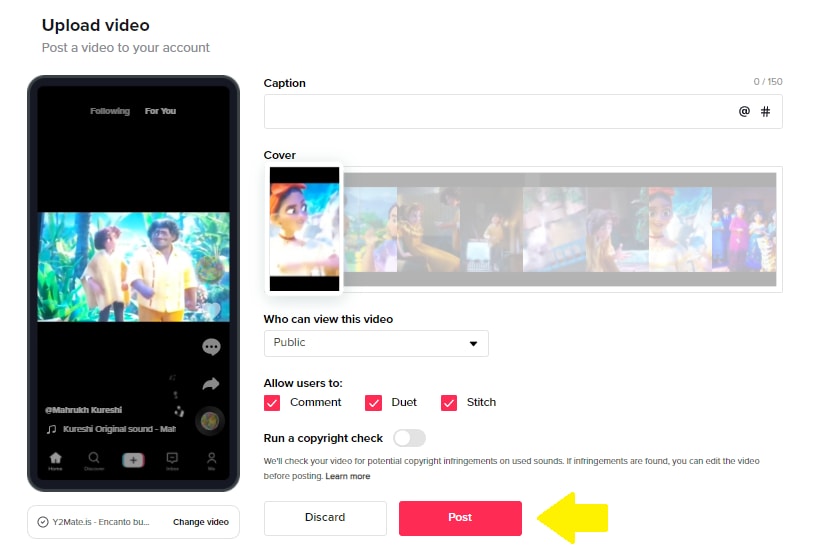
Now comes the part where you run a copyright check on the video. Turn the toggle on for “Run a Copyright Check” and wait to see if any issues arise.
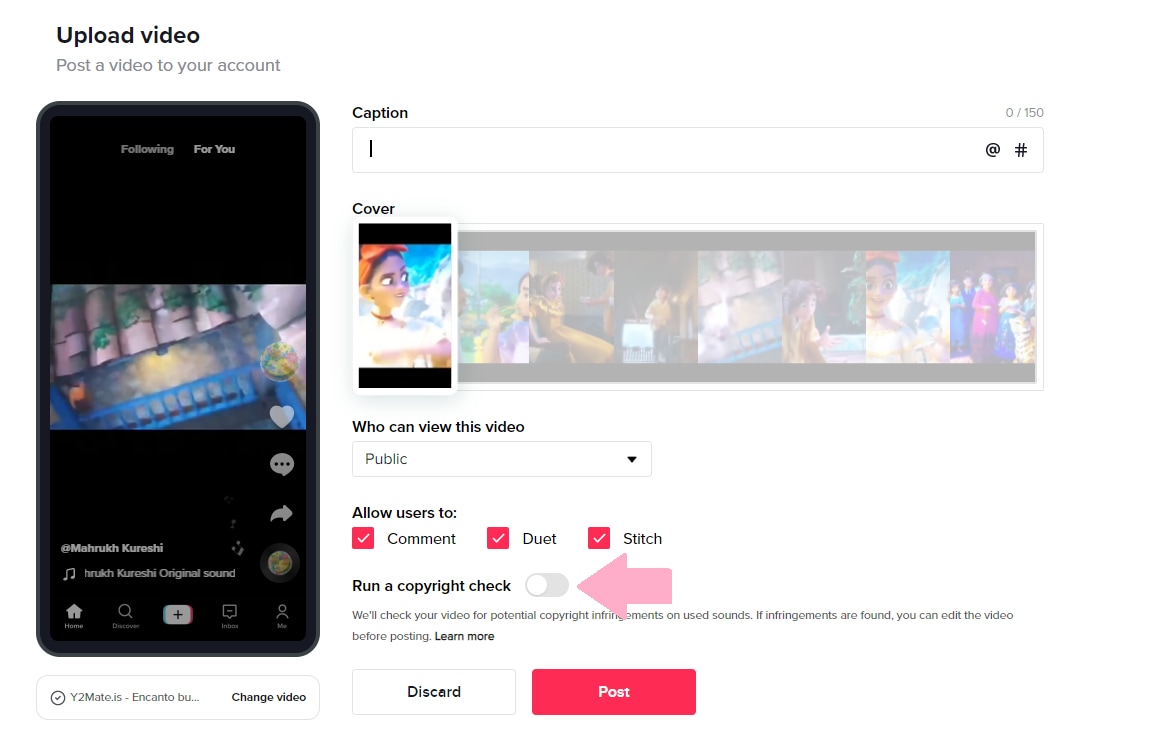
As you can see, this video does not have any copyright-related issues, so it is safe to post it.
However, if your video comes up with an issue, you can try using a sound from TikTok’s built-in library and proceed to post your video without any fear.
Conclusion
While making TikTok videos is quite a fun activity, we have to follow the rules, especially those revolving around using copyrighted material. According to TikTok’s policies, if a video has copyrighted sound, it will be muted, and if the video itself is copyrighted, like a clip from a movie or song, it will be taken down.
However, if you continue posting copyrighted content even after receiving copyright infringement notices from TikTok, it can result in your getting shut down for good!
Therefore, it’s good to know how to check TikTok video copyright before uploading through the steps explained in the article.
So, run a copyright check, and play it safe!
Check Tiktok Video Copyright Before Uploading
Whenever you’re posting a video to TikTok, you get the option of running a copyright check on it. But this option is only available on desktop browsers.
Therefore, if you’re posting a sound other than one from TikTok’s library, you can check if it’s copyrighted or not from your PC.
Here’s how:
Step 1
Go to the website version of Tiktok from Chrome, and click on “Log In” at the top-right corner of the page. You can also click on “Log In” under the “Following” option on the left.
Step 2
You will get a popup asking you to either sign up to Tiktok or log in using your email, Facebook, Twitter, Google, Apple, or Instagram. You can choose whichever option you find convenient.
Step 3
Click on the “Upload” option indicated by a cloud with an arrow.
Step 4
Click on “Select Video to Upload” and choose a video from your PC’s storage.
Step 5
Once the video is uploaded, add a caption with hashtags and select the cover for your video.
Step 6
The next step is to choose whether your video can be viewed by the public or your friends or whether you want to keep it private from everyone.
Step 7
You can also allow or restrict users to comment on your video, make duets, or stitch your video.
Step 8
Now comes the part where you run a copyright check on the video. Turn the toggle on for “Run a Copyright Check” and wait to see if any issues arise.
As you can see, this video does not have any copyright-related issues, so it is safe to post it.
However, if your video comes up with an issue, you can try using a sound from TikTok’s built-in library and proceed to post your video without any fear.
Conclusion
While making TikTok videos is quite a fun activity, we have to follow the rules, especially those revolving around using copyrighted material. According to TikTok’s policies, if a video has copyrighted sound, it will be muted, and if the video itself is copyrighted, like a clip from a movie or song, it will be taken down.
However, if you continue posting copyrighted content even after receiving copyright infringement notices from TikTok, it can result in your getting shut down for good!
Therefore, it’s good to know how to check TikTok video copyright before uploading through the steps explained in the article.
So, run a copyright check, and play it safe!
A Beginner’s Blueprint to Crafting Engaging TikTok Reaction Videos with Filmora
How to Make TikTok Reaction Videos Easily in 2 Ways

Shanoon Cox
Mar 27, 2024• Proven solutions
With all the videos of different moods and categories available on the platform, TikTok’s reaction is something that makes the footage more engaging. Available for both iOS and Android platforms, TikTok allows you to record, edit , and compile a video of up to 60 seconds, and apply a plethora of filters and animation effects to them along with adding relevant music to awe your audience.
Considering this, here you will learn how to make TikTok reaction videos with ease from within the app itself, and if that’s not enough, using one of the best and most efficient programs available in the market that can even allow you to add unique effects to the reactions you create.
- Part 1: How to Make React Videos on TikTok
- Part 2: How to Use Snap Filmora to Make TikTok Reaction Videos
Bonus: Create A More Attractive Video with Human Segmentation Effect
The human segmentation effect under AI Portrait allows you to isolate people from video background even without a green screen, and then you can composite it to make a reaction video easily. Watch the video tutorial below to find out more details.


Want to read the texts instead of watching videos? Check the complete guide to making a reaction video in 3 ways .
Part 1: How to React to a TikTok Video
After being equipped with all the worldly knowledge about TikTok reaction videos, you can follow the steps given below to learn how to react to the footage created by other people:
1. Tap Share and Record Your Reaction
Start TikTok, play the video you want to react on, tap the Share icon from the lower-right area, and tap the React option from the Share to menu. Tap Flip from the top-right corner of the Camera screen to switch between the front and rear camera as needed, optionally tap the Mic icon to disable or enable voice and system audio capture, drag and reposition React window according to the source footage, and tap the Record button from the bottom to start shooting your TikTok reaction. Wait while the source clip and your recording process are complete successfully before moving forward to the next step.

2. Apply Filters
Tap the Filters icon from the top-right corner, tap to pick a filter from those available at the bottom, and tap anywhere on the screen to accept the one you selected and to get back to the previous window.

3. Manage Audio
Tap the Mixer icon from the upper-right corner of the screen, drag the My Voice and Soundtrack Volume sliders to manage your voice recording and the internal audio respectively, and tap Done to save the changes once you’re through with the modifications. Back on the previous window, tap Next from the bottom-right corner.

4. Publish the Video
Tap the Who can view this video option to manage your reaction’s visibility settings (optional). Tap the Save to device toggle switch to prevent TikTok reaction from being stored on your mobile’s storage (optional). Next, tap the Post button from the bottom-right corner to publish the video to TikTok.

More creative tricks about TikTok video: Clone Yourself in TikTok
Part 2: How to Make Reaction Videos with Filmora
Even though you can make TikTok reaction videos using its own filters and audio mixing tools that work pretty well under ideal conditions, if you are a perfectionist and like precision in anything you do or create, you need a dedicated program that has been designed specifically for the purpose.
Although several such tools are available in the market and can be easily downloaded and used, the best among them is Filmora by Wondershare. Wondershare Filmora is an industry-standard production and post-production tool for both Mac and Windows PCs that the majority of users prefer over its competitors such as Adobe Premiere Pro, Final Cut Pro X, etc. This is because Filmora offers simple UI, is less resource-intensive, and is able to render the outputs significantly faster.
You can learn how to make TikTok reaction videos using Wondershare Filmora by following the steps given below:
Note: Before proceeding, make sure that you have already copied the source (and the reaction) video(s) from your smartphone to your computer.
1. Create New Project and Set Preferences
Start Wondershare Filmora on your Windows or Mac PC, go to File > New Project and click 9:16 (Portrait) from the submenu that appears.
Click Split Screen from the standard toolbar at the top, hover mouse to the screen type preset you want to use, click the + (Add to Project) icon that appears at the bottom-right corner of the thumbnail, and click OK from the bottom-right corner once the preset is added to the Timeline.

2. Import and Add Video(s) Preview/Timeline
Click the Media button from the standard toolbar, click anywhere inside the Media window at the upper-left corner, and when the Open box comes up, select and import the video file(s) you want to participate in the TikTok reaction. Alternatively, you can also click Record from below the standard toolbar, and choose any of the options to record your own video or voice right from within Wondershare Filmora itself.
Next, click and drag each of the imported videos to their corresponding screen sections in the Preview window in the upper-right area. Notice how the files are automatically added to the Timeline at the bottom.
3. Add Elements and Titles
Click Elements from the standard toolbar, hover mouse to the element you want to add to the reaction, click the + icon that appears at the center of the thumbnail, and reposition the element in the Timeline to match the duration with that of the reaction you are creating.

4. Export the Reaction

Click EXPORT from the top-middle section of the interface, go to the Local tab from the top of the Export box that appears next, select your preferred format from the left bar, optionally choose a destination folder from the right window, optionally click SETTINGS to fine-tune the output preferences as needed, and click EXPORT from the bottom-right corner to export the TikTok reaction. Or, you can save it in the settings perfect for iPhone or another device.
Below is a sample reaction video made with Filmora, you can do much better than that for your TikTok account:
Besides using Filmora to edit reaction videos with the split-screen presets, you can also use some other video editing software to create a reaction video . Filmora can empower your video creation with more creativity, watch the video below and download Filmora to try.
Conclusion
A TikTok reaction enables you to make the source videos more fun and entertaining. Luckily the app itself has a “React” button that helps you create TikTok reaction videos with merely a few simple taps. However, if you feel that the built-in options are not as robust as they should be, a third-party program like Wondershare Filmora is something you would definitely love to try your hands on as the software is not only easy to use, it is also lightweight, and doesn’t put any overhead on your computer hardware.
Shanoon Cox
Shanoon Cox is a writer and a lover of all things video.
Follow @Shanoon Cox
Shanoon Cox
Mar 27, 2024• Proven solutions
With all the videos of different moods and categories available on the platform, TikTok’s reaction is something that makes the footage more engaging. Available for both iOS and Android platforms, TikTok allows you to record, edit , and compile a video of up to 60 seconds, and apply a plethora of filters and animation effects to them along with adding relevant music to awe your audience.
Considering this, here you will learn how to make TikTok reaction videos with ease from within the app itself, and if that’s not enough, using one of the best and most efficient programs available in the market that can even allow you to add unique effects to the reactions you create.
- Part 1: How to Make React Videos on TikTok
- Part 2: How to Use Snap Filmora to Make TikTok Reaction Videos
Bonus: Create A More Attractive Video with Human Segmentation Effect
The human segmentation effect under AI Portrait allows you to isolate people from video background even without a green screen, and then you can composite it to make a reaction video easily. Watch the video tutorial below to find out more details.
Want to read the texts instead of watching videos? Check the complete guide to making a reaction video in 3 ways .
Part 1: How to React to a TikTok Video
After being equipped with all the worldly knowledge about TikTok reaction videos, you can follow the steps given below to learn how to react to the footage created by other people:
1. Tap Share and Record Your Reaction
Start TikTok, play the video you want to react on, tap the Share icon from the lower-right area, and tap the React option from the Share to menu. Tap Flip from the top-right corner of the Camera screen to switch between the front and rear camera as needed, optionally tap the Mic icon to disable or enable voice and system audio capture, drag and reposition React window according to the source footage, and tap the Record button from the bottom to start shooting your TikTok reaction. Wait while the source clip and your recording process are complete successfully before moving forward to the next step.
2. Apply Filters
Tap the Filters icon from the top-right corner, tap to pick a filter from those available at the bottom, and tap anywhere on the screen to accept the one you selected and to get back to the previous window.
3. Manage Audio
Tap the Mixer icon from the upper-right corner of the screen, drag the My Voice and Soundtrack Volume sliders to manage your voice recording and the internal audio respectively, and tap Done to save the changes once you’re through with the modifications. Back on the previous window, tap Next from the bottom-right corner.
4. Publish the Video
Tap the Who can view this video option to manage your reaction’s visibility settings (optional). Tap the Save to device toggle switch to prevent TikTok reaction from being stored on your mobile’s storage (optional). Next, tap the Post button from the bottom-right corner to publish the video to TikTok.
More creative tricks about TikTok video: Clone Yourself in TikTok
Part 2: How to Make Reaction Videos with Filmora
Even though you can make TikTok reaction videos using its own filters and audio mixing tools that work pretty well under ideal conditions, if you are a perfectionist and like precision in anything you do or create, you need a dedicated program that has been designed specifically for the purpose.
Although several such tools are available in the market and can be easily downloaded and used, the best among them is Filmora by Wondershare. Wondershare Filmora is an industry-standard production and post-production tool for both Mac and Windows PCs that the majority of users prefer over its competitors such as Adobe Premiere Pro, Final Cut Pro X, etc. This is because Filmora offers simple UI, is less resource-intensive, and is able to render the outputs significantly faster.
You can learn how to make TikTok reaction videos using Wondershare Filmora by following the steps given below:
Note: Before proceeding, make sure that you have already copied the source (and the reaction) video(s) from your smartphone to your computer.
1. Create New Project and Set Preferences
Start Wondershare Filmora on your Windows or Mac PC, go to File > New Project and click 9:16 (Portrait) from the submenu that appears.
Click Split Screen from the standard toolbar at the top, hover mouse to the screen type preset you want to use, click the + (Add to Project) icon that appears at the bottom-right corner of the thumbnail, and click OK from the bottom-right corner once the preset is added to the Timeline.
2. Import and Add Video(s) Preview/Timeline
Click the Media button from the standard toolbar, click anywhere inside the Media window at the upper-left corner, and when the Open box comes up, select and import the video file(s) you want to participate in the TikTok reaction. Alternatively, you can also click Record from below the standard toolbar, and choose any of the options to record your own video or voice right from within Wondershare Filmora itself.
Next, click and drag each of the imported videos to their corresponding screen sections in the Preview window in the upper-right area. Notice how the files are automatically added to the Timeline at the bottom.
3. Add Elements and Titles
Click Elements from the standard toolbar, hover mouse to the element you want to add to the reaction, click the + icon that appears at the center of the thumbnail, and reposition the element in the Timeline to match the duration with that of the reaction you are creating.
4. Export the Reaction
Click EXPORT from the top-middle section of the interface, go to the Local tab from the top of the Export box that appears next, select your preferred format from the left bar, optionally choose a destination folder from the right window, optionally click SETTINGS to fine-tune the output preferences as needed, and click EXPORT from the bottom-right corner to export the TikTok reaction. Or, you can save it in the settings perfect for iPhone or another device.
Below is a sample reaction video made with Filmora, you can do much better than that for your TikTok account:
Besides using Filmora to edit reaction videos with the split-screen presets, you can also use some other video editing software to create a reaction video . Filmora can empower your video creation with more creativity, watch the video below and download Filmora to try.
Conclusion
A TikTok reaction enables you to make the source videos more fun and entertaining. Luckily the app itself has a “React” button that helps you create TikTok reaction videos with merely a few simple taps. However, if you feel that the built-in options are not as robust as they should be, a third-party program like Wondershare Filmora is something you would definitely love to try your hands on as the software is not only easy to use, it is also lightweight, and doesn’t put any overhead on your computer hardware.
Shanoon Cox
Shanoon Cox is a writer and a lover of all things video.
Follow @Shanoon Cox
Also read:
- [New] In 2024, Decoding the Intricacies of TikTok’s PFP Language
- [New] TikTok Tricks Faster Video Loading for 2024
- [Updated] 2024 Approved Snappy Side Hustles Earning with Snapchat
- [Updated] Elevate Your Video Storytelling on TikTok With 5 Key Caption Techniques
- Break Free From Routine with These Unique Snapchat Ideas
- Celestial Cluster Cache - Cosmic Archive Assistance
- ClearSnapZoom7 Master Your Photographic Scaling
- Fix Vertical Lines on the Computer Screen
- From Novice to Content Creator Your YouTube Journey Begins for 2024
- In 2024, Crafting Captivating Photo-Based Video Content Using Pixiz's Features
- In 2024, How to Maximize Video Reach with Effective Tags, Titles
- In 2024, Ultimate Guide to Catch the Regional-Located Pokemon For Vivo V30 Pro | Dr.fone
- In 2024, Unveiling Samsung's Picture Editor Features & Drawbacks
- Top Alternative to Wyze Camera? Discover How the Waterproof Blink Mini 2 Outshines All Competitors!
- Title: [New] In 2024, Proactive Copyright Verification for Your TikTok Videos
- Author: Kenneth
- Created at : 2025-02-16 16:35:32
- Updated at : 2025-02-19 17:49:13
- Link: https://tiktok-video-files.techidaily.com/new-in-2024-proactive-copyright-verification-for-your-tiktok-videos/
- License: This work is licensed under CC BY-NC-SA 4.0.