
!["[New] 2024 Approved Master TikTok's Cutting-Edge Filming Techniques"](https://www.lifewire.com/thmb/pRpDOA8AIRjeIki_qKAnNQoXzBw=/400x300/filters:no_upscale():max_bytes(150000):strip_icc()/amazon-prime-day-is-just-16-days-away---here-s-what-you-need-to-know-76d8205ed9e54da1ae0c0d0ec5d883e7)
"[New] 2024 Approved Master TikTok's Cutting-Edge Filming Techniques"
Master TikTok’s Cutting-Edge Filming Techniques
Whether sardonic, informative, or both, voiceovers can improve a TikTok video for humor and clarity.
What do sewing how-to videos, cooking tutorials, and daily vlogs have in common? They all probably are dependent on TikTok’s voiceover feature, which can be helpful in the inbuilt editing suite of the TikTok app.
Ever wished to record a TikTok and save it for later without letting the publisher know? Then, it is always the best idea to learn how to screen record on TikTok. This article will help you learn multiple ways of screen recording on TikTok without you having to worry about the other person knowing.
And, we’ll also look at how to do a voiceover on TikTok using the step-by-step guide mentioned below.
In this article
01 How to Screen Record on TikTok?
02 How to Add Voiceover to the TikTok Video?
03 Add Voiceover to TikTok Video with Extra Fusion: Wondershare Filmora
Part 1: How to Screen Record on TikTok?
Have you ever accidentally taken a screenshot of someone’s Instagram story or screen recorded it for future reference and got scared that the person may have got notified?
While Instagram had the feature of notifying users if their story or picture has been screen recorded, it has recently changed to restrict this notification to images and videos sent via private DMs.
However, TikTokers can rest assured as TikTok has never had a similar notification feature, and you can safely screen record TikTok without mentioning the publisher.
How to Record Computer Screens on Windows
PCs allow software products useful for various purposes. For example, if you would like to record your PC screen while using Windows-based software, you’ll be required a powerful screen recorder that lets you set up a new screencasting session in just a few simple steps.
Here are some of the steps you need to consider!
Step 1: Download Wondershare Filmora
Download Wondershare Filmora onto your computer and then launch the software.
Wondershare Filmora
Get started easily with Filmora’s powerful performance, intuitive interface, and countless effects!
Try It Free Try It Free Try It Free Learn More >

Just visit the browser and type the URL ‘tiktok.com’ in the search bar. Then, look for the TikTok video you would like to record.
Besides providing functions that activate you to control the screen recording procedure entirely, Wondershare Filmora is also a video editor program that lets you manipulate your videos in any way you want.
You must double-click on its desktop icon and open the Full Feature mode right after launching the software. Now, hit the Record tab and choose the Record PC screen option.
The Wondershare Screen Recorder window will appear on the screen so you can modify the settings for your upcoming screencasting session.

You’ll see the Settings icon in the window’s lower right corner and then click it. For example, you can select the computer’s hard drive destination where the recording will be saved, modify the frame rate or set the quality of the recording from the Quality drop-down menu.

Hit the Microphone icon to choose the mic you’ll be using to record narration, and you can select the Speakers icon if you want to disable or enable the computer’s speakers during the session of screen recording.
You’ll see the Settings icon in the window’s lower right corner and then click it. For example, you can select the computer’s hard drive destination where the recording will be saved, modify the frame rate or set the quality of the recording from the Quality drop-down menu.

Mark the Mouse checkbox if you wish the mouse clicks to display in the recording, and you can easily place the maximum duration of a recording session. It is done by inserting the preferred default screen recording duration into the Record Timer box.

Hit the Rec button to begin a new screencasting session, and the software will start recording after a three-second countdown.
Tap the F9 button on the keyboard to stop recording. It will automatically open the file in Filmora’s video editor so you can edit it before publishing online.
Part 2: How to Add Voiceover to the TikTok Video?
Steps to add a voiceover to your TikTok video.
Upload or record a new video by hitting the + at the menu’s center at the screen’s bottom area.
Hit the microphone icon on the screen’s upper right corner once you’re over with the recording and trimming clips to your desired edit. Beneath, the microphone icon must mention “Voiceover.”

Source: mashable.com
Now, you can record a voiceover timed to Video’s every frame here.
Hit the “Save“ button once you’re satisfied with the voiceover

Hitting the “Save“ button will offer you back to the video’s preview, where you can add filters, text, stickers, and various sounds.
It is needed to add effects to your voiceover by hitting the “voice effects”. Here, you can control the narrator’s volume as well.
Also, make sure to enable automatic captions to make sure your video is more accessible!
Tap the Next button once you’re over with your Video. Then, you can edit the Video’s privacy settings, add a caption, and select a cover.
Part 3: Add Voiceover to TikTok Video with Extra Fusion: Wondershare Filmora
Do you want to include your voice in a video, create a voiceover demo for sharing and uploading on social networking platforms, or frame a documentary for important content?
All you need is an ideal video editing program similar to the Wondershare Filmora Video Editor.
The Filmora’s voiceover feature allows you to record your voice or add voice-over files to Video easily. In addition, you can customize the pitch, speed, and volume of the recorded voiceover and apply fade-in and fade-out effects. I’ll share how to register and add voiceover to a video with Filmora on your computer in this post.
Firstly, you can edit your Video in Filmora and then record the voiceover afterward. Or, you can first record the voiceover and then edit the Video around.
Check the steps below on how to make TikTok videos with voiceover via Wondershare Filmora.
Wondershare Filmora
Get started easily with Filmora’s powerful performance, intuitive interface, and countless effects!
Try It Free Try It Free Try It Free Learn More >
Record Voiceover and Add it to Video
We suggest you record the voiceover first in most cases so the sound will become pretty natural.
Step 1: Connect Microphone to PC or laptop
Connect the microphone to your laptop/PC when you’re ready to begin. It’s advisable to use some professional external microphones to capture high-quality sound.
Step 2: Record voiceover
Tap the Wondershare Filmora icon to launch this software. Then, select the New Project option in the beginning interface to create a new one.
Enter the Record tab and choose the “Record a Voiceover” option to arouse the Record Audio windows.
Or hit the microphone icon, and you only need 3 seconds of countdown to begin speaking.
Click the microphone icon again after you finish the above. Then, a new Record file option will be automatically present on the audio track.
Step 3: Edit Recorded Voiceover to Video
To edit the recorded voiceover, you can adjust audio settings, such as changing the Speed, Pitch, Volume, etc.

You can cut and trim out unnecessary sound sections from the recorded voiceover or apply the fade effects to the voiceover for a smoother transition.
Step 4: Sync Voiceover to Video
Now, it’s time to synchronize the recorded voiceover to video to create a compelling video.
The Wondershare Filmora allows up to 100 audio tracks; you can also add some background music to the voiceover.
Then import and drag-n-drop the video content to the video track, drag and drop the soundtrack to the video’s right-side position. Keep the voice and video track in the exact video duration if required.
Here’s how to sync voiceover to video!
Now, sync the recorded voiceover to Video to create a video. Since Filmora is compatible with 100 plus audio tracks, you can add different background music to the voiceover.
Then import and drag-n-drop the video content to the video track, drag and drop the soundtrack to the Video’s right side position. You can keep the Video and audio track in the same video duration.

Note: If you’ve recorded the iPhone voiceover or other device already, you can import it in the Project Library if you wish to add it to the Video and then sync it to Video.
Here is the ultimate step-by-step guide about adding titles to videos after knowing how to do a voiceover on TikTok.
Step 5: Export and save the new file
Click the “Export“ tab to export your new video file after you complete the project. You can either save the Video to different formats or directly share it on other social media platforms.
Additionally, you can even burn a DVD in minutes to watch it on TV.
How to Record and Add Voice over File during Filmora’s Video Editing Process
If you’ve recorded the voice over on your iPhone or another device already, even via the Wondershare Filmora, and wish to add it to the Video, visit the steps mentioned below:
1. Upload the video to Filmora
After logging in to Filmora’s main editing interface, click “Import” or drag-drop your video and voiceover file to the project library.
Filmora video editing software is compatible with a vast range of formats, so there will be no need to convert the files before import.
Drag and drop the files or video content to the Video Timeline when all the files get imported.
2. Record Voiceover in Video Editing
3. Edit voiceover and Export
You can then edit the recorded voiceover for TikTok to perfectly fit the Video and export it to your laptop/PC or directly upload it to YouTube.
For improving the sound, Filmora features more audio editing tools.
Conclusion
This article offered you a step-by-step guide on how to record a TikTok. It also displays four different screen recording methods, along with how to do a voiceover on TikTok.
Now, don’t ever worry about losing out on your favorite TikTok without the original publisher knowing via screen record TikTok via Wondershare Filmora.
02 How to Add Voiceover to the TikTok Video?
03 Add Voiceover to TikTok Video with Extra Fusion: Wondershare Filmora
Part 1: How to Screen Record on TikTok?
Have you ever accidentally taken a screenshot of someone’s Instagram story or screen recorded it for future reference and got scared that the person may have got notified?
While Instagram had the feature of notifying users if their story or picture has been screen recorded, it has recently changed to restrict this notification to images and videos sent via private DMs.
However, TikTokers can rest assured as TikTok has never had a similar notification feature, and you can safely screen record TikTok without mentioning the publisher.
How to Record Computer Screens on Windows
PCs allow software products useful for various purposes. For example, if you would like to record your PC screen while using Windows-based software, you’ll be required a powerful screen recorder that lets you set up a new screencasting session in just a few simple steps.
Here are some of the steps you need to consider!
Step 1: Download Wondershare Filmora
Download Wondershare Filmora onto your computer and then launch the software.
Wondershare Filmora
Get started easily with Filmora’s powerful performance, intuitive interface, and countless effects!
Try It Free Try It Free Try It Free Learn More >
Just visit the browser and type the URL ‘tiktok.com’ in the search bar. Then, look for the TikTok video you would like to record.
Besides providing functions that activate you to control the screen recording procedure entirely, Wondershare Filmora is also a video editor program that lets you manipulate your videos in any way you want.
You must double-click on its desktop icon and open the Full Feature mode right after launching the software. Now, hit the Record tab and choose the Record PC screen option.
The Wondershare Screen Recorder window will appear on the screen so you can modify the settings for your upcoming screencasting session.
You’ll see the Settings icon in the window’s lower right corner and then click it. For example, you can select the computer’s hard drive destination where the recording will be saved, modify the frame rate or set the quality of the recording from the Quality drop-down menu.
Hit the Microphone icon to choose the mic you’ll be using to record narration, and you can select the Speakers icon if you want to disable or enable the computer’s speakers during the session of screen recording.
You’ll see the Settings icon in the window’s lower right corner and then click it. For example, you can select the computer’s hard drive destination where the recording will be saved, modify the frame rate or set the quality of the recording from the Quality drop-down menu.
Mark the Mouse checkbox if you wish the mouse clicks to display in the recording, and you can easily place the maximum duration of a recording session. It is done by inserting the preferred default screen recording duration into the Record Timer box.
Hit the Rec button to begin a new screencasting session, and the software will start recording after a three-second countdown.
Tap the F9 button on the keyboard to stop recording. It will automatically open the file in Filmora’s video editor so you can edit it before publishing online.
Part 2: How to Add Voiceover to the TikTok Video?
Steps to add a voiceover to your TikTok video.
Upload or record a new video by hitting the + at the menu’s center at the screen’s bottom area.
Hit the microphone icon on the screen’s upper right corner once you’re over with the recording and trimming clips to your desired edit. Beneath, the microphone icon must mention “Voiceover.”
Source: mashable.com
Now, you can record a voiceover timed to Video’s every frame here.
Hit the “Save“ button once you’re satisfied with the voiceover
Hitting the “Save“ button will offer you back to the video’s preview, where you can add filters, text, stickers, and various sounds.
It is needed to add effects to your voiceover by hitting the “voice effects”. Here, you can control the narrator’s volume as well.
Also, make sure to enable automatic captions to make sure your video is more accessible!
Tap the Next button once you’re over with your Video. Then, you can edit the Video’s privacy settings, add a caption, and select a cover.
Part 3: Add Voiceover to TikTok Video with Extra Fusion: Wondershare Filmora
Do you want to include your voice in a video, create a voiceover demo for sharing and uploading on social networking platforms, or frame a documentary for important content?
All you need is an ideal video editing program similar to the Wondershare Filmora Video Editor.
The Filmora’s voiceover feature allows you to record your voice or add voice-over files to Video easily. In addition, you can customize the pitch, speed, and volume of the recorded voiceover and apply fade-in and fade-out effects. I’ll share how to register and add voiceover to a video with Filmora on your computer in this post.
Firstly, you can edit your Video in Filmora and then record the voiceover afterward. Or, you can first record the voiceover and then edit the Video around.
Check the steps below on how to make TikTok videos with voiceover via Wondershare Filmora.
Wondershare Filmora
Get started easily with Filmora’s powerful performance, intuitive interface, and countless effects!
Try It Free Try It Free Try It Free Learn More >
Record Voiceover and Add it to Video
We suggest you record the voiceover first in most cases so the sound will become pretty natural.
Step 1: Connect Microphone to PC or laptop
Connect the microphone to your laptop/PC when you’re ready to begin. It’s advisable to use some professional external microphones to capture high-quality sound.
Step 2: Record voiceover
Tap the Wondershare Filmora icon to launch this software. Then, select the New Project option in the beginning interface to create a new one.
Enter the Record tab and choose the “Record a Voiceover” option to arouse the Record Audio windows.
Or hit the microphone icon, and you only need 3 seconds of countdown to begin speaking.
Click the microphone icon again after you finish the above. Then, a new Record file option will be automatically present on the audio track.
Step 3: Edit Recorded Voiceover to Video
To edit the recorded voiceover, you can adjust audio settings, such as changing the Speed, Pitch, Volume, etc.
You can cut and trim out unnecessary sound sections from the recorded voiceover or apply the fade effects to the voiceover for a smoother transition.
Step 4: Sync Voiceover to Video
Now, it’s time to synchronize the recorded voiceover to video to create a compelling video.
The Wondershare Filmora allows up to 100 audio tracks; you can also add some background music to the voiceover.
Then import and drag-n-drop the video content to the video track, drag and drop the soundtrack to the video’s right-side position. Keep the voice and video track in the exact video duration if required.
Here’s how to sync voiceover to video!
Now, sync the recorded voiceover to Video to create a video. Since Filmora is compatible with 100 plus audio tracks, you can add different background music to the voiceover.
Then import and drag-n-drop the video content to the video track, drag and drop the soundtrack to the Video’s right side position. You can keep the Video and audio track in the same video duration.
Note: If you’ve recorded the iPhone voiceover or other device already, you can import it in the Project Library if you wish to add it to the Video and then sync it to Video.
Here is the ultimate step-by-step guide about adding titles to videos after knowing how to do a voiceover on TikTok.
Step 5: Export and save the new file
Click the “Export“ tab to export your new video file after you complete the project. You can either save the Video to different formats or directly share it on other social media platforms.
Additionally, you can even burn a DVD in minutes to watch it on TV.
How to Record and Add Voice over File during Filmora’s Video Editing Process
If you’ve recorded the voice over on your iPhone or another device already, even via the Wondershare Filmora, and wish to add it to the Video, visit the steps mentioned below:
1. Upload the video to Filmora
After logging in to Filmora’s main editing interface, click “Import” or drag-drop your video and voiceover file to the project library.
Filmora video editing software is compatible with a vast range of formats, so there will be no need to convert the files before import.
Drag and drop the files or video content to the Video Timeline when all the files get imported.
2. Record Voiceover in Video Editing
3. Edit voiceover and Export
You can then edit the recorded voiceover for TikTok to perfectly fit the Video and export it to your laptop/PC or directly upload it to YouTube.
For improving the sound, Filmora features more audio editing tools.
Conclusion
This article offered you a step-by-step guide on how to record a TikTok. It also displays four different screen recording methods, along with how to do a voiceover on TikTok.
Now, don’t ever worry about losing out on your favorite TikTok without the original publisher knowing via screen record TikTok via Wondershare Filmora.
Expert Techniques for Effective TikTok Videos (PC/MAC)
How to Upload a Video to TikTok from Mac or PC

Shanoon Cox
Dec 14, 2023• Proven solutions
TikTok has won the hearts of millions of people around the globe. Do you use the platform just to watch videos or do you upload your content too? If you said yes to the second part of the question then we are here to make your life easy. Users often spend needlessly extra time and energy when it comes to uploading edited videos on the mobile app of Tiktok.


Editing the chosen video on your computer then transferring it to your phone and uploading it to the app is a long and tedious process. It is not needed and we are here to tell you how to do it faster and easier.
Methods of Uploading Videos to TikTok on Mac OS
Methods of Uploading Videos to TikTok on Windows
Methods of Uploading Videos to TikTok on Mac OS
TikTok users like you flock to the app due to its entertainment value, global reach, and ease of use. When we talk about ease of use, we refer to the option of directly uploading a video on your TikTok profile from Mac.
The best thing about TikTok on Mac is that it has made it fairly easy for anyone to use their platform. If you want to upload a video to TikTok on Mac OS you will find it a child’s play. TikTok has a website version of the platform for people to use if they are on their computer.
You should choose a video that has already been editing by video editing software as the website will not allow you to make any edits. We always emphasize using only the best video editor for Mac.
Go to Safari and search for the website of TikTok.
Once you are on there, you will need to Log in to your account by clicking on the button that appears on the top right corner of the window.
After you are in, you need to locate and click on the Cloud icon which will open a window for you to upload your video.
![]()
Once the video is uploaded, you will be asked to put in a caption. We advise you to keep the caption quirky and fun. Another quick tip is that you should use hashtags that are trending at the moment as that will increase the visual appearance of your video more.
Time to choose a cover! Drag the frame to any part of the video to choose the thumbnail that you want as the cover of your content.

Lastly, choose the audience of the video according to your preference in the same window.
Your video is ready to be uploaded and all you need to do now is to click on the Upload button that is on the bottom right of the dialog box.
Methods of Uploading Videos to TikTok on Windows
As a person who does not own a Mac, you might be wondering if this article is for you or not. From this point onwards, the method will be for people who have a PC. To upload a video to TikTok from a PC, you can follow the same steps as above.
Believe it or not, the simplest way to upload videos to TikTok on Windows is the one that we have described in detail above. Of course, you will need to remember to edit the videos beforehand with the assistance of Tiktok video editing software.
If you wish to up your game and follow the best method and not the simplest one then we have something for you. The answer for many TikTok users is an android emulator. It is a sort of an application that behaves like an android device on your PC. It can be downloaded directly on Windows and used from your computer.
The benefit is that it will allow you to use the application version of TikTok which will allow you to edit the video just like you do on your smartphone.
You can use any Android emulator but we will advise you to use Bluestacks. The reason is that it is completely free and its interface is user-friendly
- Go to the official website of Bluestacks and download the application.

Once the download is complete, run the application.
When you are on the home screen of the app, click on the Game center.
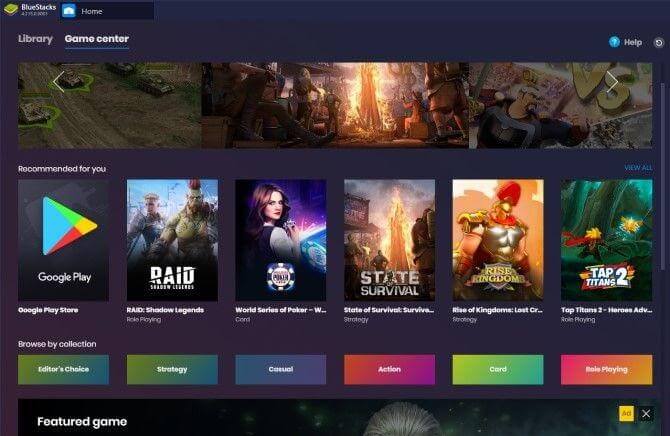
Under the “recommended for you” section, you will need to select Google Play Store.
Now comes the time where you will need to sign in to your already existing Google account.
Locate the search bar of the Play Store and search for the application of TikTok.

Install the application, sign in, and run it like you normally would on your smartphone.
It is time to upload your videos but you will need to do it through Bluestacks. Simply open Bluestacks, go to Home, and reach Library. Here you will find the Systems app, click on it and you will land at Media manager.
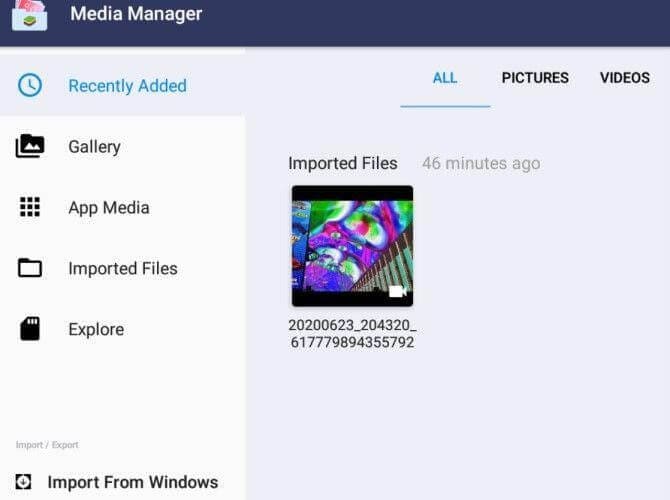
On the bottom left corner of the window, you will select Import from Windows.
Find the video of your choice and select it.
Return to the TikTok app and upload the video as you normally would on your smartphone.
Best Video Editor for TikTok
No matter if you are searching for a video editor for PC or Mac, we would vote FilmoraX video edito r as the best for the job. This is the software that is trending in the circles of Tiktokers owing to how easy it is to use.
With Filmora X, you can seamlessly cut or trim videos. You can set your video’s aspect ratio or resolution according to your specifications. Not only that, you can create a separate soundtrack just for your video!
Filmora X has astounding sound and visual editing effects and tools and it also supports 4K editing. With such software, creating masterpieces on TikTok will take minimal effort on your side.
Learn More: FAQ you need to know when using TikTok on iPhone/Mac
Shanoon Cox
Shanoon Cox is a writer and a lover of all things video.
Follow @Shanoon Cox
Shanoon Cox
Dec 14, 2023• Proven solutions
TikTok has won the hearts of millions of people around the globe. Do you use the platform just to watch videos or do you upload your content too? If you said yes to the second part of the question then we are here to make your life easy. Users often spend needlessly extra time and energy when it comes to uploading edited videos on the mobile app of Tiktok.
Editing the chosen video on your computer then transferring it to your phone and uploading it to the app is a long and tedious process. It is not needed and we are here to tell you how to do it faster and easier.
Methods of Uploading Videos to TikTok on Mac OS
Methods of Uploading Videos to TikTok on Windows
Methods of Uploading Videos to TikTok on Mac OS
TikTok users like you flock to the app due to its entertainment value, global reach, and ease of use. When we talk about ease of use, we refer to the option of directly uploading a video on your TikTok profile from Mac.
The best thing about TikTok on Mac is that it has made it fairly easy for anyone to use their platform. If you want to upload a video to TikTok on Mac OS you will find it a child’s play. TikTok has a website version of the platform for people to use if they are on their computer.
You should choose a video that has already been editing by video editing software as the website will not allow you to make any edits. We always emphasize using only the best video editor for Mac.
Go to Safari and search for the website of TikTok.
Once you are on there, you will need to Log in to your account by clicking on the button that appears on the top right corner of the window.
After you are in, you need to locate and click on the Cloud icon which will open a window for you to upload your video.
![]()
Once the video is uploaded, you will be asked to put in a caption. We advise you to keep the caption quirky and fun. Another quick tip is that you should use hashtags that are trending at the moment as that will increase the visual appearance of your video more.
Time to choose a cover! Drag the frame to any part of the video to choose the thumbnail that you want as the cover of your content.
Lastly, choose the audience of the video according to your preference in the same window.
Your video is ready to be uploaded and all you need to do now is to click on the Upload button that is on the bottom right of the dialog box.
Methods of Uploading Videos to TikTok on Windows
As a person who does not own a Mac, you might be wondering if this article is for you or not. From this point onwards, the method will be for people who have a PC. To upload a video to TikTok from a PC, you can follow the same steps as above.
Believe it or not, the simplest way to upload videos to TikTok on Windows is the one that we have described in detail above. Of course, you will need to remember to edit the videos beforehand with the assistance of Tiktok video editing software.
If you wish to up your game and follow the best method and not the simplest one then we have something for you. The answer for many TikTok users is an android emulator. It is a sort of an application that behaves like an android device on your PC. It can be downloaded directly on Windows and used from your computer.
The benefit is that it will allow you to use the application version of TikTok which will allow you to edit the video just like you do on your smartphone.
You can use any Android emulator but we will advise you to use Bluestacks. The reason is that it is completely free and its interface is user-friendly
- Go to the official website of Bluestacks and download the application.
Once the download is complete, run the application.
When you are on the home screen of the app, click on the Game center.
Under the “recommended for you” section, you will need to select Google Play Store.
Now comes the time where you will need to sign in to your already existing Google account.
Locate the search bar of the Play Store and search for the application of TikTok.
Install the application, sign in, and run it like you normally would on your smartphone.
It is time to upload your videos but you will need to do it through Bluestacks. Simply open Bluestacks, go to Home, and reach Library. Here you will find the Systems app, click on it and you will land at Media manager.
On the bottom left corner of the window, you will select Import from Windows.
Find the video of your choice and select it.
Return to the TikTok app and upload the video as you normally would on your smartphone.
Best Video Editor for TikTok
No matter if you are searching for a video editor for PC or Mac, we would vote FilmoraX video edito r as the best for the job. This is the software that is trending in the circles of Tiktokers owing to how easy it is to use.
With Filmora X, you can seamlessly cut or trim videos. You can set your video’s aspect ratio or resolution according to your specifications. Not only that, you can create a separate soundtrack just for your video!
Filmora X has astounding sound and visual editing effects and tools and it also supports 4K editing. With such software, creating masterpieces on TikTok will take minimal effort on your side.
Learn More: FAQ you need to know when using TikTok on iPhone/Mac
Shanoon Cox
Shanoon Cox is a writer and a lover of all things video.
Follow @Shanoon Cox
Also read:
- [New] Audience Captivation at Its Peak Top 20 TikTok Caption Ideas
- [New] 2024 Approved 19 Best Anime Inspirations for TikTok Stars
- In 2024, Essential TikTok Gamers You Can't Miss
- [Updated] Expertly Selected 10 Windows Apps for TikTok Videography
- 2024 Approved Exceptional TikTok PFP Creations that Command Attention
- [New] Hip-Hop Frenzy Top TikTok Rap Videos of Today for 2024
- Real-Time Artist Streaming on Douyin for 2024
- [New] 2024 Approved Copyrights and Creatives Uploading TikToks Safely
- Comedic Climb Tracking the Rise of Laughter Artists on TikTok
- In 2024, Crafting Your Legacy The Ultimate List of 20 Iconic TikTok Captions
- [New] 2024 Approved Journey Through TikTok's Anime-Inspired Content Dance, Music, and More
- [Updated] 2024 Approved TikTok Glitches Troubleshooting iOS/Android Issues
- [Updated] Ensuring Your Content Is Safe for TikTok Uploading
- [New] Clear Up Creations Leading Emblem Eraser Tools for 2024
- [New] The Top 5 Must-Know for macOS TikTok Users for 2024
- In 2024, A Beginner’s Blueprint to Crafting Engaging TikTok Reaction Videos with Filmora
- The Allure of TikTok Animation, Songs, Dances & Laughter for 2024
- In 2024, Revamp TikTok Engagement A Must-Try Set of Essential Tools
- In 2024, Secure Your Content Top TikTok Marker Erasers for iPhones & Android
- Top 15 Booktok Books Recommendation [TikTok Books] for 2024
- [New] Capture Your Best Selfie on TikTok Essential Recording Techniques Explained for 2024
- [Updated] 72 Amusing TikTok Joke Threads for 2024
- Streamlining Content Creation Using Siri in TikTok
- [Updated] Cinematic Surprises The Most Impactful TikTok Editing Tools for 2024
- [Updated] In 2024, 10 Best TikTok Filters to Make Your Videos Stand Out
- 2024 Approved Boosting TikTok Traffic The Ultimate List of Engaging Usernames
- [New] 2024 Approved Step-by-Step Techniques for Text Integration in TikTok Videos
- [New] In 2024, Top 10 Essential TikTok Analytics for Account Enhancement
- [New] The Artisan's Approach to Crafting Compelling TikTok Videos for 2024
- [Updated] Unveiling the Essence of TikTok Movement, Sound, and Humor
- Navigating Non-Responsive TikTok Features for 2024
- [New] Screwball Skirmishes Uncovering the Funniest TikTok Game Battles for 2024
- Updated The Art of Celebrity Sound Transformation An Insiders Guide to State-of-the-Art Techniques & Tools for 2024
- Essential Steps to Record Films on Computers/Macs & Phones
- New Achieving Clarity Step-by-Step Tips to Dial Down Background Sound in Avid Media Composer for 2024
- [Updated] 2024 Approved Revolutionize Your Online Presence with Live Screenshares
- Intrigue Initiates The Leading 10 Rogues for 2024
- Catch or Beat Sleeping Snorlax on Pokemon Go For Nokia 150 (2023) | Dr.fone
- In 2024, Hacks to do pokemon go trainer battles For Tecno Camon 20 Pro 5G | Dr.fone
- In 2024, AddROM Bypass An Android Tool to Unlock FRP Lock Screen For your Vivo V29
- How to View GPX Files Online and Offline Solutions Of Apple iPhone 11 Pro Max | Dr.fone
- How to Unlock SIM Card on Itel S23+ online without jailbreak
- In 2024, How to Unlock iPhone 14 Pro with IMEI Code?
- [Updated] Add a Personal Touch Using Branded Graphic Elements in Your Instagram Content
- Shine Through the Game Fixes for Dark Capture by OBS
- [New] In 2024, Best Practices in Altering IGTV Video Titles
- [Updated] 2024 Approved Instagram Images Deciphered Your Source Hunting Companion
- 2024 Approved Step-by-Step Save MOVs on Windows 10
- [Updated] In 2024, Unleash Focus The Pro's Guide to Distraction-Free Google Meet Sessions
- [Updated] 2024 Approved Exporting Tweets as WebM/AAC Audio
- How to Reset Oppo A78 5G Without the Home Button | Dr.fone
- 7 Fixes for Unfortunately, Phone Has Stopped on Poco C50 | Dr.fone
- Title: "[New] 2024 Approved Master TikTok's Cutting-Edge Filming Techniques"
- Author: Kenneth
- Created at : 2024-05-23 01:50:48
- Updated at : 2024-05-24 01:50:48
- Link: https://tiktok-video-files.techidaily.com/new-2024-approved-master-tiktoks-cutting-edge-filming-techniques/
- License: This work is licensed under CC BY-NC-SA 4.0.
