
"Light Up the Screen Tips and Steps for Adding GIFs to Snapchats"
Light Up the Screen: Tips and Steps for Adding GIFs to Snapchats

For all informal interactions between pals, Snapchat is the go-to app. Many configurable options are available on the platform, allowing you to express your inner creative sides. Snapchat helps to put your spin on anything, whether it’s just sharing random photos to your contacts or having extended chats.
The option to add GIFs to Snapchat is one such great feature. Because Snapchat is primarily a picture-sharing app, the emphasis is on making these images as engaging and imaginative as possible, and this is where animated GIFs come to play.
GIF stickers have exploded in popularity and for a good cause. The active emojis are mostly not amusing, but they also give life to your images, making your digital experience better overall.
Given how entertaining GIFs can be, knowing how to send gif on snapchat is essential. As a result, we’ve put up a detailed guide that explains how to send gif on snapchat in four distinct methods. Enjoy!
Do you want to know how to send gif on snapchat in different simple ways? Then you’ve arrived at the correct page. In this post, we’ll show you how to send gif on snapchat in just a few easy and simple steps.
1.How to send gif on snapchat?
- On your phone, open Snapchat.
- Take a picture
- Select the Stickers symbol.
- Select a GIF.
- Choose the GIF you want to use.
- Finally, please include it in the picture.
2.How to make your animated GIFs
GIF means Graphics Interchange Format, and it’s simply a series of moving, dynamic pictures (think Harry Potter) that loop indefinitely. They give your image, which would otherwise be stagnant and dull, a new dimension.
GIFs are so entertaining that they can be used to carry a whole discussion. However, if you want to learn how to make your GIFs, follow the steps below.
You’ll need to utilize the GIPHY application to generate your unique GIFs for this.
On your phone, download the GIPHY app.
- Start the app on your Mobile and select the create option.
- Smile symbol: Take a Photo and Gallery Option are the three options available to you.
- Smile Icon: This option allows you to make GIFs using the edit button.
- Capture a Photo: This option allows the user to take a photo on the scene and convert it to a GIF.
- Option of Gallery: You may build a GIF by selecting a photo from your gallery and editing it.
- Select options and begin designing depending on your preferences.
- When you will finish, click on the arrow in the bottom right-hand corner to exit.
- To save all the GIFs, go to Generated GIFs, touch on the three vertical dots, and choose Save GIF.
That GIF has now been saved to your pictures folder and can be seen anytime you need that.
3.What is the best way to transmit GIFs on Snapchat?
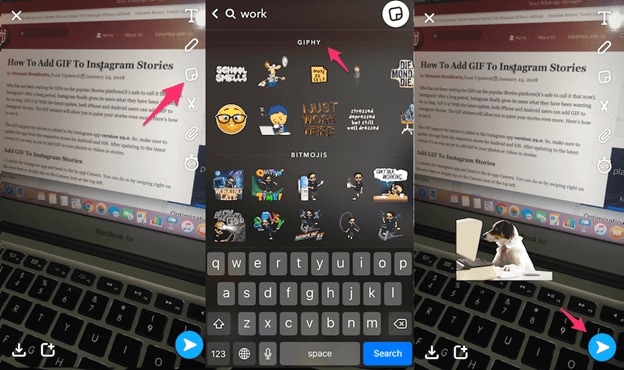
Putting GIFs in your photos is easy and takes only a few minutes. Here’s how to accomplish it.
- Log in to your Snapchat account by opening the app on your phone.
- Click a photo or choose an image from your collection to upload.
- Select the sticker button to add extra components to the Snap.
- Choose the GIF choice and any GIF you wish.
- Once you’ve chosen a GIF, it’ll show on the Snap for you to adjust and position anywhere you’d like.
- Lastly, to send the Snap to your pals, select the arrow option in the lower right corner.

4.On Android, how to send gif on snapchat Messages?
You must download the GBoard app on your phone to transfer GIFs to your pals immediately from a keypad on Android.
5.How can I get Gboard to work on Android?
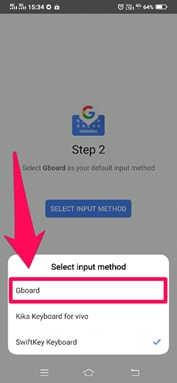
To install and activate the Gboard application and transmit GIFs directly from it, follow the procedure.
- Download the Gboard application on your Android.
- Open the app and select Enable in Configurations from the menu.
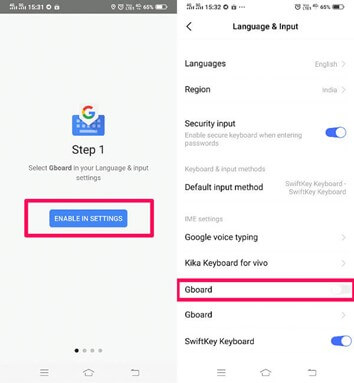
- The Communication and Input menu will appear in Preferences.
- Choose Gboard from the list of available keyboards.
6.In iOS, how to send gif on snapchat Messages?
Using the GIPHY keypad on your iPhone, you can share GIFs straight to your pals via Snapchat chats. However, you must first activate the keypad.
- Turn on the GIPHY keypad on your iPhone. Install the GIPHY phone app from the Apple Store. After you’ve downloaded the app, you’ll need to activate the GIPHY keypad on your iPhone.
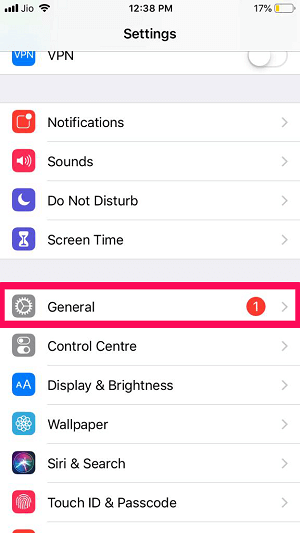
- To do just that, go over to the iPhone configuration menu and select “General” from the drop-down menu.
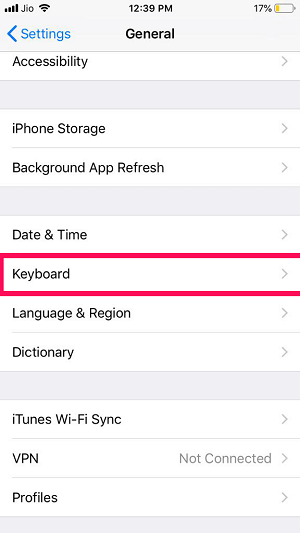
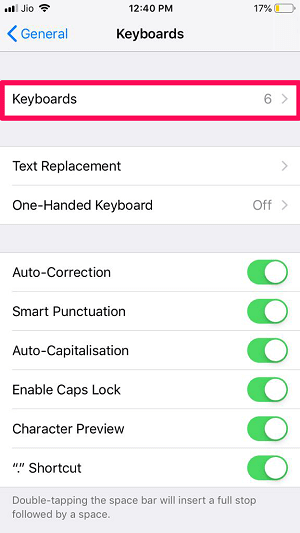
- Scroll to the bottom of the Keypad choice, then click “Keypads” once again.
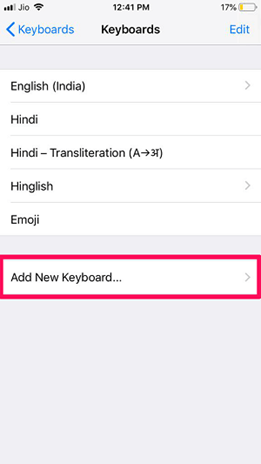
- All of the newly added keyboards will now be visible. Click the “Add Additional Keyboard” option to add GIPHY.
For Win 7 or later (64-bit)
For macOS 10.12 or later
For all informal interactions between pals, Snapchat is the go-to app. Many configurable options are available on the platform, allowing you to express your inner creative sides. Snapchat helps to put your spin on anything, whether it’s just sharing random photos to your contacts or having extended chats.
The option to add GIFs to Snapchat is one such great feature. Because Snapchat is primarily a picture-sharing app, the emphasis is on making these images as engaging and imaginative as possible, and this is where animated GIFs come to play.
GIF stickers have exploded in popularity and for a good cause. The active emojis are mostly not amusing, but they also give life to your images, making your digital experience better overall.
Given how entertaining GIFs can be, knowing how to send gif on snapchat is essential. As a result, we’ve put up a detailed guide that explains how to send gif on snapchat in four distinct methods. Enjoy!
Do you want to know how to send gif on snapchat in different simple ways? Then you’ve arrived at the correct page. In this post, we’ll show you how to send gif on snapchat in just a few easy and simple steps.
1.How to send gif on snapchat?
- On your phone, open Snapchat.
- Take a picture
- Select the Stickers symbol.
- Select a GIF.
- Choose the GIF you want to use.
- Finally, please include it in the picture.
2.How to make your animated GIFs
GIF means Graphics Interchange Format, and it’s simply a series of moving, dynamic pictures (think Harry Potter) that loop indefinitely. They give your image, which would otherwise be stagnant and dull, a new dimension.
GIFs are so entertaining that they can be used to carry a whole discussion. However, if you want to learn how to make your GIFs, follow the steps below.
You’ll need to utilize the GIPHY application to generate your unique GIFs for this.
On your phone, download the GIPHY app.
- Start the app on your Mobile and select the create option.
- Smile symbol: Take a Photo and Gallery Option are the three options available to you.
- Smile Icon: This option allows you to make GIFs using the edit button.
- Capture a Photo: This option allows the user to take a photo on the scene and convert it to a GIF.
- Option of Gallery: You may build a GIF by selecting a photo from your gallery and editing it.
- Select options and begin designing depending on your preferences.
- When you will finish, click on the arrow in the bottom right-hand corner to exit.
- To save all the GIFs, go to Generated GIFs, touch on the three vertical dots, and choose Save GIF.
That GIF has now been saved to your pictures folder and can be seen anytime you need that.
3.What is the best way to transmit GIFs on Snapchat?
Putting GIFs in your photos is easy and takes only a few minutes. Here’s how to accomplish it.
- Log in to your Snapchat account by opening the app on your phone.
- Click a photo or choose an image from your collection to upload.
- Select the sticker button to add extra components to the Snap.
- Choose the GIF choice and any GIF you wish.
- Once you’ve chosen a GIF, it’ll show on the Snap for you to adjust and position anywhere you’d like.
- Lastly, to send the Snap to your pals, select the arrow option in the lower right corner.
4.On Android, how to send gif on snapchat Messages?
You must download the GBoard app on your phone to transfer GIFs to your pals immediately from a keypad on Android.
5.How can I get Gboard to work on Android?
To install and activate the Gboard application and transmit GIFs directly from it, follow the procedure.
- Download the Gboard application on your Android.
- Open the app and select Enable in Configurations from the menu.
- The Communication and Input menu will appear in Preferences.
- Choose Gboard from the list of available keyboards.
6.In iOS, how to send gif on snapchat Messages?
Using the GIPHY keypad on your iPhone, you can share GIFs straight to your pals via Snapchat chats. However, you must first activate the keypad.
- Turn on the GIPHY keypad on your iPhone. Install the GIPHY phone app from the Apple Store. After you’ve downloaded the app, you’ll need to activate the GIPHY keypad on your iPhone.
- To do just that, go over to the iPhone configuration menu and select “General” from the drop-down menu.
- Scroll to the bottom of the Keypad choice, then click “Keypads” once again.
- All of the newly added keyboards will now be visible. Click the “Add Additional Keyboard” option to add GIPHY.
For Win 7 or later (64-bit)
For macOS 10.12 or later
Unlocking Creative Expression with Simple Lenses
How to Create Snapchat Lenses Easily: 2 Methods

Ollie Mattison
Mar 27, 2024• Proven solutions
Are you feeling like creating your own Snapchat lens, so you can have an even better experience with the app? The good news is that two new Snapchat tools have been released – the Lens Studio and Create Your Own Lens applications.
If you are a regular Snapchat user, you may want to learn about the Snapchat lens and how it can help you. We will help you get started. Here is our step by step guide on how to make Snapchat lenses.
- Part1: Comparing Lens Studio and Creating Your Own Lens
- Part2: How to Use Lens Studio
- Part3: How to Create Snapchat Lenses Using Create Your Own Lens
Part 1: Comparing Lens Studio and Creating Your Own Lens
The two programs that we are highlighting today are Lens Studio and Create Your Own Lens. These are both fantastic programs for creating your own Snapchat lens, but they do have slightly different uses. If you are the type of person who wants to design a professional Snapchat lens, you are going to prefer Lens Studio.
But if you are hoping to come up with something creative that you can share with your friends and family, then you may love Create Your Own Lens. It is a very easy program to use, and it offers a ton of features that you may be surprised to see.
Snapchat lenses is for fun
The beauty of Snapchat lenses is that you can now create your own environment, which you can use each time you are taking photos or videos. Sure, you can always use the filters that are already available in the application, but not everyone would find those enough.
If you want some customization, or you just want to mess around until you get the filter that makes sense for you, Snapchat lenses are the way to go.

Lens Studio is for business
Lens Studio is perfect for businesses that may want to create unique environments for their clients, or the times when they are releasing company Snapchat posts. Say the company is hosting an event. They may want a custom graphic for that event, which is used for all the pictures and videos posted to Snapchat about the event. Using Lens Studio lets them do that with ease.
Create Your Own Lens is great when you are going to a special event, birthday party or graduating, and you want a special graphic that comes up in all your snaps. It is very intuitive to use, and is available through the App Store as a download.
Part 2: How to Use Lens Studio
1. Download Lens Studio
The first step involves downloading Lens Studio, which you can do from your computer. It is compatible with both Windows and Mac computers, and will run on any semi-modern system. According to the Snapchat team, Lens Studio is similar to the program used by their AR teams to create lenses. That means you are getting similar functionality, but with an easier to manage interface.
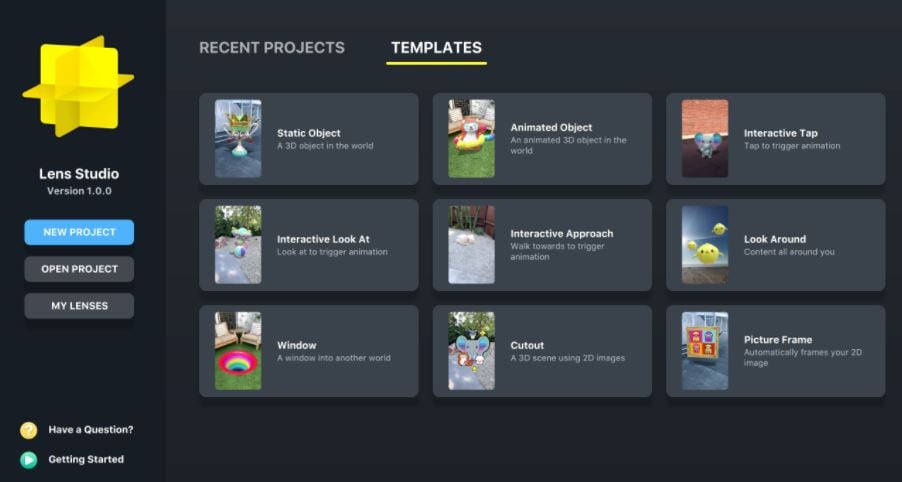
2. Choose Templates Page
It is normal to feel a little overwhelmed the first time you try and use this program. But that is why the templates page is so great. You can select from templates depending on the type of lens that you are hoping to create. You can just use a template, or you can incorporate your own ideas to customize the template.
There is also a Lens Studio Overview guide that you can access online, which will help you get acquainted with the program’s various features and quirks.
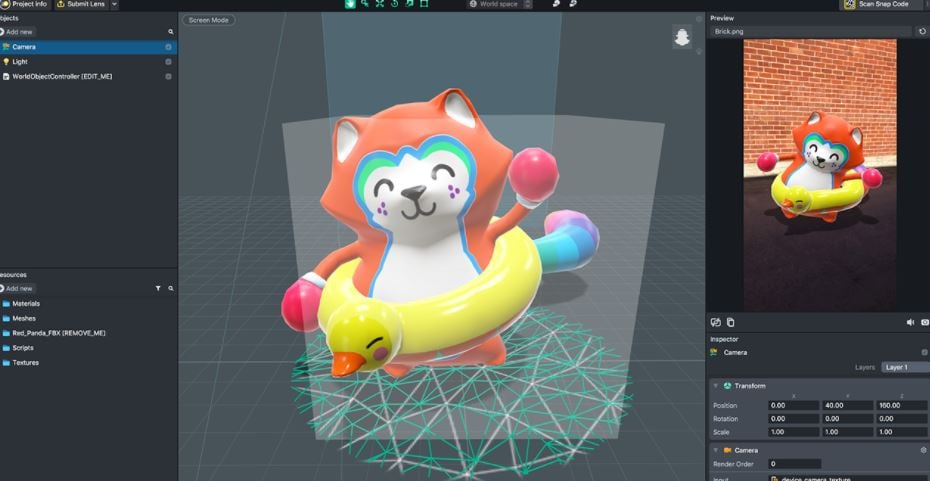
3. Use Studio Panels
Are you ready to create your own custom Snapchat lens? It is time to head over to Studio Panels on the application. This is the area where you can add your own 2D or 3D objects, and you can visualize how they would look as a Snapchat filter. You can add, remove, resize and drag objects to specific areas of the screen.
There are other tools accessible from the Resources panel. You can use these tools to ensure that your Snapchat lens is exactly as you want.
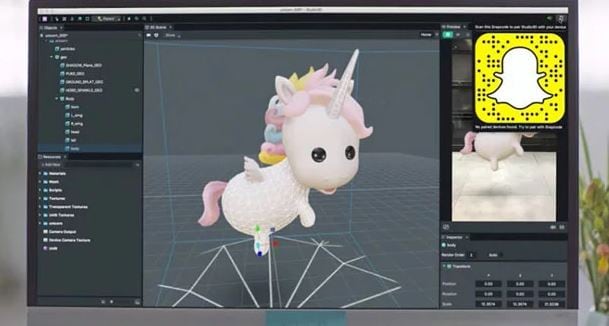
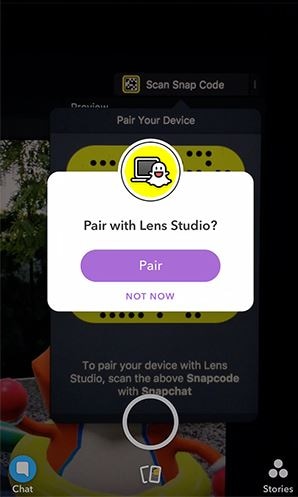
4. Preview the Snapchat Lens You Create
The great thing about this application is that you can preview the lens before you send it out to your phone. When you are satisfied with the image on the preview, you can pair your phone with the application, and you will be able to send that Snapchat lens onto your phone through your Snapcode. It is that simple!
Part 3: How to Create Snapchat Lenses Using Create Your Own Lens
- There are two ways that you can access the tool for creating fun Snapchat lenses. You can either visit the website snapchat.com/create, or you can go on the “filters and lenses” section on your iOS device. If you are using Snapchat on an Android device, you will only have the option for the website. But the feature is coming to the Android version of Snapchat very soon.
- When you are in the application or on the website, you may start to look at the different templates for Snapchat lenses. Now you can add other items into the templates, such as photographs, text or graphics.
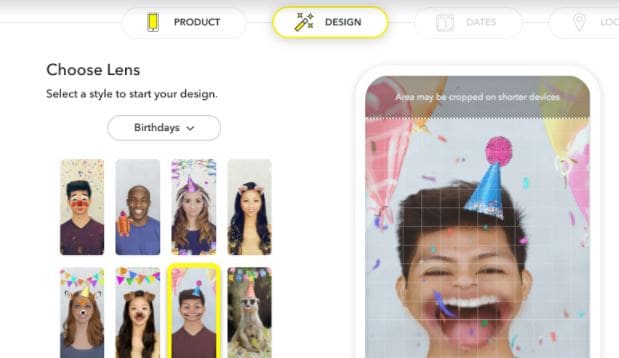
It is all up to your imagination. You can create the perfect Snapchat lens, which you can then send into your Snapchat account through your Snapcode. Of course, if you are using your iOS device to create the lens, it is already linked to your account.
Another cool feature is how you can set the location for where the Snapchat lens is available. Say you are hosting a party. You can have the Snapchat lens available to everyone who uses Snapchat within a set square footage of your home. That is an amazing way to let everyone share social media pictures and photos of your party, through the lens you created.
Conclusion
Creating Snapchat lenses has never been easier. Whether you are a business looking to add a custom lens, or you just want to create a fun lens for a graduation or party, there are tools that make the job very easy. Using these tools will allow you to create the perfect Snapchat lens for any occasion.
Ollie Mattison
Ollie Mattison is a writer and a lover of all things video.
Follow @Ollie Mattison
Ollie Mattison
Mar 27, 2024• Proven solutions
Are you feeling like creating your own Snapchat lens, so you can have an even better experience with the app? The good news is that two new Snapchat tools have been released – the Lens Studio and Create Your Own Lens applications.
If you are a regular Snapchat user, you may want to learn about the Snapchat lens and how it can help you. We will help you get started. Here is our step by step guide on how to make Snapchat lenses.
- Part1: Comparing Lens Studio and Creating Your Own Lens
- Part2: How to Use Lens Studio
- Part3: How to Create Snapchat Lenses Using Create Your Own Lens
Part 1: Comparing Lens Studio and Creating Your Own Lens
The two programs that we are highlighting today are Lens Studio and Create Your Own Lens. These are both fantastic programs for creating your own Snapchat lens, but they do have slightly different uses. If you are the type of person who wants to design a professional Snapchat lens, you are going to prefer Lens Studio.
But if you are hoping to come up with something creative that you can share with your friends and family, then you may love Create Your Own Lens. It is a very easy program to use, and it offers a ton of features that you may be surprised to see.
Snapchat lenses is for fun
The beauty of Snapchat lenses is that you can now create your own environment, which you can use each time you are taking photos or videos. Sure, you can always use the filters that are already available in the application, but not everyone would find those enough.
If you want some customization, or you just want to mess around until you get the filter that makes sense for you, Snapchat lenses are the way to go.
Lens Studio is for business
Lens Studio is perfect for businesses that may want to create unique environments for their clients, or the times when they are releasing company Snapchat posts. Say the company is hosting an event. They may want a custom graphic for that event, which is used for all the pictures and videos posted to Snapchat about the event. Using Lens Studio lets them do that with ease.
Create Your Own Lens is great when you are going to a special event, birthday party or graduating, and you want a special graphic that comes up in all your snaps. It is very intuitive to use, and is available through the App Store as a download.
Part 2: How to Use Lens Studio
1. Download Lens Studio
The first step involves downloading Lens Studio, which you can do from your computer. It is compatible with both Windows and Mac computers, and will run on any semi-modern system. According to the Snapchat team, Lens Studio is similar to the program used by their AR teams to create lenses. That means you are getting similar functionality, but with an easier to manage interface.
2. Choose Templates Page
It is normal to feel a little overwhelmed the first time you try and use this program. But that is why the templates page is so great. You can select from templates depending on the type of lens that you are hoping to create. You can just use a template, or you can incorporate your own ideas to customize the template.
There is also a Lens Studio Overview guide that you can access online, which will help you get acquainted with the program’s various features and quirks.
3. Use Studio Panels
Are you ready to create your own custom Snapchat lens? It is time to head over to Studio Panels on the application. This is the area where you can add your own 2D or 3D objects, and you can visualize how they would look as a Snapchat filter. You can add, remove, resize and drag objects to specific areas of the screen.
There are other tools accessible from the Resources panel. You can use these tools to ensure that your Snapchat lens is exactly as you want.
4. Preview the Snapchat Lens You Create
The great thing about this application is that you can preview the lens before you send it out to your phone. When you are satisfied with the image on the preview, you can pair your phone with the application, and you will be able to send that Snapchat lens onto your phone through your Snapcode. It is that simple!
Part 3: How to Create Snapchat Lenses Using Create Your Own Lens
- There are two ways that you can access the tool for creating fun Snapchat lenses. You can either visit the website snapchat.com/create, or you can go on the “filters and lenses” section on your iOS device. If you are using Snapchat on an Android device, you will only have the option for the website. But the feature is coming to the Android version of Snapchat very soon.
- When you are in the application or on the website, you may start to look at the different templates for Snapchat lenses. Now you can add other items into the templates, such as photographs, text or graphics.
It is all up to your imagination. You can create the perfect Snapchat lens, which you can then send into your Snapchat account through your Snapcode. Of course, if you are using your iOS device to create the lens, it is already linked to your account.
Another cool feature is how you can set the location for where the Snapchat lens is available. Say you are hosting a party. You can have the Snapchat lens available to everyone who uses Snapchat within a set square footage of your home. That is an amazing way to let everyone share social media pictures and photos of your party, through the lens you created.
Conclusion
Creating Snapchat lenses has never been easier. Whether you are a business looking to add a custom lens, or you just want to create a fun lens for a graduation or party, there are tools that make the job very easy. Using these tools will allow you to create the perfect Snapchat lens for any occasion.
Ollie Mattison
Ollie Mattison is a writer and a lover of all things video.
Follow @Ollie Mattison
Also read:
- [New] 2024 Approved Highlighting the Best iOS PSP Emulators #1-5
- [New] Bridge the Gap to Your Friend's Live Broadcast
- [New] Economical Aether Fileshare for Bulk Digital Storing for 2024
- [New] Elevating Your TikTok Game with Effective Use of Hashes for 2024
- [New] In 2024, Leading The Charge Top 10 Gaming Bloggers on TikTok
- [Updated] How to Create A YouTube Channel Today for 2024
- [Updated] In 2024, 10 Chucklesome TikTok Riddles
- [Updated] Stream with Style Hacks to Keep Your Daily Video Game Engaging
- Beyond Coding: Daily Life Applications of Keyboard Macros
- Connecting with Real-Time TikToks Practical Guide for 2024
- Explore the Latest Trends with These Snapchat Ideas
- Fresh Driver Downloads for Optimal Performance of Your HP OfficeJet Pro 8620 on Windows Devices
- In 2024, Screen Snag Reviewed In-Depth Analysis
- In-Depth Wasteland 2 Director’s Cut Review: An Intriguing Blend of Turn-Based Combat & Storytelling
- Proactive Preservation IOS Photos to Your Snap Story
- Stand Out with These PFP Gems for TikTok Profiles for 2024
- The Ultimate TikTok Emoji Guide – Discover Top 7 + Clandestine Icons
- Unveiling Your Device's Identity: Locating the Windows 10 Build Version
- Updated Best SolarMovie Alternatives-Watch Movies Online
- Title: Light Up the Screen Tips and Steps for Adding GIFs to Snapchats
- Author: Kenneth
- Created at : 2024-10-09 19:28:14
- Updated at : 2024-10-11 19:37:49
- Link: https://tiktok-video-files.techidaily.com/light-up-the-screen-tips-and-steps-for-adding-gifs-to-snapchats/
- License: This work is licensed under CC BY-NC-SA 4.0.