
:max_bytes(150000):strip_icc():format(webp)/windows_search-56aa11bd3df78cf772ac3ea5.jpg)
In 2024, Navigating Live TikTok Broadcasting on Your Computer
Navigating Live TikTok Broadcasting on Your Computer
Content creators on TikTok adopt various creative ways to engage audiences. Many fashion influencers provide makeup tutorials by doing a live stream on TikTok. Moreover, game lovers like to live stream their gameplay on TikTok to attract a large number of people. Thus, live streams on TikTok are a new norm among content creators and game lovers to maximize their target audience.
If you don’t know how to go live on TikTok on PC, this article will guide you. Through this well-structured article, you can find four easy ways to go live on TikTok on your computer.
- Way 1: With OBS
- Way 2: With Streamlabs
- Way 3: With XSplit Broadcaster
- Way 4: With TikTok Live Studio Software
Part 1: Prerequisite for Live Stream on TikTok from PC
To start TikTok live streaming on your PC, there are some pre-requirements. These requirements are necessary to prevent the misuse of TikTok by any means. Once you have fulfilled these requirements, you can easily go for live streaming on TikTok without any restrictions.
- To enable the live stream feature on TikTok, you must have at least 1000 followers on your account.
- You should be above 16 years old to access this feature. Moreover, to increase your engagement during live streams by sending virtual gifts, you should be 18 years old or above.
- To begin live streaming on a PC using streaming software, you must have a streaming key and server URL.
How to Get your Streaming Key on TikTok?
A streaming key is a random combination of alphanumeric characters. It helps you to connect your TikTok account with a streaming platform to enable high-quality results. To get your streaming key in the easiest way, check the following steps:
Step1 Open your TikTok app to begin the process. Select the “Plus” icon and choose the “Live” button from the right side. Afterward, choose the “Cast/Connect to PC/Mac” option to proceed.
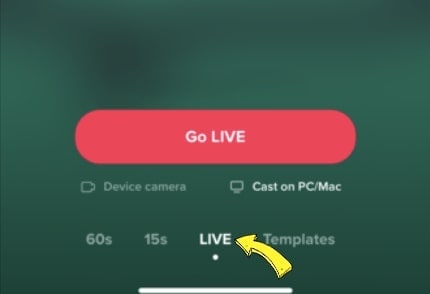
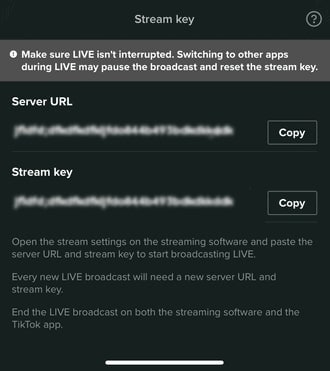
Step2 Now tap on the “Go Live” option that will open a new window. Now you can see your Stream Key and Server URL. Press the “Copy” option given next to these two options. Afterward, you can share your stream key and server URL with your PC, which will be used later.
Part 2: Benefits of Going Live on TikTok with Computer
There are various advantages of going live on TikTok with a PC. By doing so, you can ensure a better quality of your live streaming session. To learn more, let’s discuss the details.
1. Great Stability
Holding a mobile phone for live streams can be hectic and tiring. Moreover, it won’t offer camera stability, and the end result can be shaky. By using a computer, you don’t have to hold anything. With great stability and ease, you can conduct live streams for a longer run.
2. High Video/Audio Quality
iOS and Samsung devices provide high video quality. However, if you are using low-end smartphones, you won’t get high video and audio quality. In such a circumstance, you should use your computer to maintain better quality. By doing so, your audience can listen and view your live streams flawlessly.
3. Picture-in-Picture Display
Live streams on mobile phones restrict you from displaying a variety of content simultaneously. Through your PC, you can do live streaming on TikTok while playing your favorite games. You can easily open multiple windows on your PC during live streams. Moreover, you can have a picture-in-picture display to use a webcam while going for a live stream.
Part 3: 4 Ways to Go Live on TikTok On PC
Are you eager to know how to stream on TikTok on PC using different ways? Let’s shed light on some simple yet effective ways to go for live streaming on TikTok with a PC.
Way 1: With OBS
OBS is a highly compatible and free broadcasting software. It is available for mainstream platforms such as Windows, Mac, and Linux. It offers high-end results during streaming with an audio mixer. It also provides customized options to set hotkeys, choose sources, and adjust the properties. Besides being a great streaming software, OBS also functions as a screen recorder.
Therefore, OBS is a famous streaming tool that ensures great quality in live streaming on TikTok. To learn how to go live on TikTok on a computer using OBS, here are the easy steps:
Step1 Download and install OBS on your PC successfully. Once done, go to the “Controls” section and click on “Settings.” A new window will pop up from which click on the “Stream” option given on the left panel.
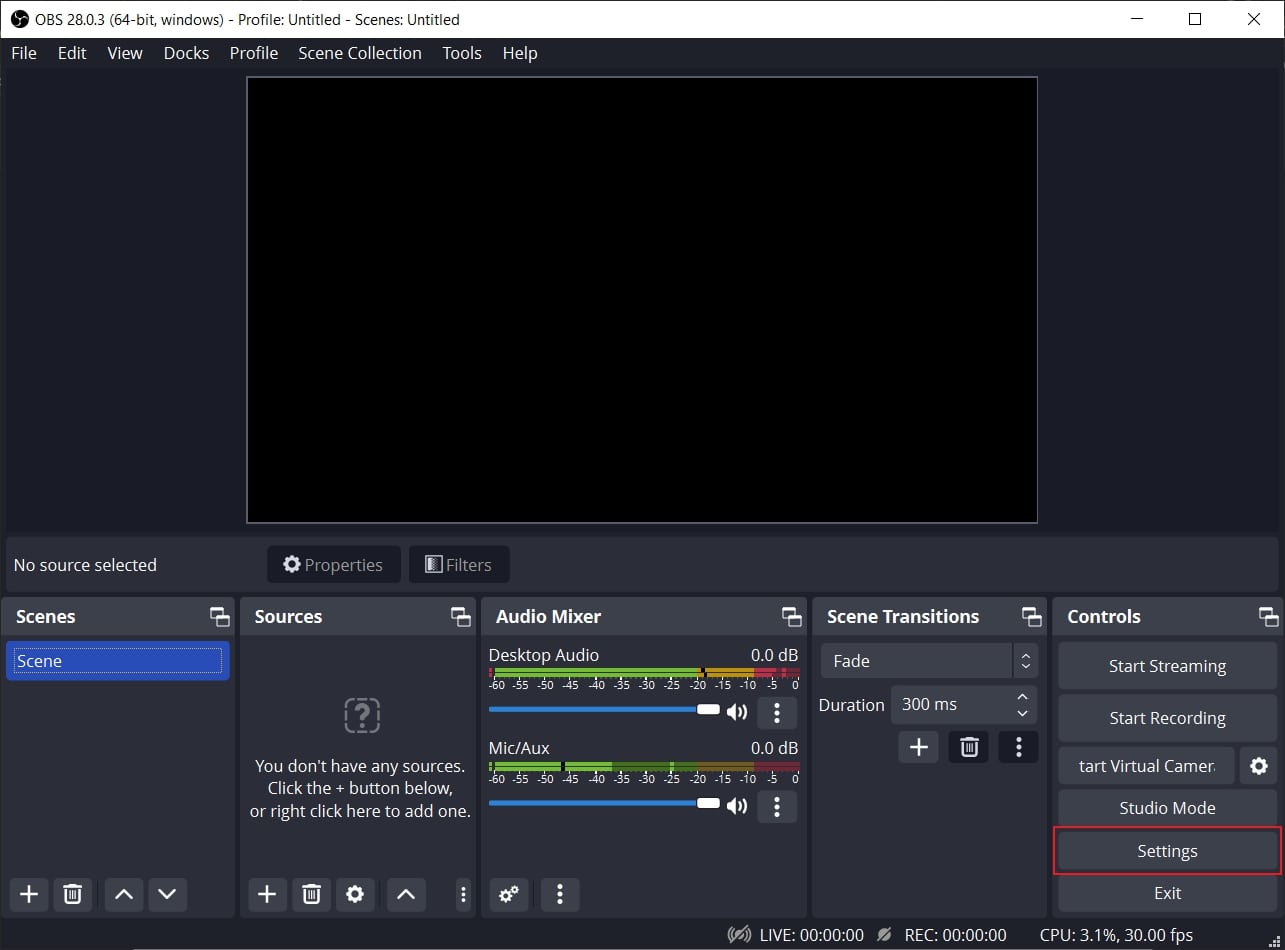
Step2 On the “Service” box, choose “Custom” to proceed. Now enter the stream key and server URL you have gotten before. Once done with all requirements, click on the “Apply” option.

Way 2: With Streamlabs
Streamlabs is a popular streaming tool comprising great capabilities for live streaming. Using this platform, you can broadcast your webcam, microphone’s audio, games, desktop screen, etc. If you want to invite a guest during your live stream, Streamlabs provide a collab camera. Furthermore, this software provides distinctive and attractive overlays. You can easily choose from hundreds of overlays and apply them to your live stream.
You can also set important alerts on this tool, preferably. In order to begin your live stream on TikTok using Streamlabs, check the below steps:
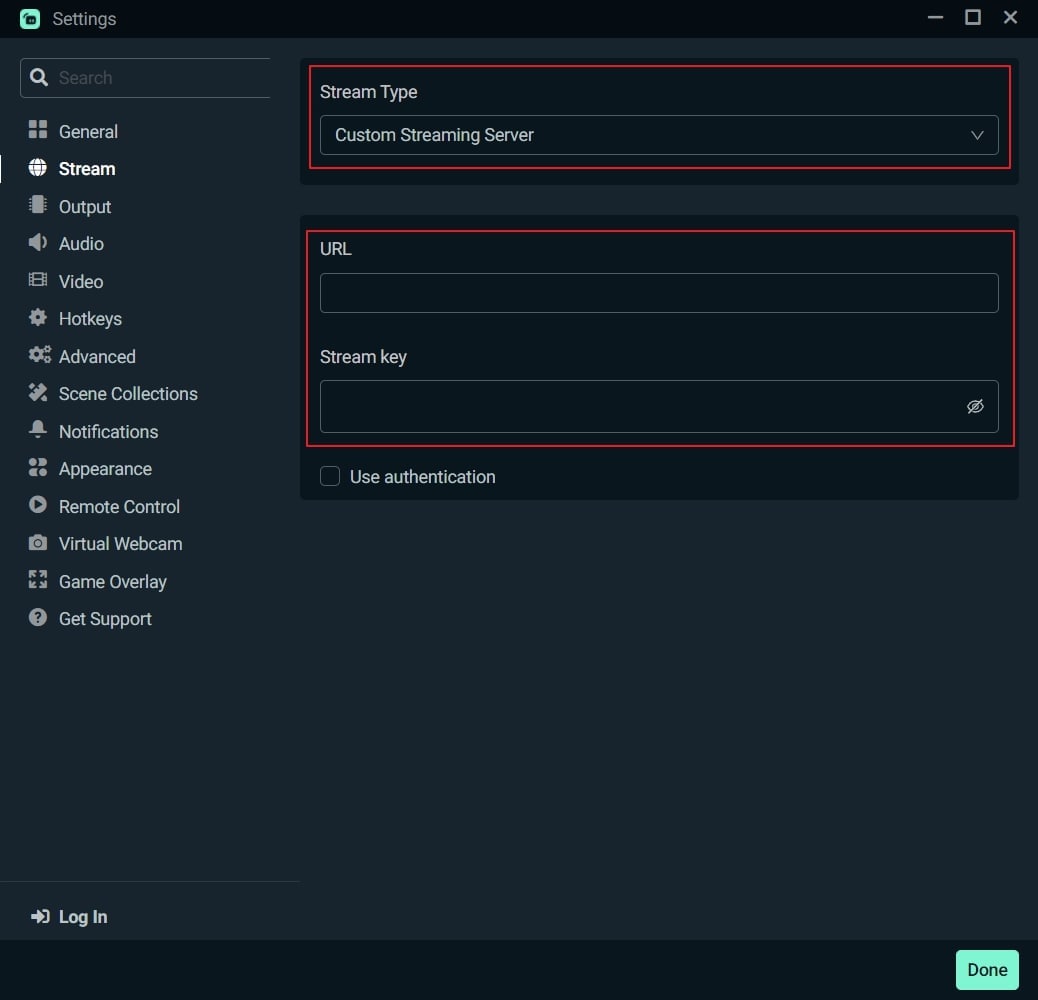
Step1 Once done with installing Streamlabs on your PC, open its main interface. Click on the “Gear” icon displayed in the left section. From the settings menu, click on the “Stream” option.
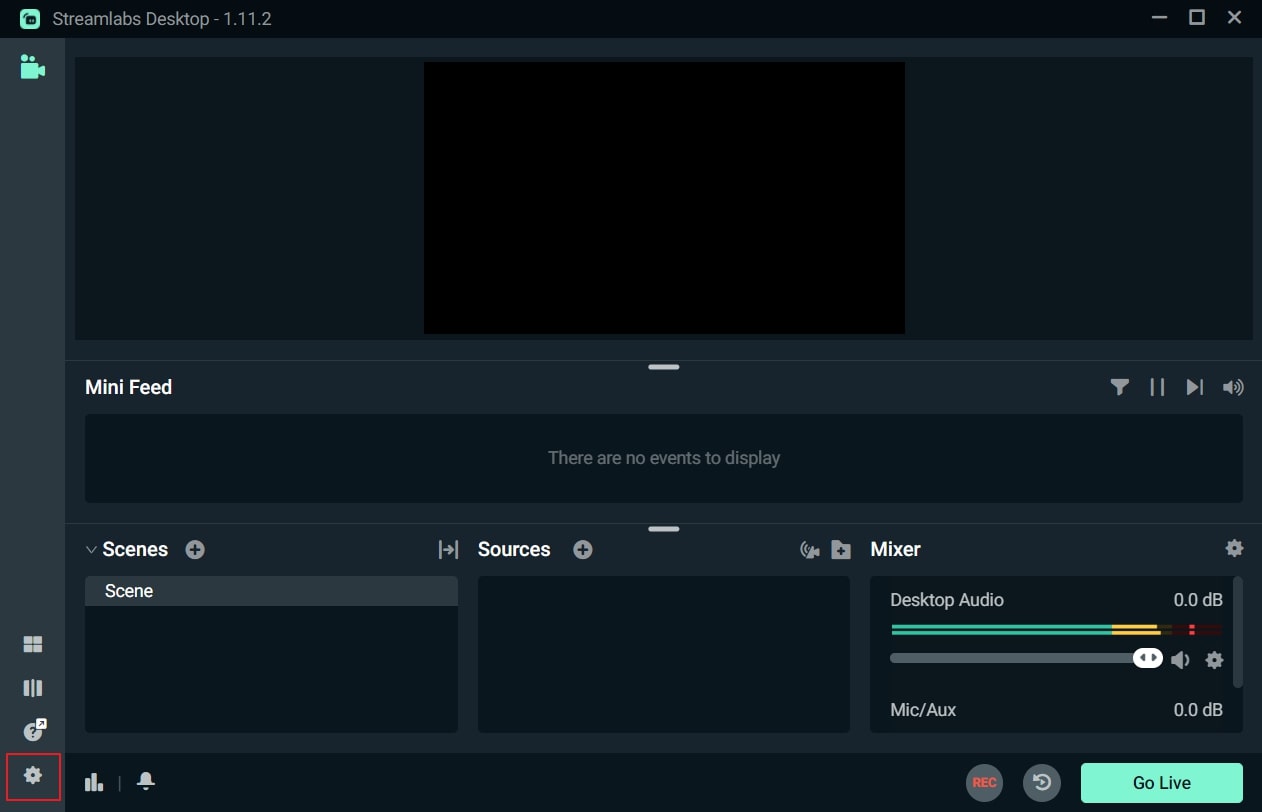
Step2 On the new menu, choose “Custom Streaming Service” as your Stream Type. Now add the required Stream Key and Server URL on the given boxes. Afterward, hit the “Done” button.
Way 3: With XSplit Broadcaster
Want to know how to stream on TikTok on PC efficiently? XSplit Broadcaster is a powerful streaming tool used by many professionals. It can be used to live stream gameplays, e-sports, and other videos in high resolution. This streaming software provides different layout wizards to display your live streaming screen efficiently.
Moreover, it also supports multi-streaming, through which you can go live on various platforms at the same time. To use XSplit Broadcaster to live stream on TikTok, here are the instructions:
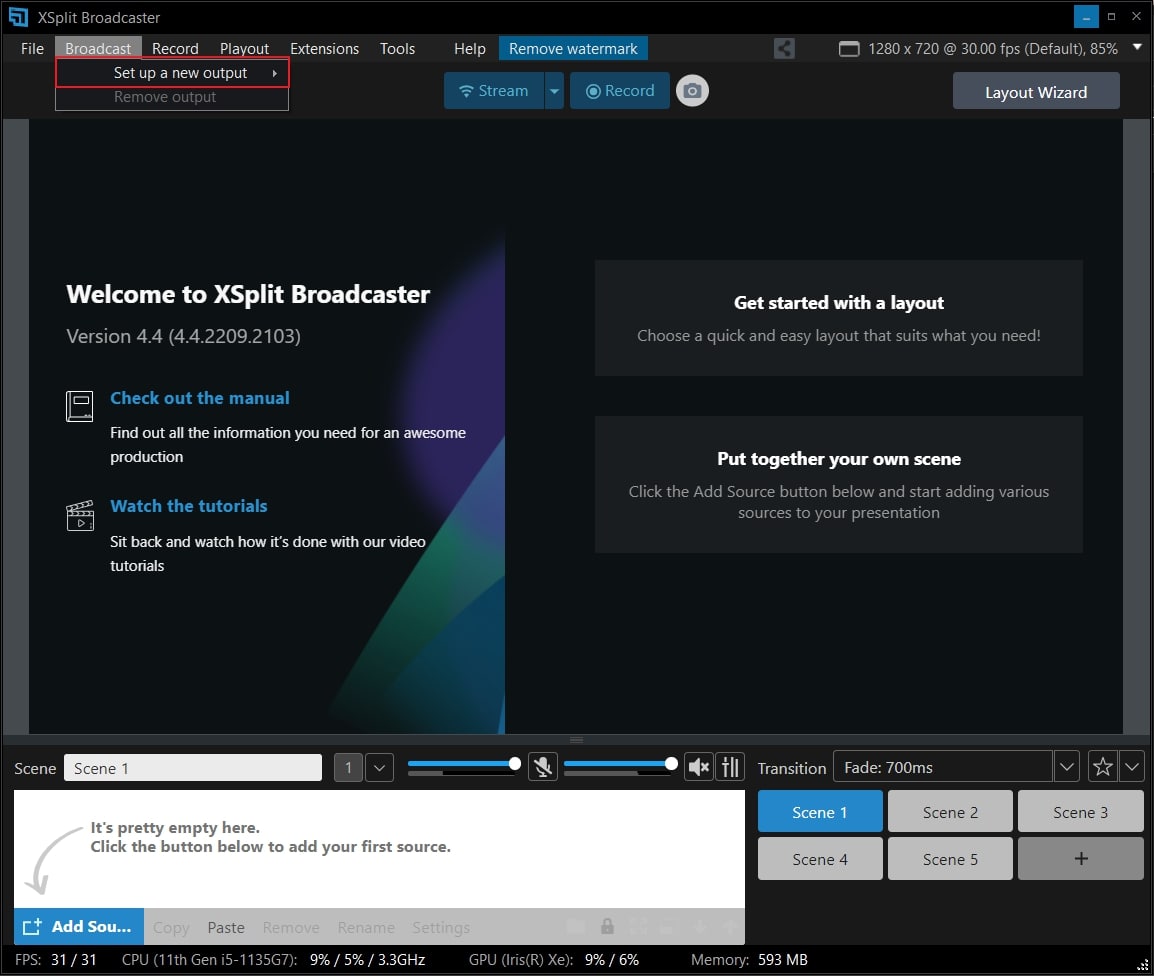
Step1 Launch XSplit Broadcaster on your PC and navigate to the “Broadcast” button displayed on top. Afterward, click on “Set up a new output” to proceed with the TikTok live stream process.
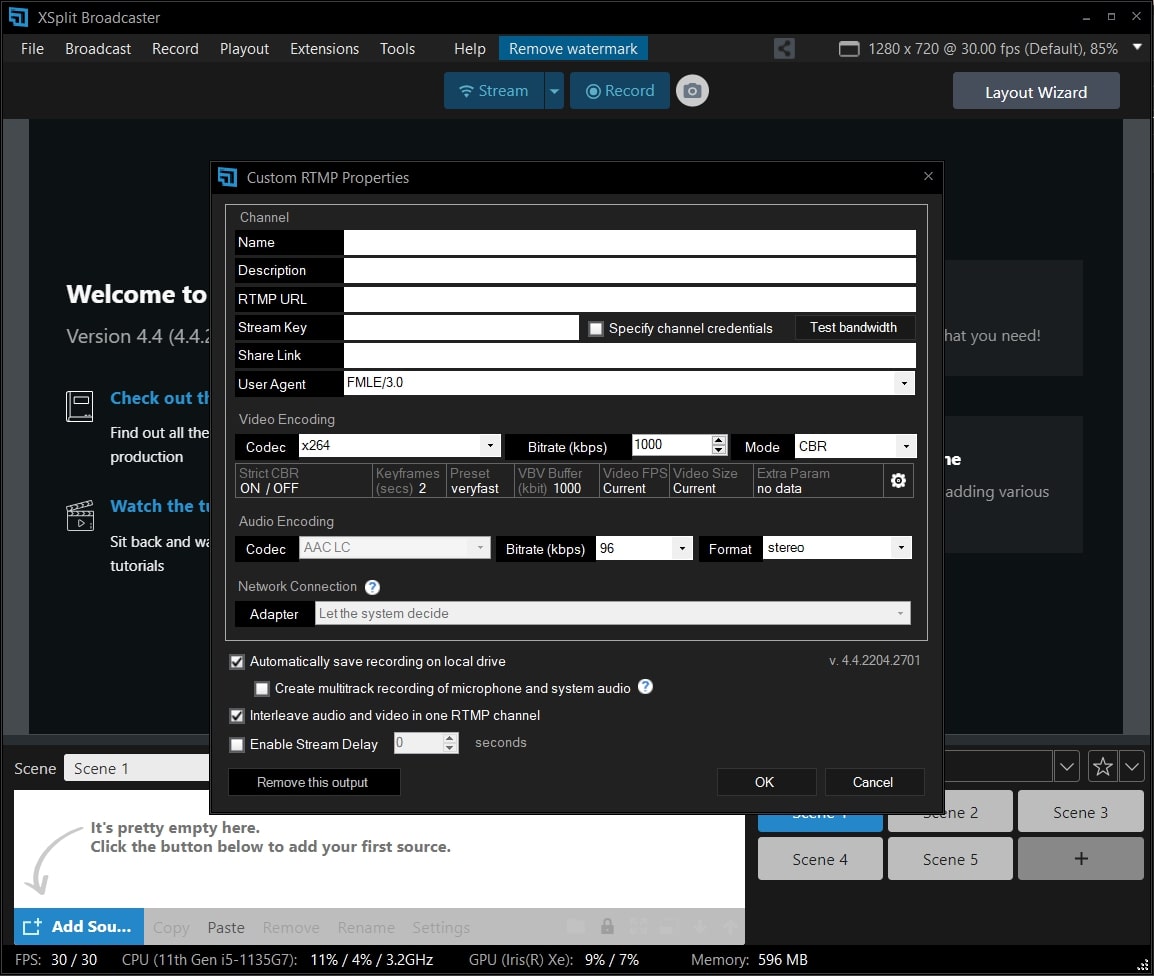
Step2 Now tap on “Custom RTMP,” which will redirect you to a new window. Here, you can add your streaming key and server URL to continue. You can also add information, such as name, channel, etc., to this window. Once done, press the “OK” button.
Way 4: With TikTok Live Studio Software
TikTok Live Studio software is the official software of TikTok for live streaming. This app is currently only available for Windows users. This software provides various customizable options that enable you to adjust your camera and microphone properties easily. It has an easy-to-use interface that allows beginners to conduct live streaming on TikTok in high quality.
As this software is directly linked to your TikTok account, you don’t have to add the stream key and server URL to initiate live streaming. Do you want to learn how to go live on TikTok on a PC using the TikTok software? You can check the following steps:
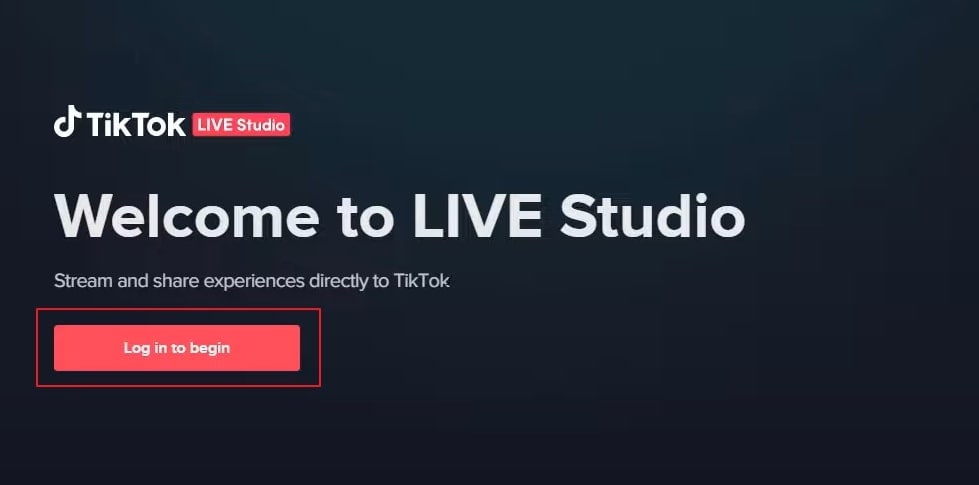
Step1 Launch TikTok Live Studio software on your PC and click on “Log in to begin.” Go to the login page and follow the on-screen instructions to set up this software successfully. On the Microphone window, choose your preferred microphone as your default device.
Step2 Afterward, adjust the camera settings and press the “Next” button. It will redirect you to streaming settings. You can choose the video and audio quality from this window. Click on the “Next” button to continue. Also, make sure to adjust the scene settings as well.
Step3 Now, you can see your PC screen along with your webcam. You can modify the screen size manually. You can also change the camera background and remove background noise from the settings. Once done with settings, press the “Start” button. Now give a title to your live streaming and choose your Live content. Next, click on the “Confirm” button and hit the “Go Live” button.
Bonus Tips: Easily Record and Edit Your Stream with Filmora
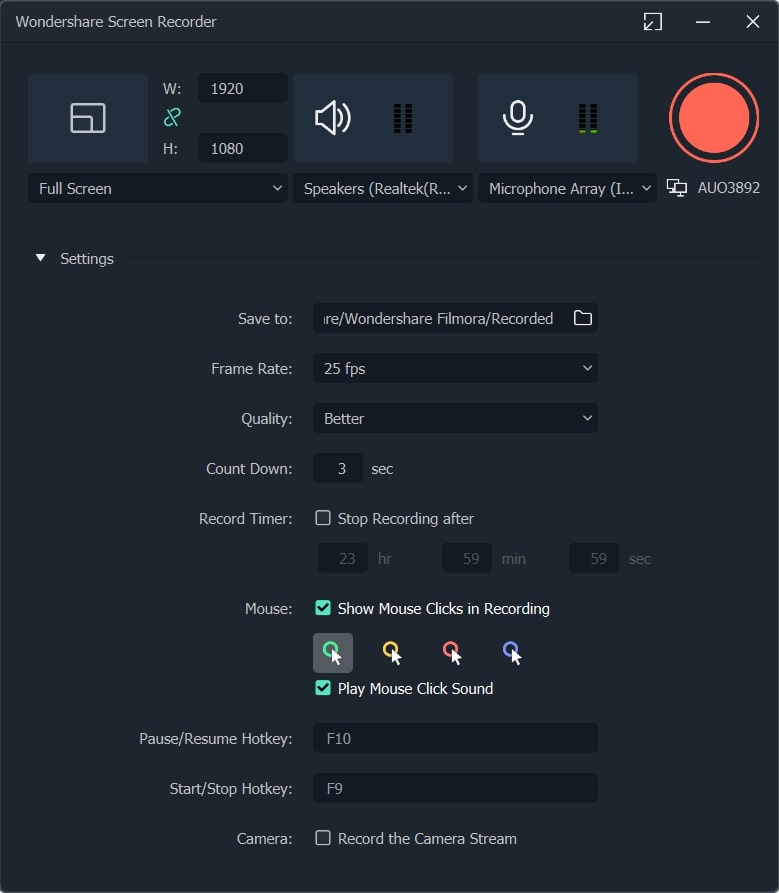
Have you ever used a screen recorder to capture your live streaming? Wondershare Filmora is the most compatible tool that offers a premium screen recorder and editor. The screen recorder in this platform can record a selected area with high audio and video quality. Along with capturing your live streaming session, you can use Pen to demonstrate in an enhanced way.
The video editor of Filmora offers professional visual effects and transitions. It supports high-quality video formats such as 4K and HD and enables intuitive editing. Moreover, you can also utilize its advanced features such as Auto Reframe, AI Portrait, Split Screen, Green Screen, etc. By availing of these features, you can execute professional editing on your recorded live streams. To understand more about Filmora’s new features, watch the video below.
Conclusion
Live streaming on TikTok is a new technique to target audiences effortlessly. There are various ways through which you can go for live streaming on TikTok. If you don’t know how to go live on TikTok PC properly, you can take help from this article. Also, to screen record and edit a live stream, you can use our recommended tool known as Wondershare Filmora.
Free Download For Win 7 or later(64-bit)
Free Download For macOS 10.14 or later
Part 1: Prerequisite for Live Stream on TikTok from PC
To start TikTok live streaming on your PC, there are some pre-requirements. These requirements are necessary to prevent the misuse of TikTok by any means. Once you have fulfilled these requirements, you can easily go for live streaming on TikTok without any restrictions.
- To enable the live stream feature on TikTok, you must have at least 1000 followers on your account.
- You should be above 16 years old to access this feature. Moreover, to increase your engagement during live streams by sending virtual gifts, you should be 18 years old or above.
- To begin live streaming on a PC using streaming software, you must have a streaming key and server URL.
How to Get your Streaming Key on TikTok?
A streaming key is a random combination of alphanumeric characters. It helps you to connect your TikTok account with a streaming platform to enable high-quality results. To get your streaming key in the easiest way, check the following steps:
Step1 Open your TikTok app to begin the process. Select the “Plus” icon and choose the “Live” button from the right side. Afterward, choose the “Cast/Connect to PC/Mac” option to proceed.
Step2 Now tap on the “Go Live” option that will open a new window. Now you can see your Stream Key and Server URL. Press the “Copy” option given next to these two options. Afterward, you can share your stream key and server URL with your PC, which will be used later.
Part 2: Benefits of Going Live on TikTok with Computer
There are various advantages of going live on TikTok with a PC. By doing so, you can ensure a better quality of your live streaming session. To learn more, let’s discuss the details.
1. Great Stability
Holding a mobile phone for live streams can be hectic and tiring. Moreover, it won’t offer camera stability, and the end result can be shaky. By using a computer, you don’t have to hold anything. With great stability and ease, you can conduct live streams for a longer run.
2. High Video/Audio Quality
iOS and Samsung devices provide high video quality. However, if you are using low-end smartphones, you won’t get high video and audio quality. In such a circumstance, you should use your computer to maintain better quality. By doing so, your audience can listen and view your live streams flawlessly.
3. Picture-in-Picture Display
Live streams on mobile phones restrict you from displaying a variety of content simultaneously. Through your PC, you can do live streaming on TikTok while playing your favorite games. You can easily open multiple windows on your PC during live streams. Moreover, you can have a picture-in-picture display to use a webcam while going for a live stream.
Part 3: 4 Ways to Go Live on TikTok On PC
Are you eager to know how to stream on TikTok on PC using different ways? Let’s shed light on some simple yet effective ways to go for live streaming on TikTok with a PC.
Way 1: With OBS
OBS is a highly compatible and free broadcasting software. It is available for mainstream platforms such as Windows, Mac, and Linux. It offers high-end results during streaming with an audio mixer. It also provides customized options to set hotkeys, choose sources, and adjust the properties. Besides being a great streaming software, OBS also functions as a screen recorder.
Therefore, OBS is a famous streaming tool that ensures great quality in live streaming on TikTok. To learn how to go live on TikTok on a computer using OBS, here are the easy steps:
Step1 Download and install OBS on your PC successfully. Once done, go to the “Controls” section and click on “Settings.” A new window will pop up from which click on the “Stream” option given on the left panel.
Step2 On the “Service” box, choose “Custom” to proceed. Now enter the stream key and server URL you have gotten before. Once done with all requirements, click on the “Apply” option.
Way 2: With Streamlabs
Streamlabs is a popular streaming tool comprising great capabilities for live streaming. Using this platform, you can broadcast your webcam, microphone’s audio, games, desktop screen, etc. If you want to invite a guest during your live stream, Streamlabs provide a collab camera. Furthermore, this software provides distinctive and attractive overlays. You can easily choose from hundreds of overlays and apply them to your live stream.
You can also set important alerts on this tool, preferably. In order to begin your live stream on TikTok using Streamlabs, check the below steps:
Step1 Once done with installing Streamlabs on your PC, open its main interface. Click on the “Gear” icon displayed in the left section. From the settings menu, click on the “Stream” option.
Step2 On the new menu, choose “Custom Streaming Service” as your Stream Type. Now add the required Stream Key and Server URL on the given boxes. Afterward, hit the “Done” button.
Way 3: With XSplit Broadcaster
Want to know how to stream on TikTok on PC efficiently? XSplit Broadcaster is a powerful streaming tool used by many professionals. It can be used to live stream gameplays, e-sports, and other videos in high resolution. This streaming software provides different layout wizards to display your live streaming screen efficiently.
Moreover, it also supports multi-streaming, through which you can go live on various platforms at the same time. To use XSplit Broadcaster to live stream on TikTok, here are the instructions:
Step1 Launch XSplit Broadcaster on your PC and navigate to the “Broadcast” button displayed on top. Afterward, click on “Set up a new output” to proceed with the TikTok live stream process.
Step2 Now tap on “Custom RTMP,” which will redirect you to a new window. Here, you can add your streaming key and server URL to continue. You can also add information, such as name, channel, etc., to this window. Once done, press the “OK” button.
Way 4: With TikTok Live Studio Software
TikTok Live Studio software is the official software of TikTok for live streaming. This app is currently only available for Windows users. This software provides various customizable options that enable you to adjust your camera and microphone properties easily. It has an easy-to-use interface that allows beginners to conduct live streaming on TikTok in high quality.
As this software is directly linked to your TikTok account, you don’t have to add the stream key and server URL to initiate live streaming. Do you want to learn how to go live on TikTok on a PC using the TikTok software? You can check the following steps:
Step1 Launch TikTok Live Studio software on your PC and click on “Log in to begin.” Go to the login page and follow the on-screen instructions to set up this software successfully. On the Microphone window, choose your preferred microphone as your default device.
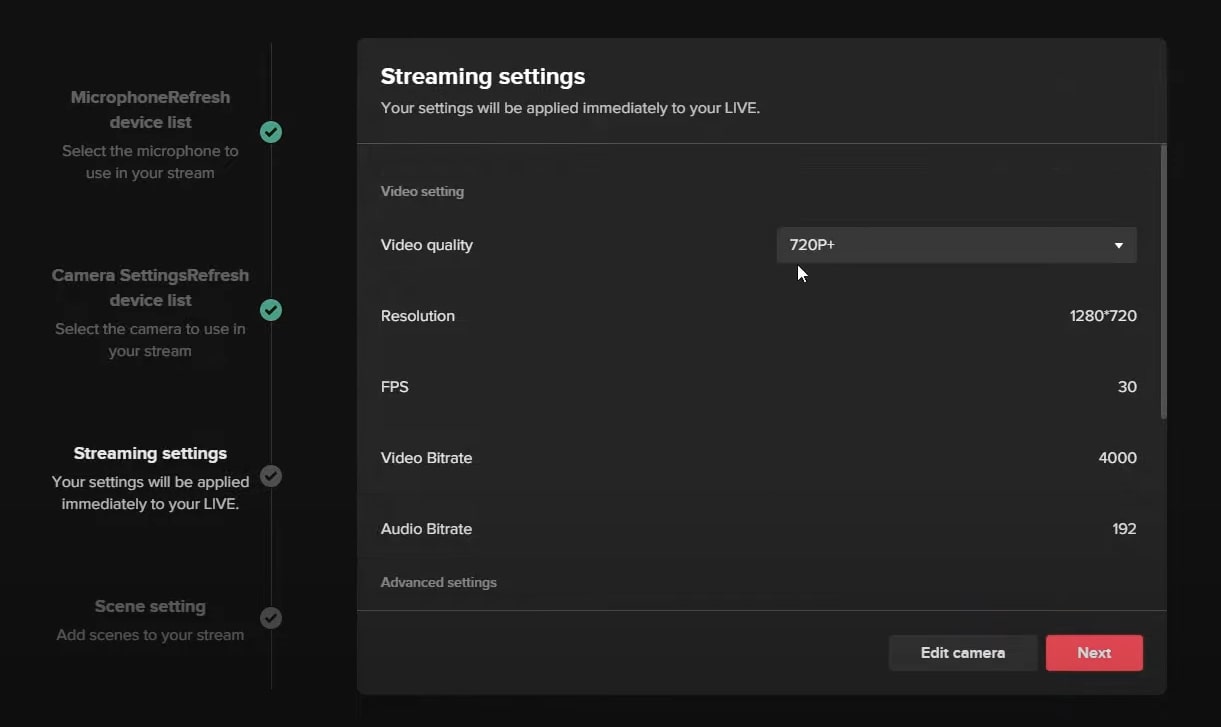
Step2 Afterward, adjust the camera settings and press the “Next” button. It will redirect you to streaming settings. You can choose the video and audio quality from this window. Click on the “Next” button to continue. Also, make sure to adjust the scene settings as well.
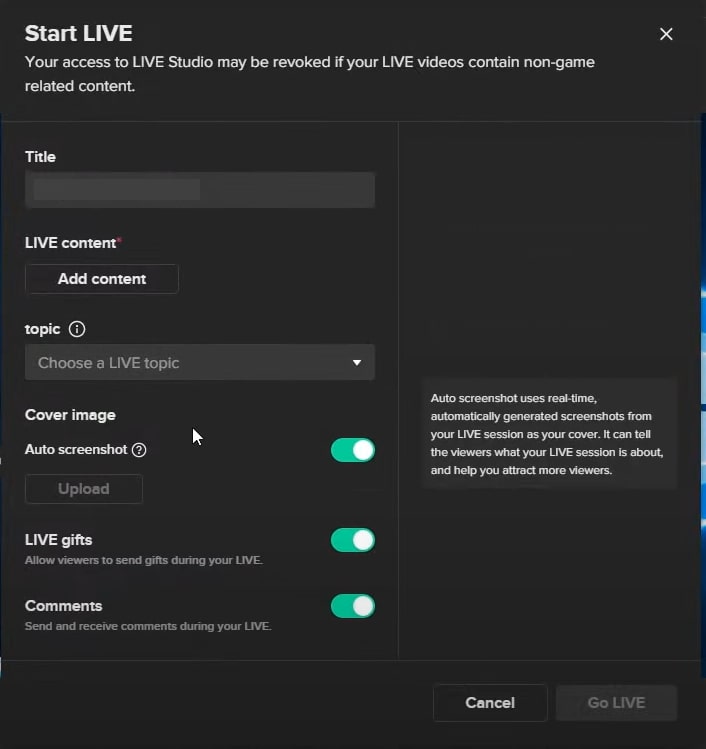
Step3 Now, you can see your PC screen along with your webcam. You can modify the screen size manually. You can also change the camera background and remove background noise from the settings. Once done with settings, press the “Start” button. Now give a title to your live streaming and choose your Live content. Next, click on the “Confirm” button and hit the “Go Live” button.
Bonus Tips: Easily Record and Edit Your Stream with Filmora
Have you ever used a screen recorder to capture your live streaming? Wondershare Filmora is the most compatible tool that offers a premium screen recorder and editor. The screen recorder in this platform can record a selected area with high audio and video quality. Along with capturing your live streaming session, you can use Pen to demonstrate in an enhanced way.
The video editor of Filmora offers professional visual effects and transitions. It supports high-quality video formats such as 4K and HD and enables intuitive editing. Moreover, you can also utilize its advanced features such as Auto Reframe, AI Portrait, Split Screen, Green Screen, etc. By availing of these features, you can execute professional editing on your recorded live streams. To understand more about Filmora’s new features, watch the video below.
Conclusion
Live streaming on TikTok is a new technique to target audiences effortlessly. There are various ways through which you can go for live streaming on TikTok. If you don’t know how to go live on TikTok PC properly, you can take help from this article. Also, to screen record and edit a live stream, you can use our recommended tool known as Wondershare Filmora.
Free Download For Win 7 or later(64-bit)
Free Download For macOS 10.14 or later
The Filmmaker’s Formula for Unbeatable TikTok Reaction Content Using Filmora
How to Make TikTok Reaction Videos Easily in 2 Ways

Shanoon Cox
Mar 27, 2024• Proven solutions
With all the videos of different moods and categories available on the platform, TikTok’s reaction is something that makes the footage more engaging. Available for both iOS and Android platforms, TikTok allows you to record, edit , and compile a video of up to 60 seconds, and apply a plethora of filters and animation effects to them along with adding relevant music to awe your audience.
Considering this, here you will learn how to make TikTok reaction videos with ease from within the app itself, and if that’s not enough, using one of the best and most efficient programs available in the market that can even allow you to add unique effects to the reactions you create.
- Part 1: How to Make React Videos on TikTok
- Part 2: How to Use Snap Filmora to Make TikTok Reaction Videos
Bonus: Create A More Attractive Video with Human Segmentation Effect
The human segmentation effect under AI Portrait allows you to isolate people from video background even without a green screen, and then you can composite it to make a reaction video easily. Watch the video tutorial below to find out more details.


Want to read the texts instead of watching videos? Check the complete guide to making a reaction video in 3 ways .
Part 1: How to React to a TikTok Video
After being equipped with all the worldly knowledge about TikTok reaction videos, you can follow the steps given below to learn how to react to the footage created by other people:
1. Tap Share and Record Your Reaction
Start TikTok, play the video you want to react on, tap the Share icon from the lower-right area, and tap the React option from the Share to menu. Tap Flip from the top-right corner of the Camera screen to switch between the front and rear camera as needed, optionally tap the Mic icon to disable or enable voice and system audio capture, drag and reposition React window according to the source footage, and tap the Record button from the bottom to start shooting your TikTok reaction. Wait while the source clip and your recording process are complete successfully before moving forward to the next step.

2. Apply Filters
Tap the Filters icon from the top-right corner, tap to pick a filter from those available at the bottom, and tap anywhere on the screen to accept the one you selected and to get back to the previous window.

3. Manage Audio
Tap the Mixer icon from the upper-right corner of the screen, drag the My Voice and Soundtrack Volume sliders to manage your voice recording and the internal audio respectively, and tap Done to save the changes once you’re through with the modifications. Back on the previous window, tap Next from the bottom-right corner.

4. Publish the Video
Tap the Who can view this video option to manage your reaction’s visibility settings (optional). Tap the Save to device toggle switch to prevent TikTok reaction from being stored on your mobile’s storage (optional). Next, tap the Post button from the bottom-right corner to publish the video to TikTok.

More creative tricks about TikTok video: Clone Yourself in TikTok
Part 2: How to Make Reaction Videos with Filmora
Even though you can make TikTok reaction videos using its own filters and audio mixing tools that work pretty well under ideal conditions, if you are a perfectionist and like precision in anything you do or create, you need a dedicated program that has been designed specifically for the purpose.
Although several such tools are available in the market and can be easily downloaded and used, the best among them is Filmora by Wondershare. Wondershare Filmora is an industry-standard production and post-production tool for both Mac and Windows PCs that the majority of users prefer over its competitors such as Adobe Premiere Pro, Final Cut Pro X, etc. This is because Filmora offers simple UI, is less resource-intensive, and is able to render the outputs significantly faster.
You can learn how to make TikTok reaction videos using Wondershare Filmora by following the steps given below:
Note: Before proceeding, make sure that you have already copied the source (and the reaction) video(s) from your smartphone to your computer.
1. Create New Project and Set Preferences
Start Wondershare Filmora on your Windows or Mac PC, go to File > New Project and click 9:16 (Portrait) from the submenu that appears.
Click Split Screen from the standard toolbar at the top, hover mouse to the screen type preset you want to use, click the + ( Add to Project ) icon that appears at the bottom-right corner of the thumbnail, and click OK from the bottom-right corner once the preset is added to the Timeline.

2. Import and Add Video(s) Preview/Timeline
Click the Media button from the standard toolbar, click anywhere inside the Media window at the upper-left corner, and when the Open box comes up, select and import the video file(s) you want to participate in the TikTok reaction. Alternatively, you can also click Record from below the standard toolbar, and choose any of the options to record your own video or voice right from within Wondershare Filmora itself.
Next, click and drag each of the imported videos to their corresponding screen sections in the Preview window in the upper-right area. Notice how the files are automatically added to the Timeline at the bottom.
3. Add Elements and Titles
Click Elements from the standard toolbar, hover mouse to the element you want to add to the reaction, click the + icon that appears at the center of the thumbnail, and reposition the element in the Timeline to match the duration with that of the reaction you are creating.

4. Export the Reaction

Click EXPORT from the top-middle section of the interface, go to the Local tab from the top of the Export box that appears next, select your preferred format from the left bar, optionally choose a destination folder from the right window, optionally click SETTINGS to fine-tune the output preferences as needed, and click EXPORT from the bottom-right corner to export the TikTok reaction. Or, you can save it in the settings perfect for iPhone or another device.
Below is a sample reaction video made with Filmora, you can do much better than that for your TikTok account:
Besides using Filmora to edit reaction videos with the split-screen presets, you can also use some other video editing software to create a reaction video . Filmora can empower your video creation with more creativity, watch the video below and download Filmora to try.
Conclusion
A TikTok reaction enables you to make the source videos more fun and entertaining. Luckily the app itself has a “React” button that helps you create TikTok reaction videos with merely a few simple taps. However, if you feel that the built-in options are not as robust as they should be, a third-party program like Wondershare Filmora is something you would definitely love to try your hands on as the software is not only easy to use, it is also lightweight, and doesn’t put any overhead on your computer hardware.
Shanoon Cox
Shanoon Cox is a writer and a lover of all things video.
Follow @Shanoon Cox
Shanoon Cox
Mar 27, 2024• Proven solutions
With all the videos of different moods and categories available on the platform, TikTok’s reaction is something that makes the footage more engaging. Available for both iOS and Android platforms, TikTok allows you to record, edit , and compile a video of up to 60 seconds, and apply a plethora of filters and animation effects to them along with adding relevant music to awe your audience.
Considering this, here you will learn how to make TikTok reaction videos with ease from within the app itself, and if that’s not enough, using one of the best and most efficient programs available in the market that can even allow you to add unique effects to the reactions you create.
- Part 1: How to Make React Videos on TikTok
- Part 2: How to Use Snap Filmora to Make TikTok Reaction Videos
Bonus: Create A More Attractive Video with Human Segmentation Effect
The human segmentation effect under AI Portrait allows you to isolate people from video background even without a green screen, and then you can composite it to make a reaction video easily. Watch the video tutorial below to find out more details.
Want to read the texts instead of watching videos? Check the complete guide to making a reaction video in 3 ways .
Part 1: How to React to a TikTok Video
After being equipped with all the worldly knowledge about TikTok reaction videos, you can follow the steps given below to learn how to react to the footage created by other people:
1. Tap Share and Record Your Reaction
Start TikTok, play the video you want to react on, tap the Share icon from the lower-right area, and tap the React option from the Share to menu. Tap Flip from the top-right corner of the Camera screen to switch between the front and rear camera as needed, optionally tap the Mic icon to disable or enable voice and system audio capture, drag and reposition React window according to the source footage, and tap the Record button from the bottom to start shooting your TikTok reaction. Wait while the source clip and your recording process are complete successfully before moving forward to the next step.
2. Apply Filters
Tap the Filters icon from the top-right corner, tap to pick a filter from those available at the bottom, and tap anywhere on the screen to accept the one you selected and to get back to the previous window.
3. Manage Audio
Tap the Mixer icon from the upper-right corner of the screen, drag the My Voice and Soundtrack Volume sliders to manage your voice recording and the internal audio respectively, and tap Done to save the changes once you’re through with the modifications. Back on the previous window, tap Next from the bottom-right corner.
4. Publish the Video
Tap the Who can view this video option to manage your reaction’s visibility settings (optional). Tap the Save to device toggle switch to prevent TikTok reaction from being stored on your mobile’s storage (optional). Next, tap the Post button from the bottom-right corner to publish the video to TikTok.
More creative tricks about TikTok video: Clone Yourself in TikTok
Part 2: How to Make Reaction Videos with Filmora
Even though you can make TikTok reaction videos using its own filters and audio mixing tools that work pretty well under ideal conditions, if you are a perfectionist and like precision in anything you do or create, you need a dedicated program that has been designed specifically for the purpose.
Although several such tools are available in the market and can be easily downloaded and used, the best among them is Filmora by Wondershare. Wondershare Filmora is an industry-standard production and post-production tool for both Mac and Windows PCs that the majority of users prefer over its competitors such as Adobe Premiere Pro, Final Cut Pro X, etc. This is because Filmora offers simple UI, is less resource-intensive, and is able to render the outputs significantly faster.
You can learn how to make TikTok reaction videos using Wondershare Filmora by following the steps given below:
Note: Before proceeding, make sure that you have already copied the source (and the reaction) video(s) from your smartphone to your computer.
1. Create New Project and Set Preferences
Start Wondershare Filmora on your Windows or Mac PC, go to File > New Project and click 9:16 (Portrait) from the submenu that appears.
Click Split Screen from the standard toolbar at the top, hover mouse to the screen type preset you want to use, click the + ( Add to Project ) icon that appears at the bottom-right corner of the thumbnail, and click OK from the bottom-right corner once the preset is added to the Timeline.
2. Import and Add Video(s) Preview/Timeline
Click the Media button from the standard toolbar, click anywhere inside the Media window at the upper-left corner, and when the Open box comes up, select and import the video file(s) you want to participate in the TikTok reaction. Alternatively, you can also click Record from below the standard toolbar, and choose any of the options to record your own video or voice right from within Wondershare Filmora itself.
Next, click and drag each of the imported videos to their corresponding screen sections in the Preview window in the upper-right area. Notice how the files are automatically added to the Timeline at the bottom.
3. Add Elements and Titles
Click Elements from the standard toolbar, hover mouse to the element you want to add to the reaction, click the + icon that appears at the center of the thumbnail, and reposition the element in the Timeline to match the duration with that of the reaction you are creating.
4. Export the Reaction
Click EXPORT from the top-middle section of the interface, go to the Local tab from the top of the Export box that appears next, select your preferred format from the left bar, optionally choose a destination folder from the right window, optionally click SETTINGS to fine-tune the output preferences as needed, and click EXPORT from the bottom-right corner to export the TikTok reaction. Or, you can save it in the settings perfect for iPhone or another device.
Below is a sample reaction video made with Filmora, you can do much better than that for your TikTok account:
Besides using Filmora to edit reaction videos with the split-screen presets, you can also use some other video editing software to create a reaction video . Filmora can empower your video creation with more creativity, watch the video below and download Filmora to try.
Conclusion
A TikTok reaction enables you to make the source videos more fun and entertaining. Luckily the app itself has a “React” button that helps you create TikTok reaction videos with merely a few simple taps. However, if you feel that the built-in options are not as robust as they should be, a third-party program like Wondershare Filmora is something you would definitely love to try your hands on as the software is not only easy to use, it is also lightweight, and doesn’t put any overhead on your computer hardware.
Shanoon Cox
Shanoon Cox is a writer and a lover of all things video.
Follow @Shanoon Cox
Also read:
- From Novice to Pro Using Templates for Stellar TikTok Videos for 2024
- [New] 2024 Approved Premium Assortment Unmarked, Superior TikTok Extractors
- 2024 Approved Making the Most of Siri Voice Interactions for TikTok Content
- [Updated] A Complete Breakdown of What PFP Means on TikTok
- [Updated] 2024 Approved Essential Tips to Download and Enjoy TikTok on MacBook
- [Updated] 2024 Approved Behind the Scenes of BookTok's Best Picks
- 2024 Approved Unveiling the Path to TikTok on Your MacBook
- [Updated] 2024 Approved Expert Tips for Broadcasting on TikTok Via Computer
- [New] TikTok Visuals 101 Mastering Camera Techniques & Filmora Styles for 2024
- [New] 2024 Approved Best of the Best Ultimate TikTok Video Savers
- [New] The TikTok Text-to-Speech Expert Guide for 2024
- In 2024, Revolutionary TikTok PFP Concepts for Popularity Boost
- Social Media Supremacy Amplifying Sales via TikTok Campaigns for 2024
- [New] 2024 Approved Increase Your TikTok Reach with These Trending Tags
- [New] In 2024, Zipping Up an Enthralling TikTok Credit Sequence
- Fresh Ideas for Every Feed Top 20 Original and Viral TikTok Caption Strategies
- [Updated] 2024 Approved 7 Leading Free TikTok Audio Tools for Seamless MP3 Conversion
- [New] Epic Battles & Dynamic Choreography for TikToks for 2024
- [Updated] Swipe Right for Speed - Quick TikTok Video Acquisition for 2024
- [Updated] Mastering TikTok Videos Mac Editing Techniques for 2024
- 2024 Approved Top Anime Elements That Make For TikTok Success
- [New] In 2024, Creating Enormous Appearance Effects for TikTok
- In 2024, Mastering Your Mac Creating Captivating Style Videography
- [New] Step-By-Step Techniques for Adding Text on TikTok for 2024
- [New] The Desktop TikTok Creator's Handbook 2023 Edition
- [New] In 2024, Track It Like That Essential TikTok Raps You Can't Ignore
- How to Unlock the Lock Screen on my 12
- [Updated] 2024 Approved Learn the Easy Way Unlocking Iphone Screen Recording
- [New] Engagement Mastery How to Craft Instagram's Best Puzzles
- Spoofing Life360 How to Do it on Xiaomi Redmi 12? | Dr.fone
- [New] The Complete Guide to Video Content Creation for Modern Marketers
- 2024 Approved Why Your Transparent GIF Is Hard to Remove and How to Do With It
- New Splice Video Editing App A Comprehensive Evaluation
- New 2024 Approved The Ultimate List of Free AVI Video Rotators for All Devices
- Updated 2024 Approved Best Free Video Cutter Tools Our Expert Recommendations
- In 2024, How to Fake Snapchat Location without Jailbreak On Apple iPhone 11 | Dr.fone
- 2024 Approved Exploring Free Screencast Software Options on Mac
- Ultimate guide to get the meltan box pokemon go For Samsung Galaxy A15 5G | Dr.fone
- Make Your Presentation More Attractive with Best Google Slideshows Templates. How to Make a Google Slideshow in Simple Step, In 2024 Do You Know How to Create Google Images Slideshow?
- In 2024, Unlock Your Apple iPhone 6s Plus in Minutes with ICCID Code Everything You Need to Know
- In 2024, Mastering LinkedIn Video Thumbnails Tips and Tricks for Success
- Updated Shielding the Sound Comprehensive Guide to Dismissing Wind Turbulence in Recordings for 2024
- Authentication Error Occurred on OnePlus 11R? Here Are 10 Proven Fixes | Dr.fone
- Easy Steps to Make Excel 2013 Hyperlinks Working | Stellar
- In 2024, Top IMEI Unlokers for Your Oppo A18 Phone
- Title: In 2024, Navigating Live TikTok Broadcasting on Your Computer
- Author: Kenneth
- Created at : 2024-05-23 01:26:23
- Updated at : 2024-05-24 01:26:23
- Link: https://tiktok-video-files.techidaily.com/in-2024-navigating-live-tiktok-broadcasting-on-your-computer/
- License: This work is licensed under CC BY-NC-SA 4.0.
