
In 2024, From Disjointed Elements to a Cohesive TikTok Narrative
From Disjointed Elements to a Cohesive TikTok Narrative
Best Video Editor for Beginners on Windows and Mac
Wondershare Filmora is one of the most popular video editing software among TikTokers , download and have a try.
TikTok’s collaborative nature is one of its most appealing features. Your video is not finished the moment you publish it. They can be responded to, remixed, and re-shared by anybody. TikTok is meant to allow users to construct on other’s films shared on the network, whether you’re utilizing audio from some other video or making a duet.
Thanks to the stitch tool, creators may remix, remake, and reply to videos with a couple of taps. This article will tell you what you need to know about stitching videos on TikTok. Continue reading to learn more about Stitching and how to stitch on TikTok. Let’s get started!
In this article
02 How to Turn Stitch On or Off?
04 How to Stitch Any TikTok Video withFilmora Video Editor ?
05 FAQs About TikTok Video Stitch
Part 1: What is Stitch on TikTok?
TikTok’s latest video editing tool ‘Stitch,’ lets people incorporate video snippets from other people into their own. Creators may use Stitch to provide a five-second snippet from a TikTok video out of their own. Unlike duets that play videos together, stitched videos play in the sequence they were stitched. Videos containing open-ended questions have gained in popularity with the advent of the stitch.
Whenever you Stitch a clip-on TikTok, you are essentially inserting your video after yet another video that has already been submitted. People frequently utilize this to remark on or reply to other videos. And, when done well, it can add a lot more context to your movies.
The one limitation of the Stitch tool is that you may only publish up to five seconds from some other video. So, if you’re focusing on a Stitch, you must select the five seconds which are most critical to highlight your message.
Part 2: How to Turn Stitch On or Off?
By enabling the Stitch feature, you make your material available to millions of prospective collaborators. Consider the possibilities – it might be a fantastic approach to enhance reach and virility.
If you aren’t comfortable exposing your films to the whole TikTok community, users can opt out of allowing others to Stitch their work. You may modify them under the Privacy Controls. Here’s how to do a Stitch on TikTok:
Step 1: Launch the TikTok app and then head to your profile by clicking on the Profile option at the bottom right. After that, select the three dots to open the settings.
Step 2: After entering the settings, select Privacy to proceed, and then tap on the Stitch option to open the Stitch settings.
Step 3: Now, you will see three options that are No-one, Everyone, and Friends. If you want to allow the Stitching, select either Everyone or Friends. However, to restrict the people from stitching your videos, choose No-one. After you are done selecting, click on the back arrow to save the applied changes.
Part 3: How to Stitch on TikTok?
TikTok keeps giving creators more reasons to continue producing, and fans like us are more committed to continuing to open it. Stitch, a new app functionality from the famous social networking platform, makes things more straightforward than ever for artists to interact with each other.
But, you might be wondering, how to do a stitch on TikTok? Don’t worry; you’ve come to the right place. Here’s how:
Step 1: Launch TikTok and then go to the video that you want to stitch. Select the Share icon, which resembles an arrow. Select the Stitch symbol from the menu that displays, and then wait a few seconds for the video to complete. The lengthier the video is, the more the loading time.

Step 2: When it’s finished, you’ll be sent to a screen where you may take five seconds of the film and use it on your own. To navigate through the movie, use the sliders and the red bars to choose the portion you want. When you’re finished, tap Next.

Step 3: You’ll be sent to TikTok’s normal recording screen. Record the remainder of your TikTok video with all of the features you’re accustomed to utilizing. You may use whatever effects, stickers, texts, voiceovers, or captions you desire. After that, press the Next button.

Step 4: Make a title and hashtags for your TikTok video. You could also choose whether or not these users may Stitch your movie here – hit the toggle switch beside Allow Stitch to turn it off. Following that, hit the Post option, and your stitched video will be uploaded.

Part 4: How to Stitch Any TikTok Video with Filmora Video Editor
Before getting started, understand why people opt for Filmora video editor for stitching videos on TikTok when this can be done through the official TikTok application. TikTok app only allows you to stitch a video for up to five seconds which is quite frustrating if you wish to stitch an entire video.
One more reason is that, with TikTok, you cannot stitch the already existing video from the camera roll, which restricts creators from adding the already edited content to the existing video. So, to avoid the above problems, Filmora is used for stitching TikTok videos.
For Win 7 or later (64-bit)
For macOS 10.12 or later
To begin, download the video that you wish to stitch with from TikTok. After, follow the below stepwise guide:
Step 1: Launch the Filmora software on your PC and import the video files by clicking on the File and then Import/Export Media. You can simply drag and drop the videos as well.
Step 2: Drag the clips from the media library to the Timeline’s video track. All video files will be stitched into a single video with no transitions.

Note: To add a transition to the video , go to the Transition tab and drop the desired transition to the junction of two clips.

Step 3: Now, preview the stitched video and, when finished, click the Export option to save numerous video segments to a single file. Choose any format from the Format tab’s list.
Part 5: FAQs About TikTok Video Stitch
1. Can you do a Stitch on TikTok with a video from your Camera Roll?
Unfortunately, you cannot utilize a video from your Camera Roll in a Stitch at the time of this writing. So, whatever your reaction to a Stitch is, you must record 100% unique footage shot with the TikTok camera. However, you may download the video first and then stitch it with some third-party software such as Filmora.
2. Can you stitch longer than 5 seconds?
No, it is not possible to stitch a video for longer than five seconds using the built-in Stitching feature of the TikTok app. But this can be done by stitching the videos using third-party applications and software.
3. How do I see TikTok stitches?
Users who want to view as many stitches as possible can do it by browsing for them on the app. You must first browse to Discover, and from there to the search box. Then type #Stitch @username, where the username is the name of the account from which you wish to view stitches.
4. TikTok Stitch option not showing. How to fix it?
Users may choose whether or not someone else can Stitch their work in their settings. The option may be found under the Settings and Privacy tab, where users can activate or uncheck Stitch for all videos. So, if the Stitch option is not showing, the user may have disabled the Stitch option.
Conclusion
The Stitch feature is an excellent way to continue the discussion with your videos. You may leave comments on popular content on the site. Most importantly, it may be a fun method to generate material different from what you usually publish. And since you know How to Stitch on TikTok after reading this article, stitch the videos today and create unique content!
TikTok’s collaborative nature is one of its most appealing features. Your video is not finished the moment you publish it. They can be responded to, remixed, and re-shared by anybody. TikTok is meant to allow users to construct on other’s films shared on the network, whether you’re utilizing audio from some other video or making a duet.
Thanks to the stitch tool, creators may remix, remake, and reply to videos with a couple of taps. This article will tell you what you need to know about stitching videos on TikTok. Continue reading to learn more about Stitching and how to stitch on TikTok. Let’s get started!
In this article
02 How to Turn Stitch On or Off?
04 How to Stitch Any TikTok Video withFilmora Video Editor ?
05 FAQs About TikTok Video Stitch

Part 1: What is Stitch on TikTok?
TikTok’s latest video editing tool ‘Stitch,’ lets people incorporate video snippets from other people into their own. Creators may use Stitch to provide a five-second snippet from a TikTok video out of their own. Unlike duets that play videos together, stitched videos play in the sequence they were stitched. Videos containing open-ended questions have gained in popularity with the advent of the stitch.
Whenever you Stitch a clip-on TikTok, you are essentially inserting your video after yet another video that has already been submitted. People frequently utilize this to remark on or reply to other videos. And, when done well, it can add a lot more context to your movies.
The one limitation of the Stitch tool is that you may only publish up to five seconds from some other video. So, if you’re focusing on a Stitch, you must select the five seconds which are most critical to highlight your message.
Part 2: How to Turn Stitch On or Off?
By enabling the Stitch feature, you make your material available to millions of prospective collaborators. Consider the possibilities – it might be a fantastic approach to enhance reach and virility.
If you aren’t comfortable exposing your films to the whole TikTok community, users can opt out of allowing others to Stitch their work. You may modify them under the Privacy Controls. Here’s how to do a Stitch on TikTok:
Step 1: Launch the TikTok app and then head to your profile by clicking on the Profile option at the bottom right. After that, select the three dots to open the settings.
Step 2: After entering the settings, select Privacy to proceed, and then tap on the Stitch option to open the Stitch settings.
Step 3: Now, you will see three options that are No-one, Everyone, and Friends. If you want to allow the Stitching, select either Everyone or Friends. However, to restrict the people from stitching your videos, choose No-one. After you are done selecting, click on the back arrow to save the applied changes.
Part 3: How to Stitch on TikTok?
TikTok keeps giving creators more reasons to continue producing, and fans like us are more committed to continuing to open it. Stitch, a new app functionality from the famous social networking platform, makes things more straightforward than ever for artists to interact with each other.
But, you might be wondering, how to do a stitch on TikTok? Don’t worry; you’ve come to the right place. Here’s how:
Step 1: Launch TikTok and then go to the video that you want to stitch. Select the Share icon, which resembles an arrow. Select the Stitch symbol from the menu that displays, and then wait a few seconds for the video to complete. The lengthier the video is, the more the loading time.
Step 2: When it’s finished, you’ll be sent to a screen where you may take five seconds of the film and use it on your own. To navigate through the movie, use the sliders and the red bars to choose the portion you want. When you’re finished, tap Next.
Step 3: You’ll be sent to TikTok’s normal recording screen. Record the remainder of your TikTok video with all of the features you’re accustomed to utilizing. You may use whatever effects, stickers, texts, voiceovers, or captions you desire. After that, press the Next button.
Step 4: Make a title and hashtags for your TikTok video. You could also choose whether or not these users may Stitch your movie here – hit the toggle switch beside Allow Stitch to turn it off. Following that, hit the Post option, and your stitched video will be uploaded.
Part 4: How to Stitch Any TikTok Video with Filmora Video Editor
Before getting started, understand why people opt for Filmora video editor for stitching videos on TikTok when this can be done through the official TikTok application. TikTok app only allows you to stitch a video for up to five seconds which is quite frustrating if you wish to stitch an entire video.
One more reason is that, with TikTok, you cannot stitch the already existing video from the camera roll, which restricts creators from adding the already edited content to the existing video. So, to avoid the above problems, Filmora is used for stitching TikTok videos.
For Win 7 or later (64-bit)
For macOS 10.12 or later
To begin, download the video that you wish to stitch with from TikTok. After, follow the below stepwise guide:
Step 1: Launch the Filmora software on your PC and import the video files by clicking on the File and then Import/Export Media. You can simply drag and drop the videos as well.
Step 2: Drag the clips from the media library to the Timeline’s video track. All video files will be stitched into a single video with no transitions.
Note: To add a transition to the video , go to the Transition tab and drop the desired transition to the junction of two clips.
Step 3: Now, preview the stitched video and, when finished, click the Export option to save numerous video segments to a single file. Choose any format from the Format tab’s list.
Part 5: FAQs About TikTok Video Stitch
1. Can you do a Stitch on TikTok with a video from your Camera Roll?
Unfortunately, you cannot utilize a video from your Camera Roll in a Stitch at the time of this writing. So, whatever your reaction to a Stitch is, you must record 100% unique footage shot with the TikTok camera. However, you may download the video first and then stitch it with some third-party software such as Filmora.
2. Can you stitch longer than 5 seconds?
No, it is not possible to stitch a video for longer than five seconds using the built-in Stitching feature of the TikTok app. But this can be done by stitching the videos using third-party applications and software.
3. How do I see TikTok stitches?
Users who want to view as many stitches as possible can do it by browsing for them on the app. You must first browse to Discover, and from there to the search box. Then type #Stitch @username, where the username is the name of the account from which you wish to view stitches.
4. TikTok Stitch option not showing. How to fix it?
Users may choose whether or not someone else can Stitch their work in their settings. The option may be found under the Settings and Privacy tab, where users can activate or uncheck Stitch for all videos. So, if the Stitch option is not showing, the user may have disabled the Stitch option.
Conclusion
The Stitch feature is an excellent way to continue the discussion with your videos. You may leave comments on popular content on the site. Most importantly, it may be a fun method to generate material different from what you usually publish. And since you know How to Stitch on TikTok after reading this article, stitch the videos today and create unique content!
TikTok’s collaborative nature is one of its most appealing features. Your video is not finished the moment you publish it. They can be responded to, remixed, and re-shared by anybody. TikTok is meant to allow users to construct on other’s films shared on the network, whether you’re utilizing audio from some other video or making a duet.
Thanks to the stitch tool, creators may remix, remake, and reply to videos with a couple of taps. This article will tell you what you need to know about stitching videos on TikTok. Continue reading to learn more about Stitching and how to stitch on TikTok. Let’s get started!
In this article
02 How to Turn Stitch On or Off?
04 How to Stitch Any TikTok Video withFilmora Video Editor ?
05 FAQs About TikTok Video Stitch
Part 1: What is Stitch on TikTok?
TikTok’s latest video editing tool ‘Stitch,’ lets people incorporate video snippets from other people into their own. Creators may use Stitch to provide a five-second snippet from a TikTok video out of their own. Unlike duets that play videos together, stitched videos play in the sequence they were stitched. Videos containing open-ended questions have gained in popularity with the advent of the stitch.
Whenever you Stitch a clip-on TikTok, you are essentially inserting your video after yet another video that has already been submitted. People frequently utilize this to remark on or reply to other videos. And, when done well, it can add a lot more context to your movies.
The one limitation of the Stitch tool is that you may only publish up to five seconds from some other video. So, if you’re focusing on a Stitch, you must select the five seconds which are most critical to highlight your message.
Part 2: How to Turn Stitch On or Off?
By enabling the Stitch feature, you make your material available to millions of prospective collaborators. Consider the possibilities – it might be a fantastic approach to enhance reach and virility.
If you aren’t comfortable exposing your films to the whole TikTok community, users can opt out of allowing others to Stitch their work. You may modify them under the Privacy Controls. Here’s how to do a Stitch on TikTok:
Step 1: Launch the TikTok app and then head to your profile by clicking on the Profile option at the bottom right. After that, select the three dots to open the settings.
Step 2: After entering the settings, select Privacy to proceed, and then tap on the Stitch option to open the Stitch settings.
Step 3: Now, you will see three options that are No-one, Everyone, and Friends. If you want to allow the Stitching, select either Everyone or Friends. However, to restrict the people from stitching your videos, choose No-one. After you are done selecting, click on the back arrow to save the applied changes.
Part 3: How to Stitch on TikTok?
TikTok keeps giving creators more reasons to continue producing, and fans like us are more committed to continuing to open it. Stitch, a new app functionality from the famous social networking platform, makes things more straightforward than ever for artists to interact with each other.
But, you might be wondering, how to do a stitch on TikTok? Don’t worry; you’ve come to the right place. Here’s how:
Step 1: Launch TikTok and then go to the video that you want to stitch. Select the Share icon, which resembles an arrow. Select the Stitch symbol from the menu that displays, and then wait a few seconds for the video to complete. The lengthier the video is, the more the loading time.
Step 2: When it’s finished, you’ll be sent to a screen where you may take five seconds of the film and use it on your own. To navigate through the movie, use the sliders and the red bars to choose the portion you want. When you’re finished, tap Next.
Step 3: You’ll be sent to TikTok’s normal recording screen. Record the remainder of your TikTok video with all of the features you’re accustomed to utilizing. You may use whatever effects, stickers, texts, voiceovers, or captions you desire. After that, press the Next button.
Step 4: Make a title and hashtags for your TikTok video. You could also choose whether or not these users may Stitch your movie here – hit the toggle switch beside Allow Stitch to turn it off. Following that, hit the Post option, and your stitched video will be uploaded.
Part 4: How to Stitch Any TikTok Video with Filmora Video Editor
Before getting started, understand why people opt for Filmora video editor for stitching videos on TikTok when this can be done through the official TikTok application. TikTok app only allows you to stitch a video for up to five seconds which is quite frustrating if you wish to stitch an entire video.
One more reason is that, with TikTok, you cannot stitch the already existing video from the camera roll, which restricts creators from adding the already edited content to the existing video. So, to avoid the above problems, Filmora is used for stitching TikTok videos.
For Win 7 or later (64-bit)
For macOS 10.12 or later
To begin, download the video that you wish to stitch with from TikTok. After, follow the below stepwise guide:
Step 1: Launch the Filmora software on your PC and import the video files by clicking on the File and then Import/Export Media. You can simply drag and drop the videos as well.
Step 2: Drag the clips from the media library to the Timeline’s video track. All video files will be stitched into a single video with no transitions.
Note: To add a transition to the video , go to the Transition tab and drop the desired transition to the junction of two clips.
Step 3: Now, preview the stitched video and, when finished, click the Export option to save numerous video segments to a single file. Choose any format from the Format tab’s list.
Part 5: FAQs About TikTok Video Stitch
1. Can you do a Stitch on TikTok with a video from your Camera Roll?
Unfortunately, you cannot utilize a video from your Camera Roll in a Stitch at the time of this writing. So, whatever your reaction to a Stitch is, you must record 100% unique footage shot with the TikTok camera. However, you may download the video first and then stitch it with some third-party software such as Filmora.
2. Can you stitch longer than 5 seconds?
No, it is not possible to stitch a video for longer than five seconds using the built-in Stitching feature of the TikTok app. But this can be done by stitching the videos using third-party applications and software.
3. How do I see TikTok stitches?
Users who want to view as many stitches as possible can do it by browsing for them on the app. You must first browse to Discover, and from there to the search box. Then type #Stitch @username, where the username is the name of the account from which you wish to view stitches.
4. TikTok Stitch option not showing. How to fix it?
Users may choose whether or not someone else can Stitch their work in their settings. The option may be found under the Settings and Privacy tab, where users can activate or uncheck Stitch for all videos. So, if the Stitch option is not showing, the user may have disabled the Stitch option.
Conclusion
The Stitch feature is an excellent way to continue the discussion with your videos. You may leave comments on popular content on the site. Most importantly, it may be a fun method to generate material different from what you usually publish. And since you know How to Stitch on TikTok after reading this article, stitch the videos today and create unique content!
Discovering an Original TikTok Identifier Code
TikTok is one of the most famous social media platforms that many people use on a daily basis. Due to high traffic on TikTok, you can reach a larger audience instantly. Through TikTok, you can efficiently market and promote your e-commerce products with live streaming. Moreover, if you are holding an event or conference, you can connect with multiple people through TikTok live streaming.
If you are willing to live stream on TikTok through your PC, you would need a TikTok stream key. To know how to get the TikTok stream key, this article will help you.
Part 1: What is Stream Key?
A stream key is a combination of random letters and numbers which stores the information of your account. It allows different streaming software to live stream your video on your preferred platform. To use streaming software such as OBS Studio for live streaming, the stream key will help you connect with your preferred platform.
If you are using the YouTube platform, its stream key will consist of all the related information, such as login details and permissions. That’s why you should keep the streaming key of your platform confidential. Thus, the stream key can prevent you from hassle as you don’t have to sign in with your YouTube account on OBS Studio for live streaming.
Part 2: How to Get your Own TikTok Stream Key?
Before jumping on how to get the TikTok stream key, there are some basic requirements. To check the prerequisites, read the below points:
- To use the live stream feature on TikTok, you need to have 1,000 followers.
- There is an age restriction to use this feature. You should be 16 years old or older.
- To send and receive virtual gifts during your live stream, the age restriction is 18 years old.
Easy Steps to Get TikTok Stream Key Instantly
Do you want to know how to find TikTok stream key? A streaming key can significantly help you to connect with your platform to ensure high-quality live streaming. Check the following instructions to get your TikTok streaming key quickly.
Step1 Go to Live Option
Launch the TikTok app on your iPhone or Android device and tap on the “Plus” icon given below. Now tap on the “Live” option by scrolling right on your screen.
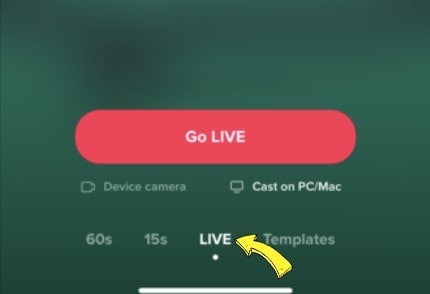
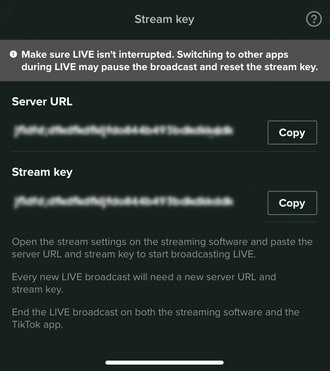
Step2 Copy the Streaming Key
Afterward, tap “Cast/Connect to PC/Mac” and select the “Go Live” button. Now you will be able to see the TikTok Stream Key and Server URL. You can tap on the “Copy” button given adjacent to the stream key and server URL. Make sure to copy both things carefully because they will be used in a later process.
Part 3: How to Go Live on TikTok with your Streaming Key?
Once you have gotten your stream key and server URL, now you can go live on TikTok through different streaming platforms. Read this section to learn how to live stream TikTok using the best streaming software.
Way 1. With OBS
OBS Studio is a famous streaming software that is used by professionals and experts. It is used for high-quality streams with additional features. It has an integrated video encoder that functions with great versatility. Along with producing live content, OBS Studio also offers an efficient screen recorder. Using this software, you can effectively add text and graphics to your video content.
In its clean interface, you have complete freedom to set your hotkeys. Using the hotkeys, you can complete a specific action instantly. While broadcasting your live stream, you can choose your preferred resolution on this software. Hence, it’s a great tool to live stream your TikTok flawlessly.
Instructions to Go Live on TikTok Via OBS Studio
OBS Studio is an advanced broadcasting software offering high-end results. To use OBS for live streaming on TikTok, check the below instructions:
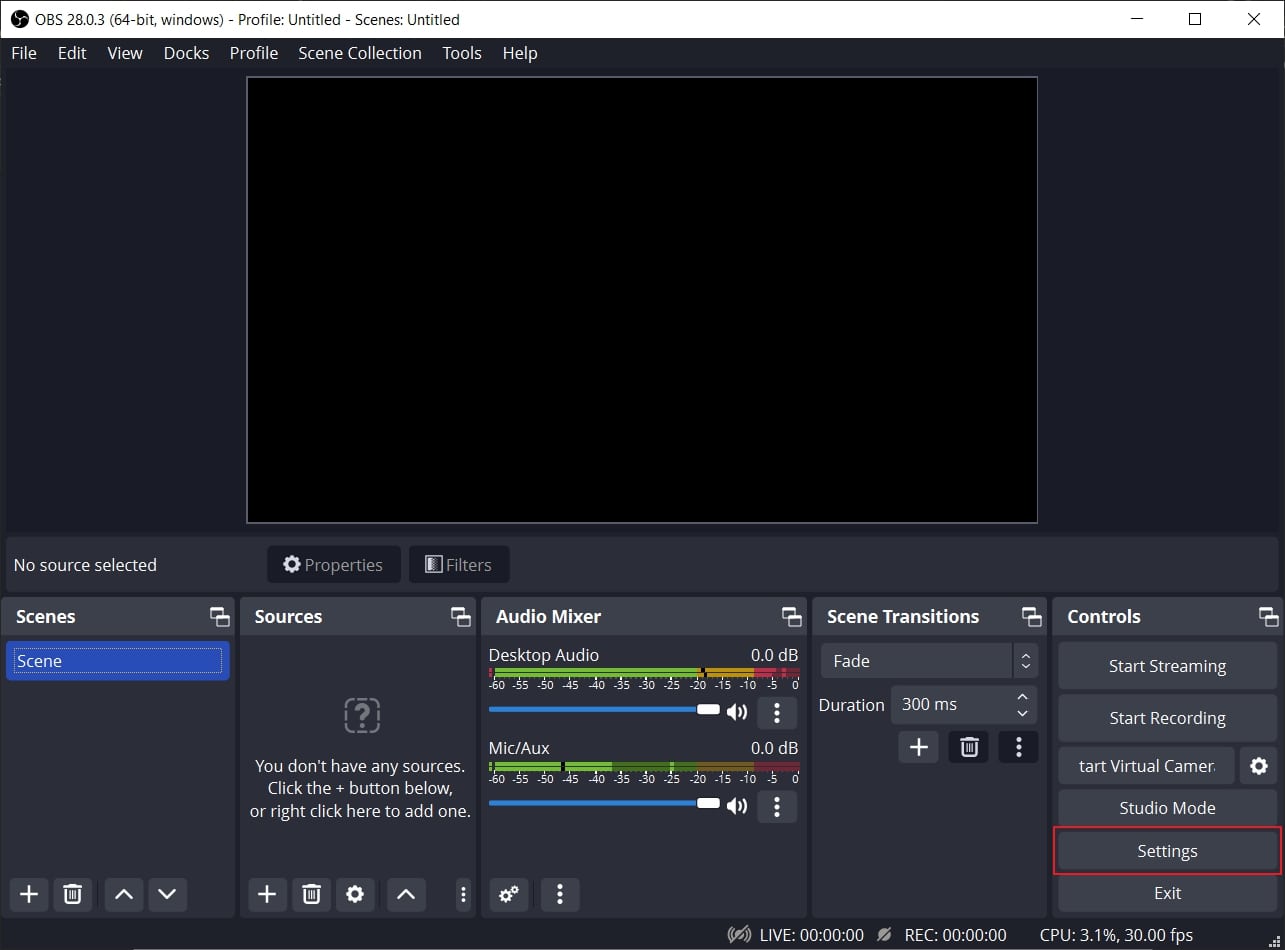
Step1 Navigate to Stream Section
Launch OBS Studio on your PC and click “Settings” under the “Controls” section. On the new window, select “Stream” from the left section.
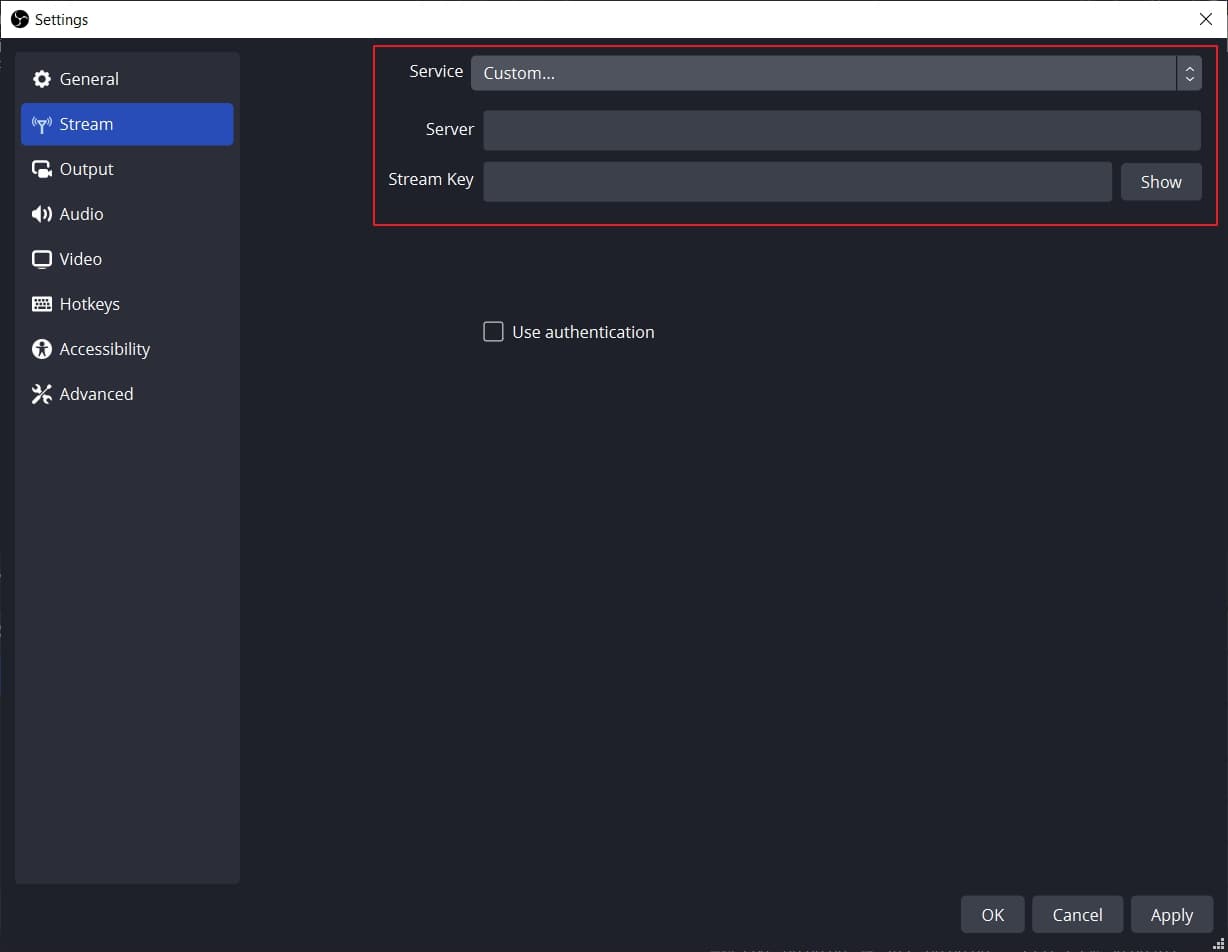
Step2 Enter Server URL and the Stream Key
On the Stream window, select “Custom” on the “Service” option. Once done, enter the Server and Stream Key on the given boxes. Now hit the “Apply” button to proceed with the process of getting live on TikTok with OBS.
Way 2. With Streamlabs
Streamlabs is an all-in-one streaming software that produces captivating results in a cost-effective manner. It shows compatibility with mainstream platforms like YouTube, Twitter, Discord, etc. This software consists of professional themes and overlays that you can utilize during live streaming. Furthermore, it supports multi-streaming, through which you can go live on various platforms simultaneously.
Using Streamlabs, you can get customizable alerts during your live stream. This will help you to check the feedback of your supporters quickly. Hence, Streamlabs is an excellent platform through which you can connect and engage with your audience effortlessly.
Instructions to Go Live on TikTok Using Streamlabs
Are you excited to use Streamlabs for conducting live streaming sessions on TikTok? To learn how to go live on TikTok using Streamlabs, here are the simple steps:
Step1 Open Streamlabs Desktop Settings
Download and install Streamlabs Desktop on your PC. Launch its interface and navigate to the “Gear” icon on the left side. It will open the settings of this tool. From the settings menu, choose “Stream” from the left side.
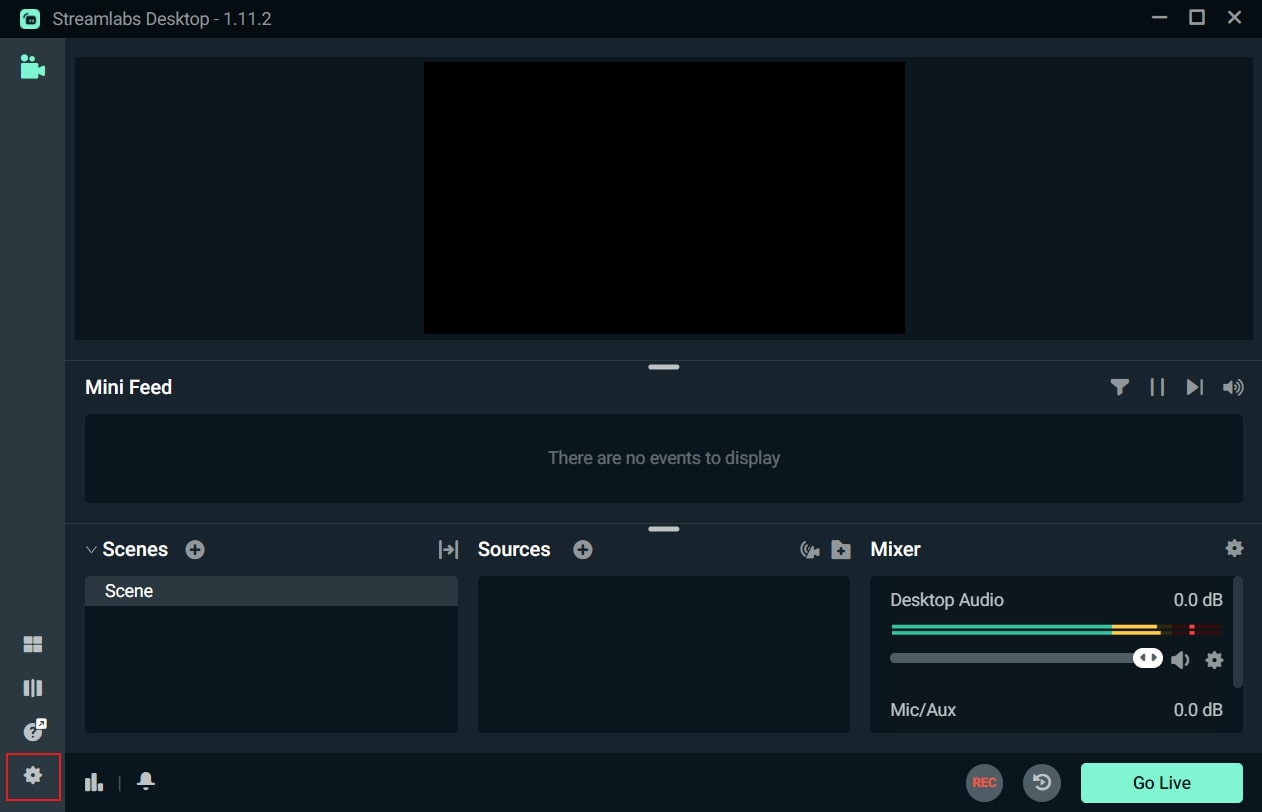
Step2 Add Streaming Key
On the Stream menu, select “Custom Streaming Service” as Stream Type. Afterward, add your Server URL and Stream Key on the given spaces. Once done, click on the “Done” button. Now you can easily go live through this streaming software on TikTok.

Bonus Tips: Easily Record and Edit Your Stream with Filmora
Are you interested in recording your live stream on TikTok? The best tool to capture your live streams efficiently on TikTok is Wondershare Filmora . This screen recorder has the ability to screen record your live streams in your desired resolution. Moreover, while recording your screen, you can simultaneously capture your webcam. It also gives you the option to select the recording area, preferably.
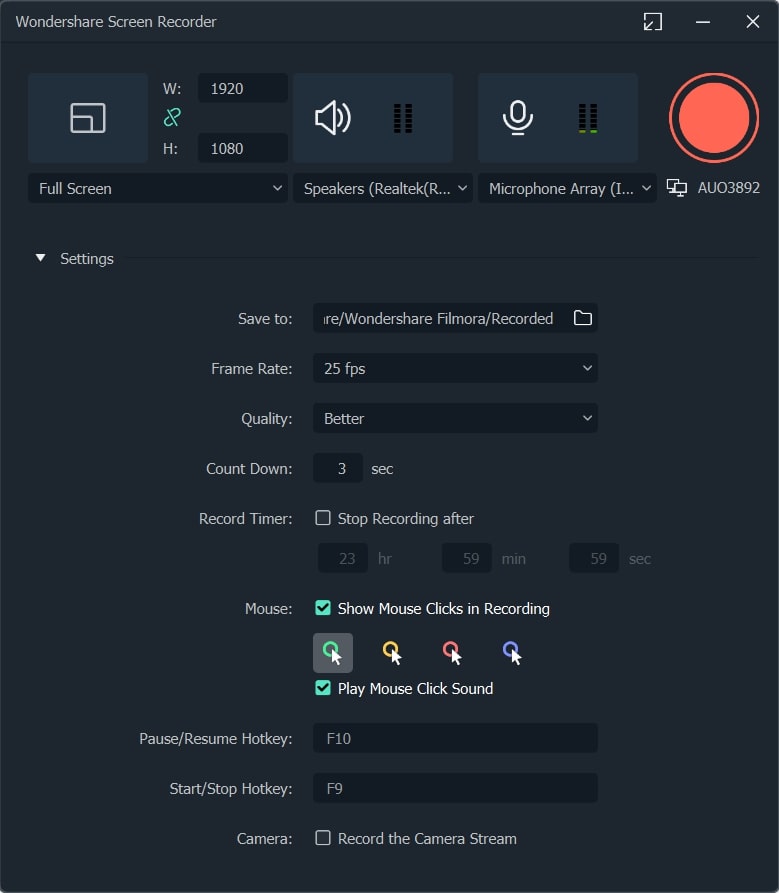
Besides screen recording, Filmora also offers a video editor. This editor offers more than 900 video effects that you can easily apply to your screen recording. Furthermore, you can also adjust the speed of your recorded video through this editor. You can also avail of other options to crop, split, resize, and trim the video. Hence, Filmora works efficiently to screen record and edit your live-stream sessions of TikTok. Watch the video below to learn more about Filmora’s new features.
Conclusion
Live streaming on TikTok is a new trend that many content creators and entrepreneurs are adopting. To go live on TikTok on your desktop, you would need a stream key. This article has provided clear instructions on how to get the TikTok stream key conveniently. Along with that, we have also highlighted a professional software known as Filmora to screen record and edit your TikTok live streaming.
Free Download For Win 7 or later(64-bit)
Free Download For macOS 10.14 or later
Part 1: What is Stream Key?
A stream key is a combination of random letters and numbers which stores the information of your account. It allows different streaming software to live stream your video on your preferred platform. To use streaming software such as OBS Studio for live streaming, the stream key will help you connect with your preferred platform.
If you are using the YouTube platform, its stream key will consist of all the related information, such as login details and permissions. That’s why you should keep the streaming key of your platform confidential. Thus, the stream key can prevent you from hassle as you don’t have to sign in with your YouTube account on OBS Studio for live streaming.
Part 2: How to Get your Own TikTok Stream Key?
Before jumping on how to get the TikTok stream key, there are some basic requirements. To check the prerequisites, read the below points:
- To use the live stream feature on TikTok, you need to have 1,000 followers.
- There is an age restriction to use this feature. You should be 16 years old or older.
- To send and receive virtual gifts during your live stream, the age restriction is 18 years old.
Easy Steps to Get TikTok Stream Key Instantly
Do you want to know how to find TikTok stream key? A streaming key can significantly help you to connect with your platform to ensure high-quality live streaming. Check the following instructions to get your TikTok streaming key quickly.
Step1 Go to Live Option
Launch the TikTok app on your iPhone or Android device and tap on the “Plus” icon given below. Now tap on the “Live” option by scrolling right on your screen.
Step2 Copy the Streaming Key
Afterward, tap “Cast/Connect to PC/Mac” and select the “Go Live” button. Now you will be able to see the TikTok Stream Key and Server URL. You can tap on the “Copy” button given adjacent to the stream key and server URL. Make sure to copy both things carefully because they will be used in a later process.
Part 3: How to Go Live on TikTok with your Streaming Key?
Once you have gotten your stream key and server URL, now you can go live on TikTok through different streaming platforms. Read this section to learn how to live stream TikTok using the best streaming software.
Way 1. With OBS
OBS Studio is a famous streaming software that is used by professionals and experts. It is used for high-quality streams with additional features. It has an integrated video encoder that functions with great versatility. Along with producing live content, OBS Studio also offers an efficient screen recorder. Using this software, you can effectively add text and graphics to your video content.
In its clean interface, you have complete freedom to set your hotkeys. Using the hotkeys, you can complete a specific action instantly. While broadcasting your live stream, you can choose your preferred resolution on this software. Hence, it’s a great tool to live stream your TikTok flawlessly.
Instructions to Go Live on TikTok Via OBS Studio
OBS Studio is an advanced broadcasting software offering high-end results. To use OBS for live streaming on TikTok, check the below instructions:
Step1 Navigate to Stream Section
Launch OBS Studio on your PC and click “Settings” under the “Controls” section. On the new window, select “Stream” from the left section.
Step2 Enter Server URL and the Stream Key
On the Stream window, select “Custom” on the “Service” option. Once done, enter the Server and Stream Key on the given boxes. Now hit the “Apply” button to proceed with the process of getting live on TikTok with OBS.
Way 2. With Streamlabs
Streamlabs is an all-in-one streaming software that produces captivating results in a cost-effective manner. It shows compatibility with mainstream platforms like YouTube, Twitter, Discord, etc. This software consists of professional themes and overlays that you can utilize during live streaming. Furthermore, it supports multi-streaming, through which you can go live on various platforms simultaneously.
Using Streamlabs, you can get customizable alerts during your live stream. This will help you to check the feedback of your supporters quickly. Hence, Streamlabs is an excellent platform through which you can connect and engage with your audience effortlessly.
Instructions to Go Live on TikTok Using Streamlabs
Are you excited to use Streamlabs for conducting live streaming sessions on TikTok? To learn how to go live on TikTok using Streamlabs, here are the simple steps:
Step1 Open Streamlabs Desktop Settings
Download and install Streamlabs Desktop on your PC. Launch its interface and navigate to the “Gear” icon on the left side. It will open the settings of this tool. From the settings menu, choose “Stream” from the left side.
Step2 Add Streaming Key
On the Stream menu, select “Custom Streaming Service” as Stream Type. Afterward, add your Server URL and Stream Key on the given spaces. Once done, click on the “Done” button. Now you can easily go live through this streaming software on TikTok.
Bonus Tips: Easily Record and Edit Your Stream with Filmora
Are you interested in recording your live stream on TikTok? The best tool to capture your live streams efficiently on TikTok is Wondershare Filmora . This screen recorder has the ability to screen record your live streams in your desired resolution. Moreover, while recording your screen, you can simultaneously capture your webcam. It also gives you the option to select the recording area, preferably.
Besides screen recording, Filmora also offers a video editor. This editor offers more than 900 video effects that you can easily apply to your screen recording. Furthermore, you can also adjust the speed of your recorded video through this editor. You can also avail of other options to crop, split, resize, and trim the video. Hence, Filmora works efficiently to screen record and edit your live-stream sessions of TikTok. Watch the video below to learn more about Filmora’s new features.
Conclusion
Live streaming on TikTok is a new trend that many content creators and entrepreneurs are adopting. To go live on TikTok on your desktop, you would need a stream key. This article has provided clear instructions on how to get the TikTok stream key conveniently. Along with that, we have also highlighted a professional software known as Filmora to screen record and edit your TikTok live streaming.
Free Download For Win 7 or later(64-bit)
Free Download For macOS 10.14 or later
Also read:
- [New] 2024 Approved Quickstart Guide Key Elements of TikTok (macOS)
- [New] Beyond the Dance Understanding Copyright Pre-Upload for 2024
- [Updated] Enhancing TikToks with Customizable Video Subtitles
- [Updated] In 2024, Engaging Audiences with Jujutsu Kaisen TikTok Content
- [Updated] In 2024, Enhance Your Vision A Compreeved Guide to TikTok Video Captioning
- 2024 Approved Formulating a Singular Hashtag for Your TikTok Sphere
- 2024'S Ultimate Guide to Choosing a Superior USB Wi-Fi Card
- How Do You Get Sun Stone Evolutions in Pokémon For Vivo Y100i? | Dr.fone
- In 2024, Dive Into the Do's and Don'ts of YouTube Beauty Channels
- In 2024, Skyrocket Your Earnings on TikTok Discover the Top 8 Ways
- Maximizing Meeting Impact with Effective Snap Usage
- Preventing AI Forgery: The Artist's Nightshade Approach
- Resurrect Your Chrome on Win11 with Ease
- Securing a Facebook Purchase Reimbursement Process
- Solved Bad and Corrupt Videos that won't Play on Vivo
- Solved How To Transfer From Apple iPhone 13 mini to iPhone 15 | Dr.fone
- Transform Your Brand with a Decade's Worth of SMM Wisdom, Distilled Into 10 Steps for 2024
- Unraveling 15 Trendy TikTok Stunts Today
- What Are the Best Sites to Download Google Pixel Ringtones
- Title: In 2024, From Disjointed Elements to a Cohesive TikTok Narrative
- Author: Kenneth
- Created at : 2024-10-02 22:54:43
- Updated at : 2024-10-05 23:28:04
- Link: https://tiktok-video-files.techidaily.com/in-2024-from-disjointed-elements-to-a-cohesive-tiktok-narrative/
- License: This work is licensed under CC BY-NC-SA 4.0.