
:max_bytes(150000):strip_icc():format(webp)/Flora_and_Son-f6517d3de531487e89f5e0e99192d13f.jpg)
"2024 Approved Audio Clarity Excellence Audacity's Noise Reduction Techniques"
Audio Clarity Excellence: Audacity’s Noise Reduction Techniques
The most frequent request you’ll get from video makers is to eliminate irritating noises like rumbling or humming from an original clip. Almost all of the time, capturing high-quality audio during filming is challenging since the conversation is often hard to hear or is made unclear due to surrounding noises, such as the dreadful air conditioners or fans.
To get rid of all these awful noises, this Audacity Noise Reduction feature will serve you a significant purpose in removing unwanted background noise for your future videos. Without further ado, let’s get started!
In this article
01 Things You Need to Prepare for Background Noise Reduction
02 How to Remove Background Noise in Audacity?
03 Why is Audacity Noise Reduction Not Working?
04 How to Prevent Background Noise in Audio Recording?
05 How to Remove Background Noise in Filmora?
Part 1: Things You Need to Prepare for Background Noise Reduction
Here are few things that you need to consider before you apply the noise reduction to your clips:
1. Noise Sample
A decent sample of the noise you wish to eliminate is perhaps the most crucial aspect of the Audacity remove noise procedure.
This will be used by Audacity to understand the noise and build a noise profile. The noise recording should last for a fair amount of time and be devoid of any other noises.
2. Avoid Copy Pasting Tiny Noise Section in Your Spoken Phrases
When you have a tiny part of noise between your stated words on your audio, please don’t copy/paste it to make a more significant piece of sound for Audacity to examine.
You would not be supplying Audacity with any more information that will help it generate a decent noise profile. The noise profile is what enables Audacity to tell the difference between speech and noise.
3. Minimum 2048 Data Samples Required
To build a noise profile, the Noise Reduction function requires a minimum of 2048 sample data. An audio file with a sampling frequency of 44.1kHz is roughly five hundredths of a second.
Note that this is the minor sound level that Audacity needs to generate a noise profile; however, should you supply a larger sample of the noise, Audacity can typically perform a great job of producing a suitable noise profile. As a result, attempt to capture a few seconds of background noises wherever possible.
4. Establish Recording Level and Record “Silence”
Setting your audio volume and capturing some “quiet” prior to speaking is the best way to achieve this. Instead, when you’ve finished talking, keep your camera/recorder going for a few moments.
Don’t move or create any sounds while capturing the background noises, and keep an ear open for any other noises. You only need to capture the ambient noise for a few moments; two to five seconds will suffice.
Part 2: How to Remove Background Noise in Audacity on Windows and Mac?
Whether you are using Windows or macOS, we will show you a step-by-step process to achieve your results using both software in this part of Audacity remove background music guide.
Remove background noise in Audacity on Windows
Step 1: On your recording, select a few moments of sound. Any segment of noise that incorporates other noises should be avoided.

Step 2: From the Effect menu, select Noise Reduction.

Step 3: Select the Get Noise Profile option whenever the Noise Reduction effect screen appears.

Note: Choose whether to implement the noise removal to the entire waveforms or only a portion of it.
Step 4: To access the Noise Reduction effects window, go to Effects > Noise Reduction. Raise the level of noise reduction progressively while previewing the result.

Step 5: Head over to the File section to Export and Save the result. Audacity does not save sound clips when you select Save Project; instead, you must choose Export. Select the file type you want to store and the place wherever you can save it. Select Save after giving the File Name.

Remove background noise in Audacity on Mac
Step 1: Create a room tone-containing audio file. When you don’t have a separate track for room tone, use a recording with a few moments of quiet in it. Click-and-drag to select a segment with a few minutes of silence using the Selection Tool.

Step 2: Select Noise Reduction from the Effects tab. Select the Get Noise Profile tab in the new tab under Step 1. The screen will shut, and Audacity will take noise profile samples of the indicated area.

Step 3: Click-and-drag to select the whole file, which requires noise reduction with the Selection Tool. To re-open the function, go to the Effect tab and pick Noise Reduction. Make modifications to the following parameters under Step 2:
- Reduce and Residue
- Frequency Smoothing (bands)
- Sensitivity
- Noise Reduction

Step 4: To listen to how the chosen file will look with the selected parameters, select Preview. Re-adjust until you have a sound noise reduction with no interference. When you’re finished, select Reduce and click OK.
Part 3: Why is Audacity Noise Reduction Not Working?
It’s possible that the Noise Reduction function isn’t letting you mop up your recording since your audio isn’t appropriate for it. The disturbance must be continuous, not random or fluctuating, to work for Audacity’s Noise Reduction function.
For example, the Noise Reduction function will not assist if your audio was made in a busy environment with unique noises such as background chatter, random traffic noises, or in an exhibition space or museum. The Noise Reduction feature in Audacity isn’t meant to cope with that kind of distortion. You’ll need to alter your recording approach if you’re capturing voice in either of those situations.
Under the following situations, the Audacity Noise Reduction function might underperform.
- Particular noise in the background, including traffic or people.
- When the harmonics of the sound and voice are comparable.
- There is sound variance where there is fluctuation in the noise.
- The volume of the voice is comparable to or lower than that of the background noise.
- When the noise is irregular or changeable rather than continuous.
- The loudness is deafening.
- The sound is a single click or pop.
Part 4: How to Prevent Background Noise in Audio Recording?
Although Audacity allows eliminating noise very simply, it is still an additional level that takes time to refine your podcast production. These pointers can help you avoid the necessity for noise reduction and cut down on the amount of time you spend processing.
1. Reduce the Computer Fan Noise
Whenever computers become too heated, they can produce a lot of noise. You may limit the amount of software that runs and position your mic away from the keyboard to help lessen this impact and avoid the fan from coming on.
However, even if you observe all of these guidelines, undesired recording sounds may still appear in your program. Fortunately, contemporary software makes this problem quite simple to resolve.
2. Reduce the Gain and Get Close to the Mic
Reduce the gain (sensitivity of the microphone) and go nearer to it. Talking straight into the microphone won’t distort your audio if you reduce the gain, and that would assist your microphone in concentrating on scooping up your voice’s tone.
Bonus Tip: Set your recorder’s (or DAW’s) sensitivity such that your speech peaks between -12 and -10db.
3. Utilize a Versatile Microphone
Condenser and dynamic microphones are the two most common types of podcast microphones. Condenser microphones are significantly more sensitive instruments meant to take up average atmospheric noise, whereas dynamic microphones have a narrower frequency range, picking up fewer ambient noises.
4. Optimize Your Recording Environment
The most significant and most crucial aspect of your podcasts’ sound quality is where you capture it. To optimize your personal podcasting space, we recommend choosing a peaceful, compact area away from HVAC systems, vehicles, external hard drives, background sound, motors, and other distractions. You may also increase the tone of your room by using natural sound absorbents such as curtains, rugs, carpets, and sofas.
Part 5: How to Remove Background Noise in Filmora?
Although there is a lot of software available to eliminate ambient noise, we highly suggest Wondershare Filmora Video Editor to edit audio and video in one place.
In addition to the standard audio editing capabilities, the recently redesigned Filmora currently includes enhanced waveforms, volume Keyframing , peak metering, and audio transitions, giving you a better audio editing interface.
For Win 7 or later (64-bit)
For macOS 10.12 or later
Filmora Video Editor will quickly remove ambient sound from both sound/video. You may also remove the sound from the video with this simple video editor, use the Audio Equalizer or Audio Mixer functions to modify the audio further, and then Export and save the audio in an Mp3 file. Here are the detailed steps:
Step 1: In the Wondershare Filmora Timeline menu, Import your footage. Trim the footage after previewing it and deleting the sections you don’t want to retain.

Step 2: To eliminate the ambient noise immediately, double-click on the video file, and go to the Audio panel to select the Remove Background Noise option. You will find that the background noise is removed automatically.

Step 3: After checking the results, select Export to download the noise-reduced clip to your desktop or upload it immediately to YouTube or Vimeo.

Conclusion
Well, there you have it. In this Audacity Remove Background Noise guide, we have reviewed every possible method you can adopt to get rid of the unnecessary background noise in the Audacity. And if the desired results are still not achieved, we highly recommend using the Wondershare Filmora editing software. Not only will it help you remove the unwanted ambient noise, but it will also allow you to customize your audio or video file further.
02 How to Remove Background Noise in Audacity?
03 Why is Audacity Noise Reduction Not Working?
04 How to Prevent Background Noise in Audio Recording?
05 How to Remove Background Noise in Filmora?
Part 1: Things You Need to Prepare for Background Noise Reduction
Here are few things that you need to consider before you apply the noise reduction to your clips:
1. Noise Sample
A decent sample of the noise you wish to eliminate is perhaps the most crucial aspect of the Audacity remove noise procedure.
This will be used by Audacity to understand the noise and build a noise profile. The noise recording should last for a fair amount of time and be devoid of any other noises.
2. Avoid Copy Pasting Tiny Noise Section in Your Spoken Phrases
When you have a tiny part of noise between your stated words on your audio, please don’t copy/paste it to make a more significant piece of sound for Audacity to examine.
You would not be supplying Audacity with any more information that will help it generate a decent noise profile. The noise profile is what enables Audacity to tell the difference between speech and noise.
3. Minimum 2048 Data Samples Required
To build a noise profile, the Noise Reduction function requires a minimum of 2048 sample data. An audio file with a sampling frequency of 44.1kHz is roughly five hundredths of a second.
Note that this is the minor sound level that Audacity needs to generate a noise profile; however, should you supply a larger sample of the noise, Audacity can typically perform a great job of producing a suitable noise profile. As a result, attempt to capture a few seconds of background noises wherever possible.
4. Establish Recording Level and Record “Silence”
Setting your audio volume and capturing some “quiet” prior to speaking is the best way to achieve this. Instead, when you’ve finished talking, keep your camera/recorder going for a few moments.
Don’t move or create any sounds while capturing the background noises, and keep an ear open for any other noises. You only need to capture the ambient noise for a few moments; two to five seconds will suffice.
Part 2: How to Remove Background Noise in Audacity on Windows and Mac?
Whether you are using Windows or macOS, we will show you a step-by-step process to achieve your results using both software in this part of Audacity remove background music guide.
Remove background noise in Audacity on Windows
Step 1: On your recording, select a few moments of sound. Any segment of noise that incorporates other noises should be avoided.
Step 2: From the Effect menu, select Noise Reduction.
Step 3: Select the Get Noise Profile option whenever the Noise Reduction effect screen appears.
Note: Choose whether to implement the noise removal to the entire waveforms or only a portion of it.
Step 4: To access the Noise Reduction effects window, go to Effects > Noise Reduction. Raise the level of noise reduction progressively while previewing the result.
Step 5: Head over to the File section to Export and Save the result. Audacity does not save sound clips when you select Save Project; instead, you must choose Export. Select the file type you want to store and the place wherever you can save it. Select Save after giving the File Name.
Remove background noise in Audacity on Mac
Step 1: Create a room tone-containing audio file. When you don’t have a separate track for room tone, use a recording with a few moments of quiet in it. Click-and-drag to select a segment with a few minutes of silence using the Selection Tool.
Step 2: Select Noise Reduction from the Effects tab. Select the Get Noise Profile tab in the new tab under Step 1. The screen will shut, and Audacity will take noise profile samples of the indicated area.
Step 3: Click-and-drag to select the whole file, which requires noise reduction with the Selection Tool. To re-open the function, go to the Effect tab and pick Noise Reduction. Make modifications to the following parameters under Step 2:
- Reduce and Residue
- Frequency Smoothing (bands)
- Sensitivity
- Noise Reduction
Step 4: To listen to how the chosen file will look with the selected parameters, select Preview. Re-adjust until you have a sound noise reduction with no interference. When you’re finished, select Reduce and click OK.
Part 3: Why is Audacity Noise Reduction Not Working?
It’s possible that the Noise Reduction function isn’t letting you mop up your recording since your audio isn’t appropriate for it. The disturbance must be continuous, not random or fluctuating, to work for Audacity’s Noise Reduction function.
For example, the Noise Reduction function will not assist if your audio was made in a busy environment with unique noises such as background chatter, random traffic noises, or in an exhibition space or museum. The Noise Reduction feature in Audacity isn’t meant to cope with that kind of distortion. You’ll need to alter your recording approach if you’re capturing voice in either of those situations.
Under the following situations, the Audacity Noise Reduction function might underperform.
- Particular noise in the background, including traffic or people.
- When the harmonics of the sound and voice are comparable.
- There is sound variance where there is fluctuation in the noise.
- The volume of the voice is comparable to or lower than that of the background noise.
- When the noise is irregular or changeable rather than continuous.
- The loudness is deafening.
- The sound is a single click or pop.
Part 4: How to Prevent Background Noise in Audio Recording?
Although Audacity allows eliminating noise very simply, it is still an additional level that takes time to refine your podcast production. These pointers can help you avoid the necessity for noise reduction and cut down on the amount of time you spend processing.
1. Reduce the Computer Fan Noise
Whenever computers become too heated, they can produce a lot of noise. You may limit the amount of software that runs and position your mic away from the keyboard to help lessen this impact and avoid the fan from coming on.
However, even if you observe all of these guidelines, undesired recording sounds may still appear in your program. Fortunately, contemporary software makes this problem quite simple to resolve.
2. Reduce the Gain and Get Close to the Mic
Reduce the gain (sensitivity of the microphone) and go nearer to it. Talking straight into the microphone won’t distort your audio if you reduce the gain, and that would assist your microphone in concentrating on scooping up your voice’s tone.
Bonus Tip: Set your recorder’s (or DAW’s) sensitivity such that your speech peaks between -12 and -10db.
3. Utilize a Versatile Microphone
Condenser and dynamic microphones are the two most common types of podcast microphones. Condenser microphones are significantly more sensitive instruments meant to take up average atmospheric noise, whereas dynamic microphones have a narrower frequency range, picking up fewer ambient noises.
4. Optimize Your Recording Environment
The most significant and most crucial aspect of your podcasts’ sound quality is where you capture it. To optimize your personal podcasting space, we recommend choosing a peaceful, compact area away from HVAC systems, vehicles, external hard drives, background sound, motors, and other distractions. You may also increase the tone of your room by using natural sound absorbents such as curtains, rugs, carpets, and sofas.
Part 5: How to Remove Background Noise in Filmora?
Although there is a lot of software available to eliminate ambient noise, we highly suggest Wondershare Filmora Video Editor to edit audio and video in one place.
In addition to the standard audio editing capabilities, the recently redesigned Filmora currently includes enhanced waveforms, volume Keyframing , peak metering, and audio transitions, giving you a better audio editing interface.
For Win 7 or later (64-bit)
For macOS 10.12 or later
Filmora Video Editor will quickly remove ambient sound from both sound/video. You may also remove the sound from the video with this simple video editor, use the Audio Equalizer or Audio Mixer functions to modify the audio further, and then Export and save the audio in an Mp3 file. Here are the detailed steps:
Step 1: In the Wondershare Filmora Timeline menu, Import your footage. Trim the footage after previewing it and deleting the sections you don’t want to retain.
Step 2: To eliminate the ambient noise immediately, double-click on the video file, and go to the Audio panel to select the Remove Background Noise option. You will find that the background noise is removed automatically.
Step 3: After checking the results, select Export to download the noise-reduced clip to your desktop or upload it immediately to YouTube or Vimeo.
Conclusion
Well, there you have it. In this Audacity Remove Background Noise guide, we have reviewed every possible method you can adopt to get rid of the unnecessary background noise in the Audacity. And if the desired results are still not achieved, we highly recommend using the Wondershare Filmora editing software. Not only will it help you remove the unwanted ambient noise, but it will also allow you to customize your audio or video file further.
Growth Through Video Content: A Guide to Thriving with TikTok
The world is changing very fast from social gatherings to Social Media Giants like Facebook, Twitter, etc. With each day passing, we hear about new progress. On a similar line of track, TikTok is raising the eyes of a mass level of people worldwide. The TikTok application belongs to a Chinese company named as ByteDance. Which is not only limited to social networking but has opened up its wings to a broader area of network ranging from short (15 min or less) video sharing, lip-syncing, dance videos, funny videos, entertaining activities, magic tricks, and a lot more. TikTok in no time gained so much popularity among the young and people from all age groups. There is so much unexplored area to explore under TikTok marketing to lead your business from others. Many companies are still in the infant stage to enter the TikTok Music Promotion or growing business through TikTok Marketing Strategies. So, through this article, you will learn more about how advertising on TikTok goes on.
In this article
01 Why TikTok Marketing Strategy Matters?
02 Set up TikTok business account for TikTok Marketing Strategy
03 How to Use TikTok Analytics Data to Grow TikTok Channel?
04 Learn from 3 Successful TikTok Ads Examples
05 Edit TikTok Videos in the Best Way
Part 1: Why TikTok Marketing Strategy Matters?
TikTok is a fast-growing and trending video-sharing application among the broad user base. That not only covers the Youth (Generation-Z) but also other age groups of people. Due to the short-duration video sharing option, it is more inclined towards a specific marketing strategy. Within 15 seconds, you need to convey your message, and with that, you will have more chances to grab large masses of people in an immediate sense. Also, there present various exciting and lucrative features that hold the attention-grabbing capacity of the users. TikTok Marketing Strategy matters a lot to engage users through entertaining videos, challenges, HashTag Challenges, funny acts, or many. Some of the key points are:
- Global Market Access
- Niche Marketing
- Quick Message Convey
- Easy to handle, create videos, as well as sharing
- Brand Promotion Through Contests
- Trending
- It has millions of active users worldwide
Companies through TikTok Music Promotion also spread their brand, product, or business, and many interactive TikTok Marketing Strategies matter a lot.
Part 2: Set up TikTok business account for TikTok Marketing Strategy
If you would like to use TikTok Marketing Strategy to set up the TikTok business account, it will add value to your efforts. Creating a business account opens up many areas for TikTok Marketing Campaign in terms of account and audience insight, performance assessment metrics in real-time, interactive tools for content creation, and a lot more.
The required steps that will lead you to the TikTok Business Account Creation so that advertising on TikTok becomes possible are:
Step 1: From the TikTok app, from page end, choose the ‘Me’ option, then; from top right-click on (…).
Step 2: Next, opt for ‘Manage Account’ and go with Business Account, from the given options by choosing the ‘Business’ icon
Step 3: After that, finalize your product category and press the Next button to enter the Business Account and avail all the TikTok services.
Once done with account creation, you are all set to launch your business idea with TikTok Marketing Agency and its services.
Part 3: How to Use TikTok Analytics Data to Grow TikTok Channel?
In addition to TikTok marketing strategies or TikTok marketing campaigns, there are other parameters to grow your business effectively. And that comes with the knowledge of utilizing TikTok Analytics Data optimally. For all the TikTok Pro users, this facility helps track the actual growth of your business. The analytics feature is a powerful tool to analyze the TikTok Marketing Agency and its strategies in an absolute sense.
Let’s try to understand how it works:
The TikTok Analytics page gets further divided into three sections
- Overview
- Content
- Followers
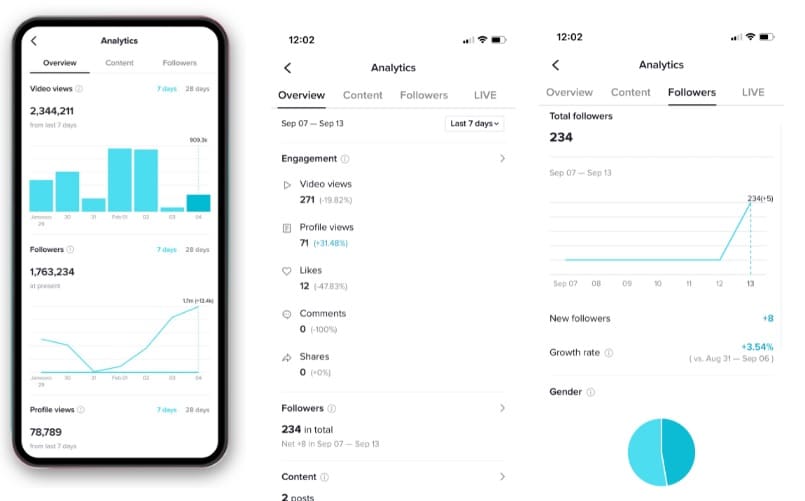
Source: invideo.io
Now, the time to gain insight into these three areas:
1. Overview section
This section gives information about the views related to the videos, followers, and profile views.
- Video views provide details for the last 7, 28, 60 days about the number of times any video has been watched.
- The ‘Followers’ area informs you who have joined recently and the total number of followers of your account.
- Profile views: for the selected date range, it gives you a brief idea about the number of profile views done in that duration.
Plus, you will get to know about overall comments, shares, or likes in that period.
Well, the list does not end here.
2. Followers section
To make this section work, you must have at least 100 followers. Then, it will show viewers’ demographic-related information such as timings, when users remain least/most active, followers from top 5 countries, growth trend, top videos, top sounds listened to, etc.
3. Content Section
This area gives any particular post/video/content in terms of comments, shares, or likes. Also, you will get to know about traffic source, average viewers, user location. It is to note that such information remains available for seven days only.
So, following the Analytics Data, it becomes beneficial to analyze the actual reach of your content to the target audience. It gives you an idea that which area needs improvement; thus, you can update the content accordingly.
Watch Video! Tips for Going Viral on TikTok Through the Analytics Page
Part 4: Learn from 3 Successful TikTok Ads Examples
Growing a business with the right approach will lead you to a world of opportunities. Several factors and examples matter a lot while leveraging the Ads campaign under TikTok. Here, let’s take a look over some of the best TikTok marketing campaign and Ads that brings success to this sensational video-sharing application.
1.KIA
KIA is one of the major brands in the Auto industry that utilizes the TikTok application rightly with its Ads campaigning with innovative ideas, design, videos, and a lot more. It comes out to be the best Ads example to lead with brand showcasing through advertising on TikTok and following top influencers.

2.PUMA (Direct X)
Whether you are in sports or not, PUMA brings about #FlashofFuture, a HashTag challenge that brings close Football lovers with their kind of celebration with video sharing series. That is an excellent way to advertise on TikTok.

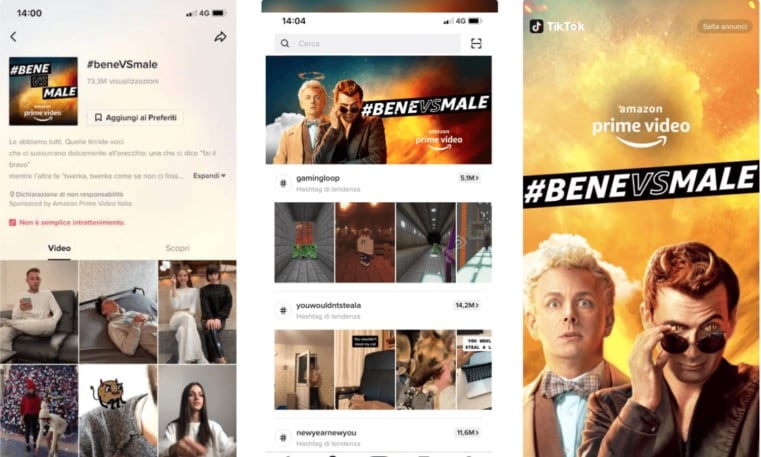
3.Amazon Prime Video (For ITALY)
We all are well aware of Amazon and its excellent par services. Amazon utilizes TikTok HashTag Challenge #beneVSmale for its new show based in Italy. Through its creative Advertising on TikTok, it reaps a good deal of benefits.
Part 5: Edit TikTok Videos in the Best Way
Would you like to have the best experience in music, video, or audio files? Here comes Wonderhsare Filmora that provides many video editing facilities. That will get fitted as per TikTok Marketing Campaign or TikTok Music Promotion. Using its multi-featured platform, it becomes easy to modify your video to get it ready to share on TikTok and create the difference.
Wondershare Filmora
Get started easily with Filmora’s powerful performance, intuitive interface, and countless effects!
Try It Free Try It Free Try It Free Learn More >

Here, let’s understand how you can add music to your video in the following steps:
Step 1: Launch and Import files
First, you need to launch the Software, and then from the main interface, either drag/drop the video file or import it using the ‘import’ option.
Step 2: Adding Music to the Video File
Now, drag the video files up to the Track area (arrange them in order). Then, drag and drop the music files to the track above the video track. There, you will get the option to edit the audio with tune adjustment, fade in or out, and many more options.
Step 3: Export file
After you complete all the editing parts, click on the ‘Export’ button to save the edited Audio/Video file at the desired location.
Using the guide above, you can easily add music to your video file to get ready to share on the TikTok platform and then lead a TikTok marketing campaign efficiently.
Conclusion
To promote your business through TikTok Marketing needs proper direction, as the field is yet not explored fully from the Business World. So, there are great chances that you might have an advantage over others. Since, as per a recent survey, most of the potential buyers are found under TikTok users. And youngsters are more prompted to purchase the product showed up in TikTok platform. Thus, following the guidelines through the article will give you a better idea about growing your business with a good margin. It is always suggestible to enter the growing market at the initial phase to gain an advantage over others, which is possible through TikTok Marketing agency. Also, the given TikTok marketing strategies give you a competitive advantage in an absolute sense.
02 Set up TikTok business account for TikTok Marketing Strategy
03 How to Use TikTok Analytics Data to Grow TikTok Channel?
04 Learn from 3 Successful TikTok Ads Examples
05 Edit TikTok Videos in the Best Way
Part 1: Why TikTok Marketing Strategy Matters?
TikTok is a fast-growing and trending video-sharing application among the broad user base. That not only covers the Youth (Generation-Z) but also other age groups of people. Due to the short-duration video sharing option, it is more inclined towards a specific marketing strategy. Within 15 seconds, you need to convey your message, and with that, you will have more chances to grab large masses of people in an immediate sense. Also, there present various exciting and lucrative features that hold the attention-grabbing capacity of the users. TikTok Marketing Strategy matters a lot to engage users through entertaining videos, challenges, HashTag Challenges, funny acts, or many. Some of the key points are:
- Global Market Access
- Niche Marketing
- Quick Message Convey
- Easy to handle, create videos, as well as sharing
- Brand Promotion Through Contests
- Trending
- It has millions of active users worldwide
Companies through TikTok Music Promotion also spread their brand, product, or business, and many interactive TikTok Marketing Strategies matter a lot.
Part 2: Set up TikTok business account for TikTok Marketing Strategy
If you would like to use TikTok Marketing Strategy to set up the TikTok business account, it will add value to your efforts. Creating a business account opens up many areas for TikTok Marketing Campaign in terms of account and audience insight, performance assessment metrics in real-time, interactive tools for content creation, and a lot more.
The required steps that will lead you to the TikTok Business Account Creation so that advertising on TikTok becomes possible are:
Step 1: From the TikTok app, from page end, choose the ‘Me’ option, then; from top right-click on (…).
Step 2: Next, opt for ‘Manage Account’ and go with Business Account, from the given options by choosing the ‘Business’ icon
Step 3: After that, finalize your product category and press the Next button to enter the Business Account and avail all the TikTok services.
Once done with account creation, you are all set to launch your business idea with TikTok Marketing Agency and its services.
Part 3: How to Use TikTok Analytics Data to Grow TikTok Channel?
In addition to TikTok marketing strategies or TikTok marketing campaigns, there are other parameters to grow your business effectively. And that comes with the knowledge of utilizing TikTok Analytics Data optimally. For all the TikTok Pro users, this facility helps track the actual growth of your business. The analytics feature is a powerful tool to analyze the TikTok Marketing Agency and its strategies in an absolute sense.
Let’s try to understand how it works:
The TikTok Analytics page gets further divided into three sections
- Overview
- Content
- Followers
Source: invideo.io
Now, the time to gain insight into these three areas:
1. Overview section
This section gives information about the views related to the videos, followers, and profile views.
- Video views provide details for the last 7, 28, 60 days about the number of times any video has been watched.
- The ‘Followers’ area informs you who have joined recently and the total number of followers of your account.
- Profile views: for the selected date range, it gives you a brief idea about the number of profile views done in that duration.
Plus, you will get to know about overall comments, shares, or likes in that period.
Well, the list does not end here.
2. Followers section
To make this section work, you must have at least 100 followers. Then, it will show viewers’ demographic-related information such as timings, when users remain least/most active, followers from top 5 countries, growth trend, top videos, top sounds listened to, etc.
3. Content Section
This area gives any particular post/video/content in terms of comments, shares, or likes. Also, you will get to know about traffic source, average viewers, user location. It is to note that such information remains available for seven days only.
So, following the Analytics Data, it becomes beneficial to analyze the actual reach of your content to the target audience. It gives you an idea that which area needs improvement; thus, you can update the content accordingly.
Watch Video! Tips for Going Viral on TikTok Through the Analytics Page
Part 4: Learn from 3 Successful TikTok Ads Examples
Growing a business with the right approach will lead you to a world of opportunities. Several factors and examples matter a lot while leveraging the Ads campaign under TikTok. Here, let’s take a look over some of the best TikTok marketing campaign and Ads that brings success to this sensational video-sharing application.
1.KIA
KIA is one of the major brands in the Auto industry that utilizes the TikTok application rightly with its Ads campaigning with innovative ideas, design, videos, and a lot more. It comes out to be the best Ads example to lead with brand showcasing through advertising on TikTok and following top influencers.
2.PUMA (Direct X)
Whether you are in sports or not, PUMA brings about #FlashofFuture, a HashTag challenge that brings close Football lovers with their kind of celebration with video sharing series. That is an excellent way to advertise on TikTok.
3.Amazon Prime Video (For ITALY)
We all are well aware of Amazon and its excellent par services. Amazon utilizes TikTok HashTag Challenge #beneVSmale for its new show based in Italy. Through its creative Advertising on TikTok, it reaps a good deal of benefits.
Part 5: Edit TikTok Videos in the Best Way
Would you like to have the best experience in music, video, or audio files? Here comes Wonderhsare Filmora that provides many video editing facilities. That will get fitted as per TikTok Marketing Campaign or TikTok Music Promotion. Using its multi-featured platform, it becomes easy to modify your video to get it ready to share on TikTok and create the difference.
Wondershare Filmora
Get started easily with Filmora’s powerful performance, intuitive interface, and countless effects!
Try It Free Try It Free Try It Free Learn More >
Here, let’s understand how you can add music to your video in the following steps:
Step 1: Launch and Import files
First, you need to launch the Software, and then from the main interface, either drag/drop the video file or import it using the ‘import’ option.
Step 2: Adding Music to the Video File
Now, drag the video files up to the Track area (arrange them in order). Then, drag and drop the music files to the track above the video track. There, you will get the option to edit the audio with tune adjustment, fade in or out, and many more options.
Step 3: Export file
After you complete all the editing parts, click on the ‘Export’ button to save the edited Audio/Video file at the desired location.
Using the guide above, you can easily add music to your video file to get ready to share on the TikTok platform and then lead a TikTok marketing campaign efficiently.
Conclusion
To promote your business through TikTok Marketing needs proper direction, as the field is yet not explored fully from the Business World. So, there are great chances that you might have an advantage over others. Since, as per a recent survey, most of the potential buyers are found under TikTok users. And youngsters are more prompted to purchase the product showed up in TikTok platform. Thus, following the guidelines through the article will give you a better idea about growing your business with a good margin. It is always suggestible to enter the growing market at the initial phase to gain an advantage over others, which is possible through TikTok Marketing agency. Also, the given TikTok marketing strategies give you a competitive advantage in an absolute sense.
Also read:
- [New] Master the Art of Viral TikToks with These Best Quotes
- Dynamic Designs The Hottest Snapchat Filters Explored
- [Updated] 2024 Approved Removing Background Noise with Audacity Techniques
- Mastering On-Screen Captions in TikTok Videos
- How to Make Jujutsu Kaisen Tiktok Video, In 2024
- [Updated] Best 10 TikTok Video Editors to Make a TikTok Video [Online/Windows/PC] for 2024
- Easy Links for Seamless Connections Between Spotify & Discord
- [New] Extraordinary Escapades The Ultimate List of Strange TikTok Titles
- [New] Planetary Palate Pleasures Iconic Dishes From Around the Globe for 2024
- [Updated] 10 Viral Culinary Phenomena on TikTok for 2024
- [Updated] In 2024, How to Achieve Clear Sound Tracks with Audacity by Eliminating Noise
- [New] TikTok Groove Made Simple for Mac Users
- [New] In 2024, Voiceover on TikTok Enhancing Your Presence
- In 2024, Navigating the Legal Landscape Check TikTok Video Compliance
- [New] Audacity Masterclass Techniques for Flawless Sound De-Noising for 2024
- [New] In 2024, Protecting Your Digital Memories How to Save TikTok Videos
- 2024 Approved Top 30 Unique PFPs for a Stellar TikTok Presence
- Grow with Integrity Selecting Reputable TikTok Leads for 2024
- Comprehensive Manual of Text Incorpression in TikTok Videos
- In 2024, Achieving Massive Props in TikTok Videos
- [Updated] In 2024, Navigate to Connect with a TikTok Life Stream
- [Updated] 2024 Approved TikTok Mastery Securing Your Content with Android & iOS Tools
- [New] In 2024, TikTok Creation Mastery Joining the Pieces
- In 2024, Unlocking the Potential of Slow Motion Video on TikTok Detailed Steps
- Boost Your TikTok Footprint Top Analytics Strategies Reviewed
- In 2024, Master the Art of Connection with These Top 20 TikTok Caption Techniques
- 2024 Approved Achieving Instagrammable Proportion The Self-Clone Method on TikTok
- [Updated] Pro-Level 10 Video Editors to Boost W TikToks
- [New] In 2024, Mastering Content Discovery Key TikTok Hashtags to Follow
- [Updated] 2024 Approved Top 5 Alternatives to TikTok You Should Know [Updated ]
- [New] In 2024, Ultimate Guide to Live Streaming FB on Laptops, Macs, and PCs
- [Updated] 2024 Approved Innovative Approach to Revamping Your Videos' Cover Images on FB
- How to Change/Fake Your Apple iPhone 12 Pro Location on Viber | Dr.fone
- 2024 Approved The Sound Sleuth's Guide to Recording Streaming Media
- [Updated] Bridge the Gap YouTube Tweet Functionality for 2024
- Updated 2024 Approved Where to Find High-Quality Free Images for Commercial Projects
- Updated In 2024, Step-by-Step Silencing Audio in iPhone Videos
- [Updated] Gamers' Guides Essential Tips for Recording Riveting Races
- In 2024, How to Delete iCloud Account On iPhone SE (2020) without Password?
- How To Fix Apple iPhone 6s Plus Unavailable Issue With Ease | Dr.fone
- [Updated] Explaining Watermarks Securing Online Media for 2024
- [New] In 2024, Instant Recording Tips for FaceTime Chats
- [New] 2024 Approved The Must-Know Aspect Ratio for Tweeting Videos
- In 2024, Masterful Marketing Top Strategies to Thrive in FB Video Space
- In 2024, Top 5 Honor 80 Pro Straight Screen Edition Bypass FRP Tools for PC That Actually Work
- [Updated] 2024 Approved Conveniently Record Your Favorite Streams Top 5 Grabber Apps
- [New] Tweet Time Machine Capturing the Essence of Twitter's Videos for 2024
- Video Fixer Software for all Corrupt Videos of Samsung Galaxy S23 FE
- 5 Ways to Move Contacts From Honor X8b to iPhone (13/14/15) | Dr.fone
- [New] In 2024, Complete Tutorial on Zoom Podcasts Recording
- How to Transfer Text Messages from Samsung Galaxy F54 5G to New Phone | Dr.fone
- In 2024, How to Detect and Stop mSpy from Spying on Your Honor X50 GT | Dr.fone
- How To Open Your iPhone 12 Pro Max Without a Home Button | Dr.fone
- New 2024 Approved The Top 10 Stop Motion Animation Tools You Need to Know
- Title: "2024 Approved Audio Clarity Excellence Audacity's Noise Reduction Techniques"
- Author: Kenneth
- Created at : 2024-05-23 01:15:18
- Updated at : 2024-05-24 01:15:18
- Link: https://tiktok-video-files.techidaily.com/2024-approved-audio-clarity-excellence-audacitys-noise-reduction-techniques/
- License: This work is licensed under CC BY-NC-SA 4.0.
